JULY FOURTH SALE: 11% OFF with code FREEDOM SHOP NOW *
*Some exclusions apply.
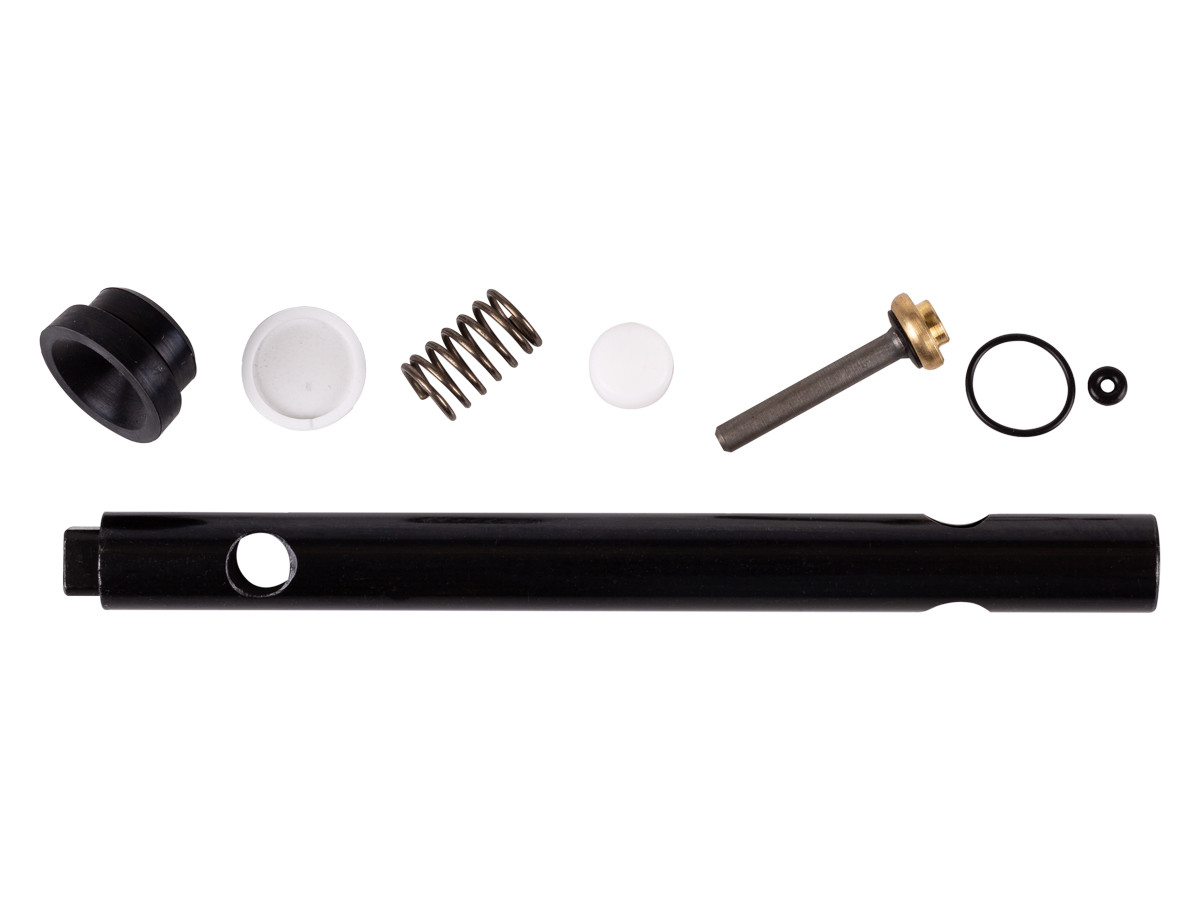
0
*Some exclusions apply.
In-stock
Create an online review and share your thoughts with other customers
| Sort by: | Date
| Helpfulness
| Rating
|
|---|
| Filer by: |
|---|
![]() 3.0 3.0
3.0 3.0
![]() 3.0 3.0
3.0 3.0
shipping was good
Things I would have changed:bolt locking stud tool is needed and better instructions
What others should know:My 1979 Sheridan has a bolt locking stud, kit doesn't have the tool to remove and replacing the o ring was a bear. A few of the new parts wouldn't work
![]() 5.0 5.0
5.0 5.0
![]() 5.0 5.0
5.0 5.0
This kit was very easy to assemble and it fixed my rifle, It's as good as new now.Thanks for all your help.
Things I would have changed:Add the lead filled gasket.
![]() 5.0 5.0
5.0 5.0
![]() 5.0 5.0
5.0 5.0
Was happy to find a rebuild kit for my Sheridan Silver streak pellet gun along with pellets and accessories. Everything worked great. It works like new now!!!!!
Things I would have changed:I think they should add a oring to the kit for the missing gasket/seal.
What others should know:Be sure to order airgun oil when you order the kit if you don't already have some. There is a difference.
![]() 4.0 4.0
4.0 4.0
![]() 4.0 4.0
4.0 4.0
Appears to have all neccessary parts, bought kit for future replacement on an old Benjamin.
Things I would have changed:Larger diagram of replacement part assembly.
What others should know:Be careful not to lose small parts when dis-assembling,i.e. springs and bearings.
![]() 4.0 4.0
4.0 4.0
![]() 4.0 4.0
4.0 4.0
complete seal kit and tools except for one valve seal
Things I would have changed:picture and directions were hard to figure out. I had to go to crosmans website for a better detail. the split seal that replaced the lead seal would not work after a hour of trying to get it in place a used the lead seal and it screwed right back together. I would put the detail and direction on seperate papers and make them more detailed. I also would find out way the split seal doesn't work, and add the one missing valve seal.
What others should know:great kit if you are somewhat handy you will have no problems. Just get a better detail first and watch were things are when you take them apart and you will be able to use this kit.
![]() 4.0 4.0
4.0 4.0
![]() 4.0 4.0
4.0 4.0
My Benjamin works like new now and it seems to hold air indefinitely.
Things I would have changed:I ordered the kit for my 1962 Benjamin model 312. Most of the parts fit. The boss diameter was too large on the forward end of the outlet valve,so I turned it down to fit in the end of the spring like the old one. The old pump piston cup was installed by a hole through the middle of it, the new cup has no hole. The old punp still works so I guess I'm OK. I couldn't find a place to put the tiny 'O' ring but it looks like it will fit real good on the end of the bolt on my Crossman 1377c.
![]() 3.0 3.0
3.0 3.0
![]() 3.0 3.0
3.0 3.0
Most of the parts were appropriate and fit and the gun works now.
Things I would have changed:The kit should have two seals for the air valve rather than one and the one provided is nearly impossible to install without destroying. The instructions should be clearer about where the air valve seal goes and how to install it. I would also magnetize the installation tool to make it easier to put the air valve together without destroying the gasket.
What others should know:the split seal for the air valve is worthless. Throw it away and get neoprene 1/2"IDx5/8OD o-rings for the air valve (both sides). Remove the old fiber gasket on the front of the air valve, replace it with an o-ring and moisten all the parts with air tool oil before reassembly. Put the other 0-ring under the threaded retainer at the rear and check to make sure it does not cut the o-ring when you tighten it. Make sure you only use air tool oil or something like Dextron to avoid damaging the rubber seals.
![]() 4.0 4.0
4.0 4.0
![]() 5.0 5.0
5.0 5.0
I think the gun shoots better than new. It seems more accurate now as I think the air bled out of the chamber or it never held the pressure it should have in the first place. I always wondered why others thought it was a tack driver and I couldn't make it shoot accurately.
Things I would have changed:Better schematics, detailed instructions. Include part # c506 ( the gasket in front of part # 28. Mine was damaged in disassembly. Need to have a socket to fit the screw that goes into the side of the bolt.
What others should know:A thin O ring will substitute for the gasket C506. I used a little silicone grease to hold both O ring and lead ring in place. I had a sheet of lead that I used a punch on to put in the correct size hole and cut around the outside with scissors. The end seal can be flipped by bumping the gun around until it seats itself in the right direction. All the other parts drop right in but be very careful about part # 28 and its gasket or O ring. Use the tool and lower it gently into place and then hold the part from rotating by using a small screwdriver through the slot in side of tube to hold it while you unscrew the tool from it. At this point hold the tube at a slight downward angle (so the remaining parts just don't fall down the tube)while inserting #27 and #29. I held #27 to #29 with the silicone grease and inserted both at the same time. Press down and tighten. The rest of it goes back together like you took it apart, except reversed.
![]() 4.0 4.0
4.0 4.0
![]() 4.0 4.0
4.0 4.0
Good instructions almost everything worked and the gun is like new.
Things I would have changed:The plastic washer that was to replace the metal one was split and deformed so I used the old one.
![]() 5.0 5.0
5.0 5.0
![]() 5.0 5.0
5.0 5.0
easy enough to install
Things I would have changed:had an o-ring in my kit that was damaged beyond use, may need new packaging to prevent this from happening to others
![]() 5.0 5.0
5.0 5.0
![]() 5.0 5.0
5.0 5.0
Easy to install, parts are high quality. I had not done a rebuild before and it worked out fine. If you are mechanically inclined you'll be fine. If not, have a friend do it.
Things I would have changed:I would make a more clear set of instructions, and only focus on the area of the repair instead of showing the breakdown of the entire gun. Having the names of the parts involved on hand would help, in case you have to call somebody for help.
What others should know:In my gun (1974 Silver Streak, soldered valve), the washer that goes on the muzzle side of the valve body (which is NOT included in the kit) appeared to actually be part of the valve body itself, and I didn't know any better. So, I didn't mess with it. After I reinstalled all the new parts, the gun didn't hold a charge. So, I took it apart again and re-cleaned everything. When I started cleaning the valve body again, I noticed that there was a bit of separation between the washer and valve body, so I -very carefully- removed the washer. It's rubber and I would suggest handling it very carefully. I cleaned off the valve body, including the area where the rubber washer seats, put a very small bit of pellgunoil on both sides of the washer, reinstalled it all and viola! Problem solved. When you remove the factory valve parts, keep in mind that the lead seal will actually hold everything in after you remove the nut. What I did was screw the tool down onto the valve stem and then I moved it back and forth gradually, while pulling up on it. I'm glad I did it that way because I think rotating the valve body excessively could possibly damage that rubber seal I was talking about earlier. Maybe it wouldn't hurt it, but better safe than sorry. Clean -everything- inside there after you get it apart. Mine was filthy and it appeared to me that it was full of some kind of dirty grease. I spent about 2 hours cleaning the insides of the gun and the parts up. When you remove the pins from the pump handle, make sure to pull the handle away from the gun (like you are pumping it), set everything on something soft and use a punch that fits inside the drilled holes in the wood. I used an old drill bit (pointed end up) that fit perfectly in the holes. Don't use something pointed like a nail set. If you do you'll find out for yourself why it's a bad idea. Lubricate the new piston seal with a bit of pellgunoil.
![]() 5.0 5.0
5.0 5.0
![]() 5.0 5.0
5.0 5.0
repair kit was great ! all necessary parts and installation tool were included, and installation directions were very clear.
![]() 5.0 5.0
5.0 5.0
![]() 5.0 5.0
5.0 5.0
very easy to install
Things I would have changed:nothing
What others should know:Pyramyd is great. You get the part fast and if you have question they are there to help. If you need air guns or parts always go to them first!!
![]() 5.0 5.0
5.0 5.0
![]() 5.0 5.0
5.0 5.0
The perfect fit.
Things I would have changed:With the illustration, it would be nice to have a description of the parts.
What others should know:The written directions are well defined.
![]() 5.0 5.0
5.0 5.0
![]() 5.0 5.0
5.0 5.0
Very easy to use with good instructions.
Things I would have changed:Add a tool to remove the bolt. I had difficulty changing the O-ring.
What others should know:Oddly, mine didn't work for the first few pumps. Perhaps something wasn't seated properly. Afterward, it pumped right up and works awesomely!
![]() 5.0 5.0
5.0 5.0
![]() 4.0 4.0
4.0 4.0
The fact that such a kit is even available...most of all!!! Looks like others feel the same way given that they are back ordered now. I have a 1970 - 40 yr old Benjamin 347 which I purchased with my own hard earned money when I was 14 yrs old! Over the years I've had to make do with a leather disk formed into a cup over a nylon washer to act as the Hycar cup in the pump chamber. It worked pretty well, but the outlet valve and seat leaked slowly so I had to pump and go, so to speak. Definitely couldn't pump up and shoot when I decided to...that is until now. WOW what a difference. Even new I had to pump up to 7 or 8 pumps to get REAL power out of my gun. Now 3 pumps and she's at full velocity. This kit was well worth the money to be able to restore something that has been a side kick when I was a kid and even for my own 4 sons who put her to the test. I can't wait to show them how well she shoots now.
Things I would have changed:For the older guns the instructions could have a few addenda indicating the "tweaking" needed for the kit to work properly (see comments below) Might include a couple lead packing seal rings rather than the one, because they are so soft it doesn't take much to damage them...ask me how I know that?! (again see comments below). One more item...maybe the valve removal tool could be offered as an option, since we have a couple more older guns and don't need two more tools to fix them, just the rest of the kit. This undoubtedly would reduce the price substantially. Other than that, the kit is pretty complete.
What others should know:Three items: 1. I had to turn down the "nipple" end of the outlet valve to fit inside the tapered end of the valve spring. I did this with a drill and file which worked pretty well. This end doesn't have to be precise so a few scratches don't matter, just the proper diameter of the spring ID. 2. I had to drill a hole in the middle of the Hycar/ pump washer since it is held on by slipping it over the fitting at the end of the pump rod. I used 3/16" bit to do this. Drilling a hole in rubber isn't easy since it closes in after the bit is removed. a few reams and the hole will fit OK. 3: KEEP the old lead packing ring seal, since you may need it, should you damage the one sent with the kit. The one in my kit was just a bit larger than the diameter of the outlet valve seat assembly and by the time I figured this out...well maybe we won't go there! Lastly, I have an original schematic with part number listings for the 340, 342 & 347 rifle models from the Benjamin Air Rifle Co. and would be glad to email a scanned copy of it to anyone who needs it. Contact: interesting-info@earthlink.net Enjoy your "NEW" rifle...
![]() 5.0 5.0
5.0 5.0
![]() 5.0 5.0
5.0 5.0
I thought that I would not ever have the parts to repair my Sheridan working again, BUT with your REPAIR KIT it was simple if you follow the directions and use them,I also went a little bit further and polished the brass inside the Valve and main springs it made my air rifle fire and hold AIR like a NEW ONE it's GREAT
Things I would have changed:The only thing that I would change would be to give the direction that the new Valve Stopper goes in with the brass end UP facing the end you are working from other than that everything was their to work with. Thank You Pyramyd Air
What others should know:If you are a do it yourself kind of person and can follow instructions you can install this kit yourself and save some money to buy more ammo to shoot with.
![]() 5.0 5.0
5.0 5.0
![]() 5.0 5.0
5.0 5.0
Fairly easy to install if you are mechanically inclined.
What others should know:Do some web searching and find the blogs for install write-ups. These definitely helped me.
![]() 4.0 4.0
4.0 4.0
![]() 3.0 3.0
3.0 3.0
all the parts fit but the old parts were really a challenge to get out.
Things I would have changed:theirs a gasket that needs to be replaced that's not included in the kit. the nut that receives the square end of the tool has a section in front of it that has the gasket. i just reused the lead gasket that i replaced and it seemed to work. also the instructions weren't that good
What others should know:when you tighten the nut with the square end make sure its tight, i mean tight! it wont hold pressure otherwise. make sure you keep track of the spring configuration if you don't want to take it apart 10 times
Buy With Confidence
Get FREE shipping on qualifying orders! Any order $150+ with a shipping address in the contiguous US will receive the option for free ground shipping on items sold & shipped by Pyramyd AIR during checkout. Certain restrictions apply.
Free shipping may not be combined with a coupon unless stated otherwise.
View Shipping Info
We work hard to get all orders placed by 12 pm EST out the door within 24 hours on weekdays
because we know how excited you are to receive your order.
Weekends and holiday shipping times will vary.
During busy holidays, we step our efforts to ship all orders as fast as possible,
but you may experience an additional 1-2 day delay before your order ships.
This may also happen if you change your order during processing.
View Shipping Times
It's important to know that due to state and local laws, there are certain restrictions for various products.
It's up to you to research and comply with the laws in your state, county, and city.
If you live in a state or city where air guns are treated as firearms you may be able to take advantage of our FFL special program.
U.S. federal law requires that all airsoft guns are sold with a 1/4-inch blaze orange muzzle
or an orange flash hider to avoid the guns being mistaken for firearms.
View Shipping Restrictions
Get the most out of your equipment when you work with the expert technicians at Pyramyd AIR. With over 25 years of combined experience, we offer a range of comprehensive in-house services tailored to kickstart your next adventure.
If you're picking up a new air gun, our team can test and tune the equipment before it leaves the warehouse. We can even set up an optic or other equipment so you can get out shooting without the hassle. For bowhunters, our certified master bow technicians provide services such as assembly, optics zeroing, and full equipment setup, which can maximize the potential of your purchase.
By leveraging our expertise and precision, we ensure that your equipment is finely tuned to meet your specific needs and get you ready for your outdoor pursuits. So look out for our services when shopping for something new, and let our experts help you get the most from your outdoor adventures.
View Service Info
Shop and purchase with confidence knowing that all of our air guns (except airsoft) are protected
by a minimum 1-year manufacturer's warranty from the date of purchase unless otherwise noted on the product page.
A warranty is provided by each manufacturer to ensure that your product is free of defect in both materials and workmanship.
View Warranty Details
Didn't get what you wanted or have a problem? We understand that sometimes things aren't right and our team is serious about resolving these issues quickly. We can often help you fix small to medium issues over the phone or email.
If you need to return an item please read our return policy.
Learn About Returns
Get FREE shipping on qualifying orders! Any order $150+ with a shipping address in the contiguous US will receive the option for free ground shipping on items sold & shipped by Pyramyd AIR during checkout. Certain restrictions apply.
Free shipping may not be combined with a coupon unless stated otherwise.
View Shipping Info
Want More?
Join Our Email List for News and Deals!
Join the Pyramyd AIR mailing list: Our e-mails are filled with new products, deals, sneak peeks, tips and tricks, contests and more - sign up today!
Text JOIN to 91256 and get $10 OFF Your Next $50+ Order!
* By providing your number above, you agree to receive recurring autodialed marketing text msgs (e.g. cart reminders) to the mobile number used at opt-in from Pyramyd AIR on 91256. Reply with birthday MM/DD/YYYY to verify legal age of 18+ in order to receive texts. Consent is not a condition of purchase. Msg frequency may vary. Msg & data rates may apply. Reply HELP for help and STOP to cancel. See Terms and Conditions & Privacy Policy.
Customer Support
Customer Support
![]()
![]()
![]()
![]()
![]()
![]()
Copyright © 1999-2024 Pyramyd AIR. All Rights Reserved.
By brummerville
Removal tool works.
Things I would have changed:Vague instructions
What others should know:You probably only the piston seal but have to buy the whole kit here.