Today reader Hank whose blog name is Vana2 tells us specifically how to tune precharged pneumatics (PCP). This is a report I have been waiting for because the information from this report feeds into my next job of tuning the .177-caliber AirVenturi Avenge-X on high power for improved performance.
If you’d like to write a guest post for this blog, please email me at blogger@pyramydair.com.
Take it away, Hank
About PCPs and Tuning: Part Two
by Hank Vana2
This report covers:
What is tuning?
A tuning overview
Before we start
Fingerprinting a PCP
The regulator pressure, hammer spring tension and velocity relationship
A couple of comments on tuning
Summary
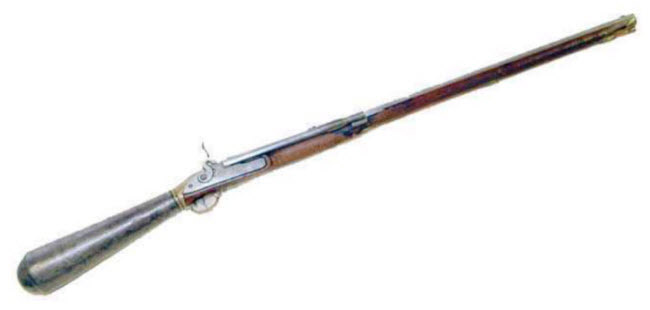
The Pre-Charged Pneumatic that started it all — the Girardoni repeating air rifle of 1780.
In Part One I discussed PCPs in general. Today I talk about tuning them. First of all, I’ll reiterate that the tuning a new PCP is probably not necessary because the factory tune is fine for general use. On the other hand, if you purchase a second hand PCP and it’s not shooting well you will likely need to do some tuning.
Step by step tuning instructions are beyond the scope of a guest blog as there are too many differences between brands and models to cover. By sharing my approach to tuning and some insights I’m hoping to give enough understanding that you are comfortable enough, with a bit of research, to proceed on your own.
What is tuning?
A PCP that has been fine-tuned will shoot accurately, consistently and efficiently. When tuning, I’m looking for a regulator pressure and hammer spring tension setting that results in a velocity that stabilizes a projectile the airgun likes. An optimal tune will give most efficient and best operation yielding a low Extreme Spread (ES) and Standard Deviation (SD) for velocity. It will further result in a specific velocity for those settings and that projectile.
While low SD and ES numbers are good, the trick is to find the velocity that will stabilize the projectile and work with the harmonics of the airgun. Several different velocities may work well.
A tuning overview
Most people choose some velocity value and go about tuning the PCP to achieve that velocity. Even if the velocity chosen usually yields good results for that projectile it doesn’t guarantee that the PCP will be well tuned or tuned to the best accuracy.
Between 850 and 900 feet per second (f.p.s.) is often touted as being the best for a .22 caliber projectile. This is generally true for an 18 grain pellet and a 30 foot-pound tune, but any number of things can change this rule of thumb. When tuning, it’s best to let the PCP tell you what’s good and not make any assumptions.
Each airgun experiences a vibration caused by the projectile spinning down the barrel. This circular motion “waves” the barrel around (microscopically), pointing it in a constantly changing direction. The amplitude of this motion is determined by the design and support of the barrel and the weight and speed of the projectile. Similar to the way a guitar string can change its sound by where the vibration is intercepted, a PCP needs to be tuned to work with the barrel harmonics and launch the projectile on the same “note” (properly called a “node”).
I define “fine tuning” as the process of finding the optimum tune velocity that works best with the harmonics of a particular PCP. I say “a particular PCP” because each airgun is unique and may even be slightly different to its siblings that rolled off of the same assembly line.
A PCP can be tuned to shoot MOST suitable ammunition from well to extremely well. By “suitable” I mean a good quality projectile in a weight appropriate to the power of the PCP. Poor ammunition will never shoot consistently and extremely light or heavy projectiles can be challenging to tune for. There are no “standards” in the airgun industry so barrel and projectile design is totally up to the manufacturer. This means that there may be compatibly issues that can’t be resolved with tuning. Try brands that people have had good results with and choose the most promising ones.
Before we start
Before we start I’d like to make a couple of comments about tuning that I feel are important enough to BOLD.
•The regulator pressure is used to control projectile velocity.
•The hammer spring tension is used to balance the valve to the pressure.
•There is ONE OPTIMUM TUNE for a given PROJECTILE WEIGHT, REGULATOR PRESSURE and HAMMER SPRING TENSION.
•Changing any parameter WILL affect the others and rebalancing will be required.
Very small velocity adjustments can be done with the hammer spring but that is not preferred.
Fingerprinting a PCP
Before you can tune a PCP you have to know what it is doing, understand what is happening when you make adjustments and how sensitive the controls are.
Randomly trying different settings will rarely get the decent results. You need to follow a plan; the tuning methodology needs to be systematic. I call this fingerprinting the PCP.
Fingerprinting involves shooting at a series of regulator (REG) pressures and hammer spring (HS) tensions while recording the velocities, watching the projectile flight and listening to how the PCP sounds. In each series you can see the power curve for that set of parameters (projectile, regulator and hammer).
Listening to the PCP is important as a suddenly loud report will tell you when air is being wasted. A chronograph is considered an essential tool for tuning but that could be contested if you have a lot of experience. I have a friend who does excellent tunes without a chronograph simply by shooting groups, watching the projectile flight and listening to the PCP.
Many projectiles that shoot acceptable groups at 25 yards show their true erratic flight out past 35 yards. For general shooting, I find a projectile that has good flight and tune for at 40-50 yards, for long distance shooting 75 yards would be better.
Be aware that good groups don’t mean good flight. Usually spirals, hooks and wobbles are erratic but I’ve seen them fly to the same point of impact (POI) making an excellent group. Change the distance slightly and the POI will move to a new location.
I set my scope parallax to 40 yards and shoot on a calm sunny evening (for strong side lighting) using a dark backstop so the projectiles are easier to see. I make notes about projectile flight and sound levels while fingerprinting as that information will be useful later.
My approach to tune a (broken in) PCP that I’m not familiar with is — I chose a projectile to suit the application and setup a dark colored backstop. Starting at a low REG pressure (100 bar) and minimum HS tension I shoot a string of shots, incrementing the HS tension until increasing the HS no longer increases the velocity. At this point the PCP is on the flat of the power curve for that pressure. Then I will increase the REG pressure 10 bar and repeat the HS test. I will continue incrementing the REG pressure and testing HS until I reach the maximum REG pressure that I want to use.
The flat of the power curve is a stable area where the velocity doesn’t change appreciably — only a couple of feet per second (f.p.s.) — when increasing the HS tension. This is the optimum (efficient) tune.
Plotting all these numbers will show the optimum tune (power curves and velocities) for each combination of settings for that specific projectile. Now it’s a matter of choosing the most suitable one based on what we have seen while fingerprinting.
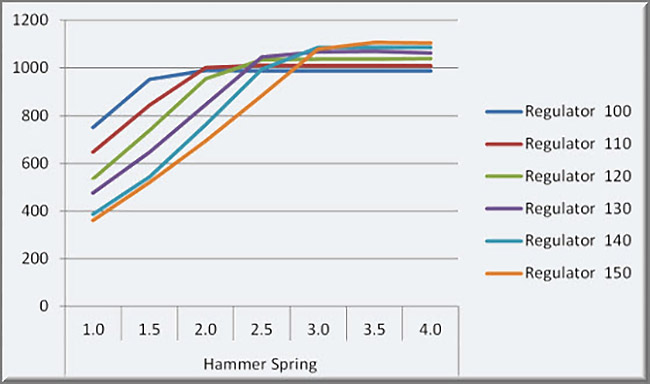
This is a plot of a projectile tested at different regulator pressures and hammer spring tensions.
As an example, here are actual numbers from a high performance PCP I’m setting up to shoot slugs at 100 yards. From looking at my notes and the graph I decided that the flat of the power curve at 130 bar (purple line, 1013 fps, 68 fpe) was a good starting point. I set the hammer spring to about 5% (962 f.p.s., 62 foot-pounds of energy) below the flat of the 130 bar power curve then from there I made (very) small increases to the hammer spring while watching for unstable flight, tuning for harmonics and best groups. When the groups started opening up I knew I had gone too far, and backed the hammer spring to the best setting.
I’ll check a tune by confirming that the point of impact is not wandering (due to slight spiraling or hooking) at different ranges.
Catching the best harmonic node can mean trying different power curves and sometimes repeating the whole process and fingerprinting a different projectile is necessary.

The regulator pressure, hammer spring tension and velocity relationship
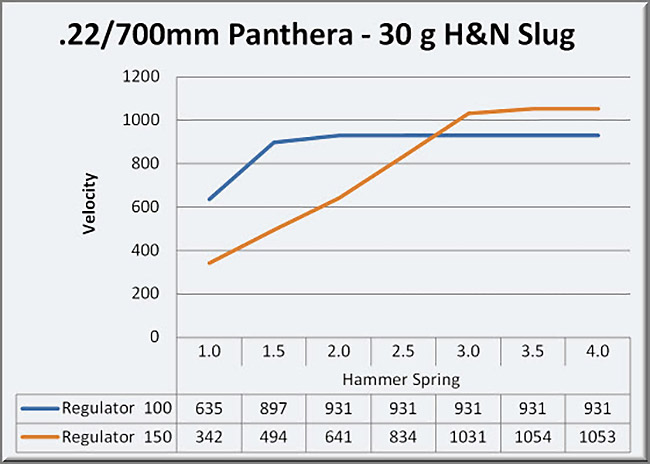
Here you can see how the FX Panthera valve is performing at different pressures.
One would think that increasing the regulator pressure and hammer spring tension would result in a higher velocity. People get confused when that doesn’t happen.
If you look at the blue “Regulator 100” line in graph above you can see that a weak hammer spring setting of 1.0 results in 635 fps by opening the valve against 100 bar of pressure where the orange “Regulator 150” line shows that the same hammer spring setting was only able to achieve 342 fps fighting against 150 bar of pressure.
The maximum velocity for the 100 bar blue line is 931 fps at hammer spring 2.0 because no matter how hard the valve is hit, there is only so much potential (for that weight of projectile) at 100 bar. Hitting the valve harder keeps it open longer but the extra air is wasted because the projectile has left the barrel and can no longer be accelerated.
At 150 bar the higher pressure limits the valve and it’s not until a 3.0 hammer spring setting that the orange line crosses the blue one. For this weight of projectile and regulator pressure, the 3.0 hammer spring setting is also the flat of the power curve. At 150 bar and 3.0 hammer the 30 grain slug is approaching transonic speeds at 1050 fps and that’s not where I want to be.
The 130 bar setting (purple line in the first graph) was the best for a 30 grain projectile in this PCP –100 bar was too little, 150 bar was way too much.
You can achieve a specific velocity at a variety of regulator pressures, some people (and some PCPs) prefer to work at lower pressures (increased shot count) and others at high (faster plenum filling).
A suggestion about tuning PCPs – keep an open mind and let the PCP show you what it likes best. Slugs don’t always need to shoot fast and pellets don’t always need to be slow.
Fingerprinting a PCP is worth the time, cost and effort. It shows you the performance levels and the effects of the adjustments letting you make informed decisions as you tune. Randomly changing settings and hoping to find a good solution to this 3 way equation (projectile, regulator and hammer) is an exercise in frustration.
A couple of comments on tuning
Be sure to record, note, measure and/or photograph the factory settings before making any changes.
Baseline the PCP and check it periodically. Springs under constant tension can weaken and change the tune.
Make notes and record the results, label targets so that the data can be reviewed later. Wait until the PCP is well broken in before doing any fine tuning. When tuning, use a light touch on the adjustments — the difference between good groups and great ones can be just a couple of f.p.s.
Tune from low regulator pressure to high and from low hammer spring tension to high.
Inconsistent velocities are likely when tuned to the steep slope at the beginning of the power curve or past the sweet-spot into the rough. This is where the slightest difference in projectile weight or diameter and valve or regulator performance can have a great effect on the ES and SD numbers.
If increasing the hammer spring tension does not increase the velocity the PCP is on the flat of the power curve and an increase of the regulator pressure will be required to raise it.
If increasing the regulator pressure and balancing the valve does not increase the velocity a design limit has been reached and a lighter projectile may be necessary.
If increasing the regulator pressure lowers the velocity then the hammer strike may be too light.
Summary
Are you still here? Long winded eh? Yeah — sorry about that! PCPs are simple once you understand them; it just takes a lot of words and pictures to explain what is happening inside.
You don’t NEED to tune a new PCP, buy one that suits your needs, find a pellet suitable for the factory tune and you’re good to go.
On the other hand, tuning is fun and an excellent excuse to get out to the bench and shoot!
Hope this was of interest.
Hank


Ah! Peaking under the lid of that “harmonics” can of worms. 🙂 This looks like an excellent post, which I will enjoy reading in the morning. Thanks Hank.
Daniel
Hank,
You brought up an interesting point about barrel harmonics.
Perhaps in a future blog post you could take about the effect a “free floating” barrel has?
Also, one barrel band vs. two barrel bands? I am sure B.B. can also talk about this subject.
Enjoy the weekend!
-Yogi
Yogi,
If I said anything about barrel harmonics I’d be lying. The last harmonics I studied were the vibrations of steel girders that transmitted speech from inside a building to the outside for TEMPEST purposes.
BB
B.B.,
Well that brought back some memories!
Turn on the stereo….
Activate the window rattlers too!
shootski
shootski,
No windows where I was working — a SCIF.
BB
B.B.,
I escaped (Anti Bunker Mentality) from the permanent ones as often as i could to the flying Temporary Ones that had windows. I did get to experience a few VIP SCIF/SAF with windows.
shootski
PS: I was usually there and expected to do some sort of a dance on their carpets…i never did dance leaving lots of Pompous AH with egg salad on face!
So probably just get a 3662, Arrow, or Notos, and just find the most accurate pellets for it if I just want to shoot?
OP,
You can get away with any factory tuned PCP, even the Avenge-X if you desire. This guide is to find the “optimum” setting.
I have three PCPs here at RRHFWA, not counting CO2. Only one of them is regulated with an aftermarket regulator. I have as of yet to shoot this particular PCP to see if the regulator even works. I do hope so, but if it does not I will take it off and work with the traditional shot curve.
The “Dark Side” is really not that dark.
RR, my home for wayward Airguns is just the opposite of yours, where you only have 3 pcp’s, I only have 3 springers..
Not including Marksman’s.
Ian
Hank,
I don’t have a PCP and don’t really feel the need to buy one for my 10m indoor shooting.
Nevertheless, I find your blogs on this topic very interesting and easy to understand for non-experts.
The whole “harmonics” or “modes” thing is pretty familiar to audio guys like me. You find them everywhere – in speaker enclosures, in your listening room, even the sound that travels inside the cone of speaker drivers has them. So, yes, counterintuitive as it seems, a gun barrel is a bit like a string or maybe even more like a tubular bell that is fixed on one side and free on the other. With very sensitive equipment, one could probably record the “tone” or show the vibration modes when it is excited by a shot.
This video seems to show just that (including other vibrations): https://www.youtube.com/watch?v=_9ULBtsnkR0
Stephan
Thanks for the link Stephan, I’ll check it out later.
*** I don’t have a PCP and don’t really feel the need to buy one for my 10m indoor shooting. ***
I said the same thing but my wife gifted me a FWB P8x target pistol which changed my mind. To avoid “feeling the need” (and the associated costs) I’d suggest that you stay clear of these 10 meter target pistols 😉
Cheers!
Hank
Hank,
I think unless I improve dramatically and start competing, my FWB LP80 and Weihrauch HW75 will satisfy all my “target pistol” needs nicely 🙂
The P8 is probably *really* nice though…
Stephan
Hank,
Excellent report! Could you please explain why some people want an internal regulator and an external regulator? Also, I have heard it said that every 5 years or so, PCP’s need to have their O-rings changed.
Well done,
Yogi
Yogi,
Where do you come up with these things? 🙂
My TalonSS has operated since 2001 with the factory o-rings!
BB
Really. The only airguns here at RRHFWA that I have had to reseal have been sproingers and CO2ers and all of those were very old. I mean older than me, and I am as old as dirt.
I think Yogi has been listening to his PCP buddies down at the range.
I am not saying that PCPs will not leak. Sometimes a seal will leak right from the factory. Man is not a perfect creature. He does not do perfect things. When Man does get it right, why mess with it?
From what Darksiders tell me. All my PCP knowledge is second hand, and it will always be that!
-Yogi
PS One of the best things about airguns is that at the range you can hear other people’s conversations, and glean some knowledge from that.
Tom,
No disrespect, but maybe you should shoot your TalonSS more often?
-Y
Yogi,
You know, as I wrote that comment I started thinking about that. It’s hard with all the airguns I have to review, but I’ll look for a way.
Thanks,
BB
BB I hate to highjack this discussion, but I don’t know any other way to contact you. I’m working on a Crosman 1100 Trapmaster and I’m having trouble disassembling the Piercing Body, specifically removing the Powerlet Guide Nut from the Piercing Body. There’s very little information on the internet about this subject. But what there is indicates that this is a difficult part to remove. I’m looking for any advise on removing it or a link to a replacement Powerlet Guide nut (part # 1100-12). I’m a bit desperate at this point, so any information would be greatly appreciated. Thanks in advance.
OldRazorback,.
Can anyone help him,?
BB
I’m looking for part# 1100-12 on the diagram, as I believe I’ll have to destroy it to get it out.
Try this:
https://anotherairgunblog.blogspot.com/search/label/crosman%201100?m=0
Quickly skimming, it looks like a left hand thread so turn right to loosen, and heat may help.
If that link doesn’t work, try the website (if on your phone, click the desktop version) then look down the side index for Crosman 1100.
If that doesn’t work, you may be able to buy parts from a fellow named Mike Baker at peter_built78@hotmail.com.
I’ve already read these links and tried what they recommend. Heating the parts allowed me to unscrew it about 1/2 turn (it is a right hand thread, not left. The left hand thread is another part.) before it froze again. It’s a really thin and fragile part and the torque required to remove it has basically destroyed it. I could machine it out if I had a replacement for it. I’ve reached out to Mike Baker. Hopefully he has the part.
Post a picture of the part before it is more mangled. I or someone may have an extra of the part.
Don
Don I have a home machine shop, so I made a tool to fit the Powerlet Guide Nut, so I wouldn’t damage it. I tried heating, chemicals, and Kroll, to no avail. The torque required to get it to move ~1/2 turn did the damage. I’m thinking my only alternative at this point is to drill/mill it out and replace it. If you or anyone else has this part (1100-12), I would happily pay you for it.
Another image to show the location of the offending part.
I will look for the part, it may be a couple days. Have you called Crosman to see if they still have the replacement part, or the whole assembly?
1-800-724-7686 or 1-585-657-6161 Monday through Friday buisness hours.
Don
No, but I’ve read that they don’t support this gun anymore. It’s certainly worth a try, though.
I think I may have a Powerlet for a 1100 if you’re interested.
I found these two nuts in one of my boxes they are basically the same except for the length or number of threads. They don’t seem to match the diagram drawing but are similar on your picture.
Let me know if these look correct or send your best guess dimension on the O.D. of the nut if you can. I can look in another box.
Don
Here is another picture of the nuts:
I don’t believe those are what I need. See the attached drawing. The internal holes are too big. The nut I need has the spring loaded Piercing pin that’s a slip fit inside of it.
Ran out of room below. It looks like the nuts I have are not the right ones. It appears the link below at jgairguns had the part at one time.
https://www.jgairguns.biz/1100-c-78_89_107/
Hope this works. Let me know.
Don
Yes I found them as well. Unfortunately they don’t have it in stock. They’re supposed to notify me when they get it though. In the meantime I think I’m going to machine a complete plug of my own design to see if I can get the gun up and running again. Thanks for trying to help. Keep me in mind if something comes up.
Will do, good luck.
Yogi,
When I was in the market for a 40-50 fpe .22 caliber PCP to shoot slugs I did a lot of research on the FX Impact.
The Impact is a complicated PCP (with 50ish O-rings) that had a reputation for leaking. I contacted a bunch (10-12) of people who were complaining about leaks and most of them admitted that they had adjusted the Impact to “maximum power” and some had exceeded the recommended regulator pressure settings and were running the aftermarket 300 bar reservoirs on a 250 bar airgun.
Agreed, an O-ring is a potential problem – if it was damaged during installation, if it is worn out, if it is beyond its service life or is has been abused it can leak or fail. In my experience they are reliable and robust… and last well beyond 5 years.
…oh, I ended up getting a .22 caliber 700mm barreled Impact MK2 a couple of years ago and after many thousands of pellets/slugs its been shooting great.
Hank
Hank,
This is a superb guide to tuning a PCP. Though I prefer not using regulators, a very similar method is used to tune a PCP without one. Give yourself a pat on the back.
Well done Hank! This report helps those of us who like to tinker have a better understanding of how to proceed (and, very importantly, why it is best done that way). Thanks!
Hank,
Thanks for this guide:
•The regulator pressure is used to control projectile velocity.
•The hammer spring tension is used to balance the valve to the pressure.
•There is ONE OPTIMUM TUNE for a given PROJECTILE WEIGHT, REGULATOR PRESSURE and HAMMER SPRING TENSION.
•Changing any parameter WILL affect the others and rebalancing will be required.
What about those PCPs with adjustable air flow, (the power wheel?)? Does this turn it into a four way adjustment? My brain seems to be slowing down as I cannot remember the particular term for that.
Siraniko
Hank,
Very good primer on how to tune a pcp.
You said it twice in your write up but it bears repeating, “Wait until the PCP is well broken in before doing any fine tuning.” Letting the regulator break in, the barrel break in, etc. is akin to shooting a new springer and breaking it in before searching in earnest for the best pellet and mounting a scope.
I would also suggest that new pcp owners pay attention to their barrel length and twist rate which usually narrows the field on what ammo will likely work best (noticed you are using a 700mm barrel on your Panthera which is the slug barrel?)
Last observation…..it amazes me the number of guys that start twisting knobs on their new pcp’s without basic information, like you have just provided, but they would never even think of adjusting their carburetors on their gas engines since most don’t know what they’re doing.
Siraniko,
You are referring to the Transfer Port (TP) adjustment.
The TP affects velocity by restricting the airflow to the barrel. It works, but I consider it to be more of a “digital power selector” that an analog tuning control.
Hank
Hank,
Thanks.
Siraniko
Siraniko,
Back almost sixteen years ago Tom covered Transfer Ports in Spring Piston Powerplants in a three Part series. Interestingly much of what he wrote about is really just as applicable to PCPs, CO2 (as well as other gases), Single and Multi pump powerplants:
https://www.pyramydair.com/blog/2008/10/the-air-transfer-port-part-1/
For those that don’t want all the reading the most important things Tom found: “As early as 1948, the gunsmith and pistol competitor Walther F. Roper surmised that it wasn’t the volume of compressed air that makes a spring gun work but the speed at which the air is compressed and released. Three decades later, the Cardews of airgun experiment fame agreed with his observation.” How fast it is compressed doesn’t matter to the other airgun powerplants since any THERMALLY
caused increase in pressure is not in play at all but how fast it travels behind the projectile in the bore is the Holy Grail of airgun velocity. There always seems to be an optimal TP size ratio to barrel bore diameter.
Any throttling of the TP by some form of intrusion results in TURBULENCE which is almost always a velocity/FLOW killer.
PCPs need FLOW and velocity especially as projectile MASS and/or caliber is increased.
shootski
Shootski,
Thanks. So has anybody determined the optimal Transfer Port diameter for each caliber for a PCP? 2/3rds the diameter? 3/4ths the diameter?
Siraniko
Siraniko,
Yes!
Many folks have tried to ;^)
This LINK is to one of the better for PCPs:
https://hardairmagazine.com/ham-columns/the-effect-of-port-sizes-on-pcp-airgun-power/
Tom’s for Spring (metal coil only) Piston is the other.
Both, however, are only BEST ATTEMPTS because no one has been able to do the measurements and the mathematics as far as i know to actually have a formula for any actual airgun. Everything that exists on the topic is speculation or Rules of Thumb level of knowledge.
As Hank has well stated TP size, especially adjustable, is not a great method for changing airgun performance.
We could run Post Graduate courses on the Design, Computational skills, and Testing of Transfer Ports and more importantly the flow of gases from the Reservoir to behind the PARTICULAR projectile as it departs the barrel muzzle; they can not be considered independent of each other.
All that said…the rule of thumb that works best for straight cylinder TP is a very few thousandths less than the barrels nominal caliber for greatest efficiency and bore diameter for maximum power.
That last size to bore diameter presents all manner of design issues. AirForce uses straight on axial flow, others use the 90° to provide the shortest distance and Least volume, others use the DAQ method of 90° to a hollow bolt probe to get the best of both…maybe….
Great and definitive answers from shootski…LOL!
shootski
Hank
Thanks for the very detailed guide for tuning PCP’s. I am only a novice with 3 PCP’s. Two have regulators and all 3 have hammer spring external adjustments. Having said that I would add one tip to your report for anyone looking for a quick workable sweet spot: LOWER THE HAMMER SPRING TENSION FIRST. The reason is regulator factory settings are high (at least on mine). Use a chronometer and lower the tension until velocity begins to drop. Sound decibels may be quite a lot less. This results in at least one sweet spot setting which may or may not be the best for you.
This takes nothing away from your easy to follow instructions. Even though my .25 Avenger is delivering lots of shots with the desired accuracy I’m going to start over using your method.
Deck
Deck,
Since POWER sells, most manufacturers set their PCPs to the highest power that they can and still have decent accuracy.
Yeah, backing off on the hammer spring (slightly) will often bring you off of the flat part of the “optimum” (efficient) tune into the best tune for the PCP. But, that is a bit of a guess and a hope approach.
Systematically, starting at low power and working your way up will give you a picture of what is happening and make it easier to find the best tune.
Hank
Hank
If the regulator pressure gage doesn’t return to the same pressure reading after shooting a 10 shot group, does this suggest a leaking valve or some other issue?
Deck
Deck,
Is the reg over-shooting or not reaching the set pressure?
Presuming that the reservoir has adequate pressure, it sounds like something is binding inside the reg. Could be corrosion or burrs on the Bellville washers or something foreign interfering with the piston/valve movement.
If the valve seat is damaged (from being over pressured) worn or has some dirt on it that could cause it to creep beyond the set pressure.
A reg, like a lot of other mechanical devices has an optimal working range, settings at the extremes of the range may not be stable.
Hard to tell without more details.
Hank
Hank
I think it occurs when the reservoir is at its highest pressure after a fill and again at lowest usable pressure. I will pay closer attention. Thanks.
Deck
Decksniper,
“Pressure Gauge Accuracy
Pressure gauges commonly used for airguns are not 100% accurate. As a standard industry grade D gauge, it has a plus or minus 5% tolerance. 5%, at 3000psi, is 150psi, for an extreme spread of 300psi. 3000psi gauges will most probably have the greater amount of their error at the 3000psi level. That’s because pressure gauges are most accurate in the middle of their range. So the least amount of expected error, in a 3000psi gauge, would be at the 2000psi range. To reduce the amount of inaccuracy, the use of a 4000psi reading gauge would move the 3000psi reading to the middle of its range where the amount of error is the least.”. Dennis Quackenbush
This could be all or part of what you experienced.
shootski
Shootski
I think this describes what is going on with my Avenger regulator gage.
Thanks
Deck
The rules that are used for gauge election in the shipbuilding industry; the nominal pressure should be between 25% and 75% of full scale. The basic reasoning at the lower end it is difficult to get an accurate reading. The upper range has to deal with higher stress over an extended period of time (years) and as shootski pointed out typically reduced accuracy at the upper end. The fact that the gauge is under stress at all times the Navy requires gauges to be periodically checked for accuracy, typically 3 to 5 years. The periodicity depends on the gauge and its use. For PCP use a periodic check against other gauges is a reasonable and easy, ie the compressor or hand pump gauge.
An officially calibrated gauge would be a bit of overkill since repeatability of the gauge is more important than absolute accuracy, in my opinion.
Mike
bmwsmiley,
Civilian Cal Labs are SPENDY TOO!
shootski
LOL
GREAT information !!!
I have read this three times in order to have it all sink in.
Thanks Hank
rk
I have been schooled! Thanks, Hank. I really learned a lot with this blog here today. As for O rings, they do last quite a while but on my Crosmans (Benjamins if you will like the Marauder and Disco), the O rings at the internal aluminum cylinder that has the air guage screwed into it, are the first to go, letting the HPA leak out the hole where the guage screws into that cylinder.
Fred formerly of the Demokratik Peeples Republic of NJ now happily in GA
Fred DPRoNJ,
That is a design issue, in my opinion.
The O-Rings are called on to hold back the hpa and are extruded through the gaps instead of doing the job they do best of only sealing COMPLETELY an annular joining point by being compressed into their groove, usually by some mechanical means like a threaded joint.
shootski
Thinking that is where FM’s Ben-Max .177 is losing air, albeit very slowly; not ready to tear into it yet, need a dose of courage. The Cowardly Lion in FM is speaking.
I have replaced the o rings in my Disco but now one of my Marauders has a slow leak. Just put some soapy water around the air guage where it screws into the aluminum block and see if that’s where the leak is. What I am going to try to do first is once the air has all leaked out, unscrew the air guage and put a few drops of transmission seal swell onto the aluminum block so it runs down to each o ring. If you don’t hear from me again, it’s because when I re-pressurized the tube, it blew up. Just kidding about that but if you do tear into it, you can push the block out of the front of the tube (once the guage and fitting at the front is remove) by pushing it out with a wooden dowel. Now what I did is take a Dremel with a rotary grinder and put a chamfer on the machined hole on the inside of the tube so that when I pushed the block back in with the new o rings, they didn’t get cut up by the sharp, machined edges of that hole. Of course, clean the tube after putting the chamfer on it. You can also do it with a circular file, Just enough to take the sharp edge off.
Fred etc
When I put a HUMA regulator in my Prod, I noticed that most of the places that o-rings had to slide past the edges that initially were very sharp. I used a Dremel with a brass wire wheel to deburr and round off the edges. A few thousandths radius is all that is required to reduce / prevent the abrasion of the o-ring when installing / assembly / disassembly. A very small amount of silicone lubricant also helps, just enough for the o-ring to look wet.
Mike
Thanks guys!
Glad that my guest blog was well received, happy to share what I’ve learned!
Happy Friday all!
Hank
Outstanding. Nothing more to add for regulated PCPs.
Hank, a most informative and excellent blog! Kudos to you.
I feel very well equipped to dip my toes into the dark side. My new (to me) Disco awaits.
Slightly off topic, but sort of relevant: I did a similar “fingerprinting” of a CO² pistol once. I think there are many analogies between CO² and PCP, since CO² provides you with a stable pressure at a given temperature. So the earlier versions of the Crosman Mark I and II have a hammer spring adjustment and a high-low hammer spring power selector. Last winter, I started at the lowest setting and the low power selector and shot 5 shot groups (this was before I purchased my first chronograph, like Hanks friend), then turned the hammer spring screw in 1/2 turn between groups. Thrn I did the same thing on high power.
I learned a lot about how velocity helps stabilize pellets and perhaps about harmonics, as I could see the groups tighten, open up, and then tighten up again, before opening up again at the highest setting. It was a cool experiment. I was trying to find a pellet that would shoot good groups at both the high power setting and the low power setting, but the harmonics have to just happen to line up on each setting.
Hank’s blog brought that all back to me. I think I can do that again with my chronograph that records the velocities to an app on my phone while I shoot groups at the same time, and them chart the results on a spreadsheet.
Hank great report. The graphs really make your point. Thanks.
I have rebuilt my Low Pressure Pellet Gun after your gentle push; asking me how it was going. I have been pondering on where to start for a long time. Generation 3 is now ready for testing with a stable aluminum chassis. It has a regulated operating pressure from 100 to 150 psi from my shop compressor.
I think your tuning process will work on my LPPG. I had tuned the previous gen 2 hammer for weight and spring compression but may need to retest for gen 3. Your report came at a perfect time. My variables are almost infinite for every part of the gun ie: home made. I can’t test all variables so I need to make assumptions on what will have the most impact on accuracy. I have selected 25 yards as my distance to optimize for accuracy.
Don
Don, I was wondering, too, on how your project was coming along. I think it is fascinating. Best of luck.
Benjamin-Don
You may be on the verge of discovering the next “Disco”. If Girardoni and BB can do it, why not?
Deck
Benji-Don
Please excuse the amin in name above. Word press got me.
Deck
Deck,
No problem Benjamin goes way back in my family tree.
Don
Benji-Don,
Glad to har your at Generation Three!
I may have shared this bit from Dennis Quackenbush before, if so sorry, but it is on topic for Hanks Gust Blog so not all bad.
“Turbulence limits airflow
Air released at higher pressure is higher velocity air. As air speed increases it gets fouled in the path that it takes, restricting the main current of the air. Awareness of a problem always precedes understanding. Everybody knows that you want a smooth flow and has a general idea of how it should be, but the higher the pressure, the more important the little things are. Have you ever noticed how, on a pre-charge gun, if you increase its operating pressure its performance gets worse? If the performance at higher pressure becomes erratic, it’s probably due to turbulence. That’s s why lowering the fill pressure from 3000psi to 2800psi makes the gun consistent because you’ve eliminated the disruption of a confused airflow.
Let’s use an automotive poppet valve as an example. Although it works in reverse, drawing air through the poppet, rather than pushing air out of the area the poppet seals off. The descent of the auto piston creates vacuum. When the poppet opens air is drawn down the duct passage, past the valve stem, which obstructs the flow, making a transition as the bend in the flow in the back of the poppet valve and then through the annular space between the valve poppet and the seat. Motorcycle engines of the late 70’s could obtain an air velocity of 400fps with the attention paid to detail in their porting. Whereas production auto engines could be as low as 180fps with their simplified, as cast, porting.
So the air gun is pushing the air the other way. When the valve poppet is opened, air has to flow around the valve return spring, past the head of the poppet valve, through the annular space, then into a round conduit that is disrupted by the valve stem, it has to take a turn and then reshape itself into the round passage again and then into the breech of the airgun. This airflow is terrible. It has dead areas in the area of the turns. Flow is restricted to the lee side of the stem and biased to one side of the valve.
To get supersonic speeds you need supersonic airflow. And air flowing at that speed is a different creature. In the bends of air passage cavitation can occur and the airflow will actually erode away metal from the valve passage. This, and other problems, are all part of figuring out how to make better airguns.”
Dennis Quackenbush
Don, YOU are in rare company with your LOW Pressure work in my book!
shootski
Shootski,
Not sure you remember, but you egged me on when you said a low pressure pellet gun even tethered will not be that accurate. So I have set out to achieve 1/4 inch c2c at 25 yards. I think it is doable.
As you know I set out to achieve 500 fps at 100 psi. I did not achieve it but did exceed it at less than 150 psi. I may not achieve 1 moa at 25 yds but I am giving it my best.
I was worried about the turbulent air flow and air friction losses affecting pellet velocity from your discussion above in gen 1 and gen 2. I now think with the low pressures that turbulence and friction is less of an issue on my air flow. My transfer port is a bit larger than my .25 caliber barrel and is inline with the bore. The air flow inside my valve is low velocity due to the massive valve size. I will get into more detail once I complete my accuracy testing. I wish I had longer barrels to explore the air friction vs pellet friction a little more but I am passed that now with the accuracy goal.
On your peanut butter safety lid shooting in that wind wow. I would say that took more skill than Ton Jones one lucky shot at a phenomenal distance. Just my opinion.
Don
Benji-Don,
Terrible of me to egg you on into something you are enjoying so much! Lol!
I hope you continue to get those incremental successes that bring so much joy and satisfaction.
I really don’t think Ton’s shot was lucky. I watched his face as he “computed” his next shot inside his head. His style of shooting depends more on the ART of Long-range learned from practice and experience. I think of his style as that of a Natural Ballistician as opposed to my (and many others) of Computational Ballistics. The more i shoot at longer ranges in conditions the more i realize the beauty in his approach.
I look forward to your reports on your LPPG.
shootski
Benji-Don
One way to reduce turbulence is to radius the throat of any restriction. Putting a radius on the inlet to an orifice can reduce pressure drop and increase flow for a given pressure by as much as 10%. Where putting a radius on the outlet of the orifice will only increase flow by a maximum 1%. Exact values depend on density, viscosity, and velocity of the flow. Velocity in the transonic region (Mach 0.9 to 1.1) are more problematic.
Mike
Mike,
Thanks for the input. Here is a preliminary design of my valve. I need to update to a new drawing showing how the valve is currently. The concept is still the same though.
I think I have captured most of the potential 10% reduction in losses with my current design.
My valve is designed to stay wide open until the pellet has left the barrel. No need to conserve air with the shop compressor tethered to the gun. It refills the valve/reservoir between shots.
Don
Benji-Don
The inlet to the barrel has a great radius. The sharp edge of the seat will cause dirt particles to accumulate on the seating surface. Putting a small radius on that edge will reduce the dirt accumulation. Even highly filtered air has some dirt / oil this will cause accumulation in that area over time.
The rod guide appears to be a plate with lots of drilled holes. This plate will act as an orifice to flow from the right to the left. A quick improvement would be to radius both sides of the plate. But a better way is to make the plate like the picture below. My sketch is done in MacBook Pages so it’s rough at best. The inner edges should have a radius.
Mike
Mike,
My workshop has a hacksaw, dremel tool, and a drill press so parts are scavenged and modified from whatever I can find. I do have 4 large round holes for air passage through the rod guide plate (fender washer) instead of the mesh I had shown on the original sketch. The velocity of the air through the plate is about 1/10 of the velocity in the barrel. I did my best to develop a smooth curve into the barrel.
For now I am focused on accuracy and hope to begin testing when the weather cooperates.
Thanks for your interest and recommendations.
Don
Benji-Don
You need to do a blog on your low pressure pellet gun, pictures and everything. I’m very interested in what you’ve done.
Brent
Brent,
I have been thinking about a guest blog on it for a while. If I do a blog it will be a few months down the road. Thanks for your interest in my low pressure pellet gun.
Don
Hank, B.B., and Readership,
Hank has put together a a WOWSER level pair of reports!
For Hank:
The BRAVO ZULU hoist is flying on the Yardarm.
For B.B. and the Readership:
This is only the Cliffs Notes level of knowledge about PCP Tuning that Hank has provided for you; he knows a great deal more about this topic.
How do i know that? Because he asked me to look at his drafts. He has, at the very least, twice more the information about PCPs in general and their tuning. We went back and forth about what to include and he showed a great mount of restraint in not fire hosing you all with WAY TOO MUCH information…that restraint is something i could never have done as well!
shootski
Gunfun1, where you at? You’re falling behind on enabling.
Deck
“This is a plot of a projectile tested at different regulator pressures and hammer spring tensions.”
Hank,
This entire report was excellent and informative!
The nerdy engineer in me LOVED that first chart (the one over the text I copied and pasted above).
Once one absorbs your report, there is a huge amount to be learned from that one chart.
Thank you for a most interesting read! 🙂
Good tuning to you,
dave
If FM were to put together a binder containing useful information about things airgun, this article would be in it, together with quite a few others pulled down from this blog. FM may have to do that – possibly title it “Field Manual for Airgunners.” No pun intended.
Readership,
Some shootski fun!
Air Arms .177 Diabolo Field Heavy 10.3 gr/0,670 grams
JSB .22 EXACT JUMBO heavies .22 15.89gr/1,030 grams
Conditions:
Wind E 18mph/29kph
Gusts 37mph/59kph
Temp 48°F/8,9°C dropping.
DP 37°F/2,8°C
1007.7mb
I shot both Off Hand at approximately 30yards/31meters and used 80mm Skippy Peanut Butter safety seals as my targets. They were hung from branches/twigs at about one yard/meter above the ground for safety.
I shot my SIG SSG ASP20 .177 WHISKEY3 Scope with Wood Stock first.
I took 30 shots at the SKIPPY target while walking a 20° arc to change the perspective (a little) for each shot facing South the wind and gusts were about 90° from my left. The wind had the targets dancing as they were hung on short wire bag ties.
For group size comparison i used a Swiss Franc which is a mm or so smaller than a US 25 cent coin (Quarter) in .177 with 25 of 30 pellets into about one MOA the other five open that to about four MOA. That four MOA couldn’t possibly be the rifles fault and i would like to think it was the Wind and Gusts…NOT ME…LOL!
The second target was shot with my .22 caliber SIG SSG ASP20 also topped with a WHISKEY3 with a Synthetic Stock. The .22 and I shot 23 of 30 pellets into about 3 MOA and the other seven opened that to about five MOA.
I have shot many more rounds through the .177 SIG and i think the 10.3 grain .177 pellet family from/made by JSB is the Three Bears solution.
I think i need to keep looking for THE .22 pellet and it might be a bit heavier of a pellet or different head diameter that helps me get smaller groups. Back to the bench!
I think as it got colder and dusk was approaching my fundamentals were breaking down. I was letting conditions set my pace instead of setting my pace to overcome the conditions. I noticed i was rushing!
My position building, wind reads, and slapping the trigger on occasion instead of a deliberate press were all compounding errors.
Errors that are driven by the physical and mental fatigue of shooting a break barrel for sixty shots; that doesn’t happen when i shoot sixty shots with any of my PCPs.
I will try to find a similar windy day and repeat the sixty shots but this time i’ll shoot the .22 caliber SIG first and then the .177 to see if it reverses the outcome or not.
Sounds like a terrible time…NOT! Pushing our comfort zone and getting off of the bench, bag, rest, sticks and Embracing shooting ERRORS is how we learn to get better.
This was mostly for Hank (Vana2) who asked for some practical targets a while back.
As well as Decksniper who owns a SIG and any of you other readers who own SIG SSG ASP20s specifically or spring piston of any brand.
shootski
PS: jda001’s Shooting Club’s Founding commemorative painted wooden target plate of 1868 gave me some inspiration.
It translates as: On one occasion you shoot to the point on another occasion you shoot next to it.
And (like) accurateness in the shooting so it goes for you in life.
PPS: i need to resize my images as they are a tiny bit larger than the 2MB limit…argh!
shootski, that’s some good targets alright, some nice shootin’ there! 😉
thedavemyster,
The Urban Bumbies don’t stand a chance when i shoot my DAQ Outlaw .308 looking through the MEOPTA 5-30×56 Meo Pro Optica6 ED RD FFP at any power level.
My County continues to spend my Tax Dollars studying the excess Deer population problem and as i XC ski through the parks at night (now that we have had our first two real snows in two years) i can see that the population is going to explode this Spring…most of the Does are each going to drop one or two new Bumbies to devastate the urban forests.
CRIMINAL! For both the Deer and the Taxpayers.
shootski
shootski,
That is really sad! Georgia has a better solution to deer overpopulation: generous bag limits.
“Georgia also has very generous whitetail limits, with hunters being allowed to harvest up to 10 antlerless and two antlered deer each season.”
Specific bag limits:
“12 per season, Statewide. See Deer Seasons and Either-Sex Days for either sex days. No more than 10 may be antlerless and no more than 2 may be antlered. One of the 2 antlered deer must have at least 4 points, one inch or longer, on one side of the antlers or at least a 15-inch outside spread.”
(from: https://www.onxmaps.com/hunt/research-tools/us/georgia )
Georgia also has a really cool “Hunters for the Hungry” program:
https://gwf.org/ghfth/
I wish more states would follow likewise with these guidelines.
More deer that might otherwise starve due to overpopulation could be humanely harvested to feed hungry families.
Blessings to you,
dave
.177 group:
.22 group:
Shootski
And that folks is so mo shootin!
The price of Sig ASP20’s just went up if you can find one.
Deck
Decksniper,
Thank you.
The key to better shooting (that i began to lose as my shooting progressed) was a lesson from The Gunny (USMC): your hits on target go up with an increase in number of shots not taken. He was VERY opposed to spray and pray that the US Military was embracing at that time.
It stood me in good stead with aerial gunnery as well where the number of rounds are limited by magazine size and weight limitations (NOT like Hollywood) that leave you with only a few seconds of shooting to EMPTY = time to run from the dogfight.
Give it a try if you don’t practice the technique already.
shootski
Shootski
That sergeant knew what he was talking about.
Deck
shootski,
what rubbish shooting! 🙂
_________
Besides my provocative pun above, I actually mean to say, that I think the very best kind of plinking can be had from shooting rubbish, or in other words: airgunner’s are happier recyclers. 🙂
Furthermore, I remember that 30 shots with gas spring airguns (ASP20s) are also considered maintenance.
I thank you for sharing your plinking session. 🙂
hihihi,
Rubbish shooting is shooting automobiles, refrigerators, and other household objects dumped in inappropriate places!
I much prefer your Recycling Shooting ;^)
But it would have become rubbish plinking if i had kept going for much longer!
However, you are on point that the gas springs appreciate either kind of shooting.
shootski
One of the most fun activities FM engaged in was going rubbish shooting with his buddies – when you could still do that in S Florida – using targets such as junk cars and appliances and seeing the effects of .22 rimfire, .30 centerfire and .58 “minny” impacts on them. The cost of ammunition also did not impact the wallet too badly at the time.
For whoever may be interested, today I shot darts at a paper target on a backstop of cork.
Result: I have yet to discover an effective method for retrieval without pliers, ie using fingers only to pull the dart back out.
(pictures in my comments here: https://www.pyramydair.com/blog/2024/01/slavia-612-breakbarrel-airgun-part-one/#comments )
———
I placed a metal washer with a very slightly smaller hole underneath the breech seal.
This leather seal has a larger hole and yet it looks almost closed up (maybe a result of over-softening with neatsfoot oil).
Anyway, I noticed no difference shooting… 🙂
Cool! 🙂
hihihi,
What if you blunted the points just slightly on one bolt/dart? If it seems to help a little keep going until it bounces off the cork or stop blunting when you feel it is as you like it. If it doesn’t work you only lose one.
I doubt you are going to hunt with your bolts/darts so sharp points aren’t needed.
shootski
hihihi
Try adding three 4 inch by 4 inch cork rounds to your paper dart board. This works for me at 5 meters with a Crosman 760 at 2 pumps
jda001,
thanks. Are you sure that’s a picture of cork discs?! 🙂
I added some of my thoughts in my comment below the blog article, “Slavia 612 breakbarrel airgun: Part One” ( https://www.pyramydair.com/blog/2024/01/slavia-612-breakbarrel-airgun-part-one/#comment-512863 ).
In a nutshell: I think glue does most of the slowing down- and cork holds the dart. 🙂
shootski,
what an interesting idea. I wonder what a blunt tip will do to the cork?
Anyway, I intend to try it, next time. Thanks. 🙂
———
At the moment I have a plentyful supply of darts, so sacrificing one or two fluffies seems well worthwhile… 🙂
“not quite an airgun”
Hank,
It’s not quite an airgun, and it’s definitely not a PCP, but this 9mm Flobert shotgun has proved useful here.
I don’t know how many poisonous snakes you have up north there, but we’ve got lots of them down here.
This tiny 3-pound rimfire shotgun is supposed to put out a quarter ounce of #9 shot at 600 fps.
(my new chronograph says it averages 573 fps for 79.7 fpe…not bad)
The best thing is it’s really quiet; I read that these things are “garden guns” in Europe for garden pests.
The can was peppered at 5 yards, the same distance I used it on the copperhead near the garage door.
(that made my wife really happy, as she walks that path to the garage several times a day!)
This is now my wife’s shotgun, with a rack for it in her golf cart (that she uses to get around the farm).
As they say, “Happy wife, happy life.” 😉
Please keep these enjoyable reads coming,
dave
thedavemyster,
I really like your wife’s Little Badger!
That is certainly a KISS solution to pesting.
shootski
Thanks shootski,
Yes, you called it right; that shotgun is the Chiappa Little Badger, made in Italy.
(I was able to get the Deluxe model, with a wooden stock: https://www.chiappafirearms.com/product/500.001/little-badger-deluxe-shotgun-blued-9mm-flobert-24-bbl)
It’s an excellent piece of kit; but the ammo is a bit pricey, nearly a dollar a round with shipping.
(I’m using Fiocchi ammo…Italian gun, Italian ammo…not a huge amount of choices anyway! =>)
But it’s not like we’re using a ton of ammo, like shooting skeet or something, LOL!
We’ve only fired about 15 rounds in the last 3 years.
And most of those were fired by friends who were intrigued, and just wanted to try it out.
I saw a video about the gun (https://www.youtube.com/watch?v=OKKZXHoy_Co ).
After a lot of searching, I located one at a gun store in Pennsylvania.
They actually had two, and I wish I’d had the foresight to get them both (4 years ago).
The Chiappa website is a bit off on the specifications.
They list the weight as “1.5,” so perhaps they meant kilograms, as the weight is 3 pounds on my scale.
They also list the overall length as 10.5″ when the actual overall length is 40.5″ with a 24″ barrel.
Still, it’s a great little shotgun, very useful, and I’ve never seen anything else quite like it. 🙂
Blessings to you,
dave
thedavemyster,
Dave I bet someone forgot to convert decimeters to inches as well! 10,5 decimeters is 41.3″
Regardless of how you measure it that is a handsome piece.
Anyway to use Flowbert blanks and reload your own hulls? I hadn’t reloaded in years until getting my DAQ .410 Camp & Garden air shot pistol.
shootski
“Anyway to use Flowbert blanks and reload your own hulls?”
I hadn’t thought of that yet; oh wait, I see you have some further info down below. 🙂
Dave,
I found this: https://www.umarex.com/products/blank-firing-guns/ammunition/4.1306.html
Umarex makes 9mm possibly rim-fire blank/pepper ammo.
Never knew that existed.
Also saw some Winchester .38 Special antique ammo for breathtaking price; not guaranteed to work! Must be some nice cartridges.
shootski
shootski, that’s some intriguing info to check out; thank you! 🙂
Dave
The Flobert may be a useful thing for the family but I really loved the other two little “items” in that picture. Not the can or the pellets that is.
Bill,
Thank you! Both of those air pistols are precious to me as they are both special gifts.
The Crosman 1322 started life as a 1377 from PyramydAir, a gift from my wife.
Then it got customized with a longer barrel, a steel breech, steel rear sight, and rosewood stocks.
The rosewood stocks are the last ones made by a craftsman who got sick from wood dust.
My wife agrees they are beautiful works of art, and a tribute to a master woodworker.
The .177 caliber Beeman Webley Tempest is one my Dad had me buy him back in 1981.
Before he passed away, he gifted it to me; hence, that gun is also a keeper. 🙂
Blessings to you,
dave
Hank,
Thank you very much for this important guest blog. This report was just what I was looking for in terms of understanding how the various adjustments affect the nature of the puff of air behind the pellet, and the method that you use to get to the result you’re looking for.
Like some others, I read it over three times and mulled it over afterward to make sure the information settled well in my mind. Great stuff, thanks again!
Regards,
Will