
This report covers:
- The brain
- Still cameras
- How light is used
- Lesson one
- Lesson two
- What have you learned?
- More
Today I talk about one of the most important subjects in the field of photography — light. I won’t cover flash photography which is a highly specialized subject, but I’ll address several other types of light. Let’s get started.
The brain
The biggest obstacle to using light correctly is your brain. It is a sophisticated computer that deals with light so well that when you try to put images on film (or on digital files that represent film) you face obstacles you weren’t aware of.
Still cameras
Still cameras capture images of still life. In the beginning of photography, which was the early 1800s, people did not realize how still that had to be. One of the first photographs that still exist took several days to expose! This was reduced to only 8 hours by the year 1822, and then to mere minutes by the late 1830s.
As the understanding of silver chloride advanced the exposure time was reduced to mere seconds, but compared to what we know today it was still a long time. And light is at the root of it all because light is what makes the silver chloride react.
Consequently, in the early days, and right up into the early 20th century, some cameras may not have had shutters. Instead the photographer took the lens cap off for several seconds to expose the film. That’s nice to know, but what does it have to do with taking pictures for guest blogs? Everything, as it turns out.
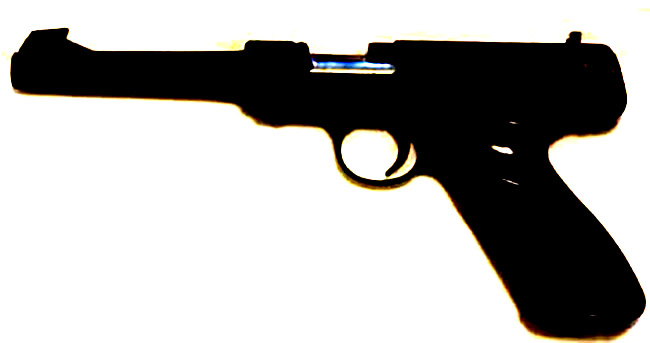
This is a typical photograph of an airgun taken on a white background. It’s the most common mistake gun photographers make.
How light is used
Your brain does everything I’m about to explain and much more, which is why photography can seem so difficult. I’ll illustrate my point with pictures.
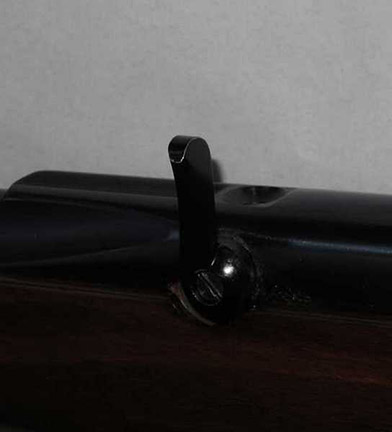
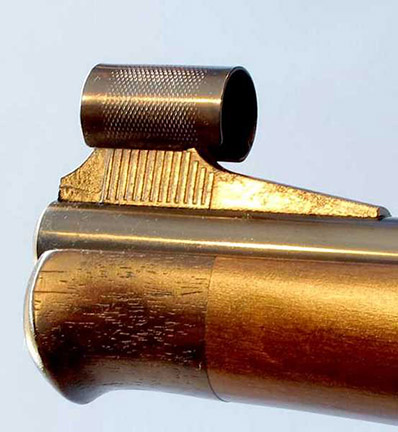
This image of the BSA tap was taken with the rifle against a white background. The white appears medium gray for reasons you will soon learn. I used flash, which is the enemy of the photographer in these circumstances. There has been no retouching; this is exactly the way the camera recorded this image.
Why is the white background so gray in the image above? It’s because the camera’s “brain” was trying to compensate for the dark object that was being photographed in the foreground. And it did!
Believe it or not, the image that you cannot see in the foreground is much lighter than it appears to the camera. Let me lighten the entire image so the background is white, and you’ll see what I mean.
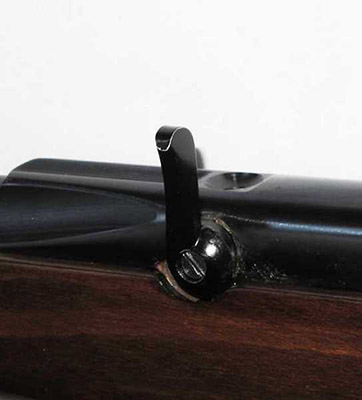
Same image as before, only it’s been lightened to get rid of the camera’s tendency to try to balance the light in the image. Read about this below.
The camera tries to balance the image it sees, so the darks aren’t too dark, and the whites and bright colors aren’t too bright. That’s why the white background appears medium gray in the first image. I used the flash, so there was tons of light on that white material, and the camera really had to darken the image, to keep it from being too bright. When it does that, it also darkens the main image that’s in the foreground — the image that was dark to begin with — the image we wanted to see. The effect is to turn what you are interested in seeing into a black silhouette!
Let me show you how this image should be lit. Turn off the flash and allow the camera to “see” the image with less light — yes, less light. To do this, you have to keep the shutter open longer, and that means the camera has to be held steady to keep from blurring the image. A tripod is the best way to do this, but in Part One I told you how to steady a smart phone camera with a coffee mug, so that will work, too.
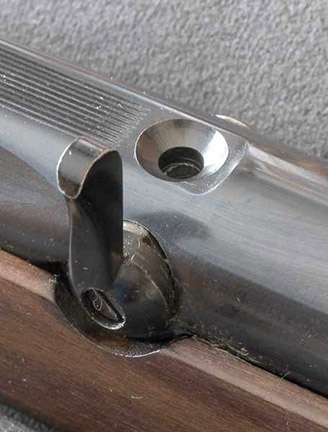
The angle of this shot is a little different than the other two images, but more important is the color of the background. Notice that it’s black! A black image against a black background, and yet everything is clear. This picture was taken with the camera on a tripod and the exposure lasted for one-third of a second. I didn’t figure that out; the camera did. A smart phone sitting still could have taken this picture, as well.
In the third image the object is easy to see against the black background. And yet notice that neither the object nor the background are really black. They’re both shades of gray. This is the camera at work, averaging the image so it isn’t too contrasty. By forcing the shutter to remain open much longer for this shot, I got everything exposed more.
Lesson one
The first lesson is that you don’t need to use flash to take good pictures of your airguns for guest blogs. In fact, if you do use flash, there are a great many things you need to think about that can be ignored if you simply don’t use it.

Lesson two
Amateur photographers lack the resources that professionals have. Cloud boxes that eliminate shadows are one resource I’ve always wanted but never had. I compensate with indirect lighting and by taking pictures outdoors in the shadows on bright days or in direct light on overcast days — where the sky acts as an enormous cloud box of indirect lighting.
Another resource I lack is an unlimited supply of seamless non-reflective backdrops. I’m talking about material that can be used to set off the photograph in the foreground. Let me show you how I compensate for that. Let’s look at a picture I took of the muzzle of a BSA Stutzen.
The muzzle of the BSA Stutzen is set off nicely against an even blue backdrop. How did I do it?
To take this picture, I used a tripod, once again. The light in the room was not bright (despite the bright spot seen on the sight ramp), so I set the camera shutter to stay open longer by setting the exposure to the slowest speed setting (setting the ASA/DIN number or film speed to the lowest setting, which is ASA 80 on my camera). Because the camera “thinks” the film takes longer to expose, it keeps the shutter open longer. I don’t do this manually, though I could. Instead, I set my camera shutter to the aperture priority setting and slow down the ASA speed to 80. The camera’s brain does the rest.
Because the shutter will be open longer, I have to use a tripod or the entire image will be blurry. But that’s okay! I am planning on using that tendency to blur to my advantage. The backdrop in this picture is not a blue that has a uniform color, nor is the lighting in the room sophisticated indirect light. Instead, that backdrop is a blur!
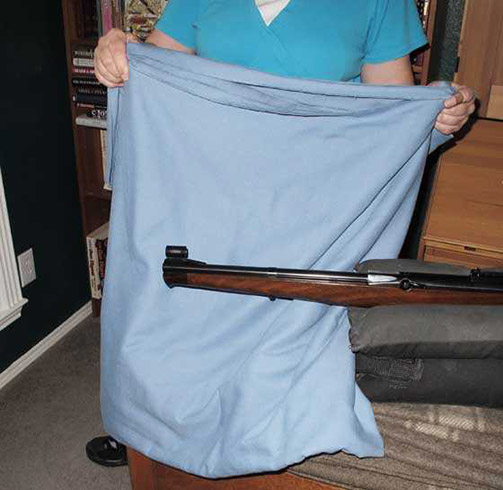
My wife, Edith, moved the blue backdrop while the shutter was open, so it was blurred in the picture of the BSA muzzle. Because the exposure took so long, the backdrop averaged out and looks uniform. The camera was closer to the muzzle than it is here, of course. I backed up to show how it was done, and this picture was taken with flash.
What have you learned?
I hope you’ve learned how light affects the pictures you take. And also how important it is to hold the camera still as the photo is taken. If you’re writing a guest blog these two things will help make your pictures shine.
More
There is still more to come on light. In another report I will show you how to “paint with light.”

BB,
I’ve taken a lot of pictures over the years, thousands of them, yet I see that I still have much to learn!
Speak on…I am listening. 🙂
Blessings to you,
dave
Cool, thanks for the tips!
I have used backdrops far enough behind subjects to eliminate shadows and far enough back to be out of focus, but I never thought of using a moving background to make it featureless. (Probably because I rarely have an extra set of hands to help me.)
I use a neutral gray foam (like what is in a gun case) as a background for a lot of my close up photos with diffused light.
I haven’t asked BB if the gray background presents a challenge to editing the photos.
If it does please let me know I will change backgrounds.
I use 100 watt 5k (that’s the light color or “temperature”) LED panel with a piece of white copy paper taped over the light source to act as a diffuser.
Sometimes I will bounce the light off of the ceiling or off of the wall near my desk to give indirect diffused light.
Ian
Thanks for the report. There definitely is a lot to consider when photographing. And the differences in good photos versus great photos are significant. One item that has come in handy for me is a free camera app for iPhone called Fjorden Camera App. Here is a link to the web page: https://shop.fjorden.co/en-us/pages/app
They make an interesting grip for iPhone cameras that I haven’t tried. It is relatively expensive. But might be worth it if you use your iPhone camera a lot and want better physical controls for it.
BB,
Yes, light is your enemy when taking “detail” shots. Dark backgrounds do indeed help when your “subject” is also dark. I have learned so much about photographing airguns from you.
P.S. Double wording
Still cameras
Second paragraph
As the understanding of (of) silver chloride…
Lesson one
…there are a great many things you need to think about that (that) can be ignored if you simply don’t use it.
RR,
Fixed the two thats. Found the two ofs. You can too. Just do a “find” search for of of.
BB
On a side note, I recently tried the JTS Dead Center 18.1 grain .22 caliber pellets in the Beeman R1 rifle and they seem to work very well in that rifle. My first 10-shot group after zeroing the scope measured .394”. That rifle has quite a kick to it and isn’t easy to shoot. If anyone else has access to this combination of rifle and pellet and tries it, please let us know the results. Thanks.
Nice! Here’s a tip I learned to have domed pellets make wadcutter-like holes. Take a gumball-sized ball of duct-seal (aka ballistic putty) and flatten it into a thin pancake (like 1mm or 1/16″). Then press it between your backstop and your target paper. The putty eliminates all of the tearing. You can reuse what’s left of the putty for the next target.
Here is an example:
Since I started to use rubber mulch as a backstop, I found this a good use for the pile of duct seal I initially bought at the beginning of my airgun renaissance. The little ball of duct seal lasts quite a while.
Nice, thanks RG!
B.B., thanks for the photo tips. I went back and re-read Part 1. Great stuff. Do you recommend taking max resolution photos and then cropping and reducing file size for publishing, or setting the camera to take lower resolution pics from the start? Or, perhaps it does not matter. I was just thinking of the pic of the dime with the initials of the engraver. Once you zoom in and crop out the unneeded portions of the original picture it would of course be a smaller file size. But if the camera was set to a lower resolution, the detail may not have been captured.
Roamin,
Because some of my pix also go in print publications I shoot at 300 dpi and reduce to 72 dpi for the internet.
BB
BB,
The thing to remember about automatic cameras is that it is trying to get a uniform exposure for the picture (professional photographers used to use “gray cards” to check light levels).
If you have a black colored item (an airgun) on a white background, the camera will try to balance the light for the picture so that it “sees” a uniform gray. That is why using a darker background gives better resolution.
Enjoy the day.
Bill
So now I know why I try to avoid a flash.
I read someplace that natural sunset lighting works well. Perhaps for large items anyway. Lots of light, not too much reflection. I try to use it as much as possible. It also seems to be more dramatic.
Speaking of pictures, ever think of using s different picture for each multi part blog?
Two examples of sunset light.
Picture 1
Top picture was incorrectly picked, but I cant delete it 🙁
Picture 2 — Great, I went to reduce the size and cropped it instead. 🙁