Today reader Dean Speidel, whose blog handle is Motorman, continues to sharing his experiences with an Anschutz 335 breakbarrel air rifle. This day we look at the assembly of the rifle.
If you’d like to write a guest post for this blog, please email me at blogger@pyramydair.com.
Take it away, Motorman
Anschutz 335 Rebuild: Part Three
Motorman / Dean Speidel
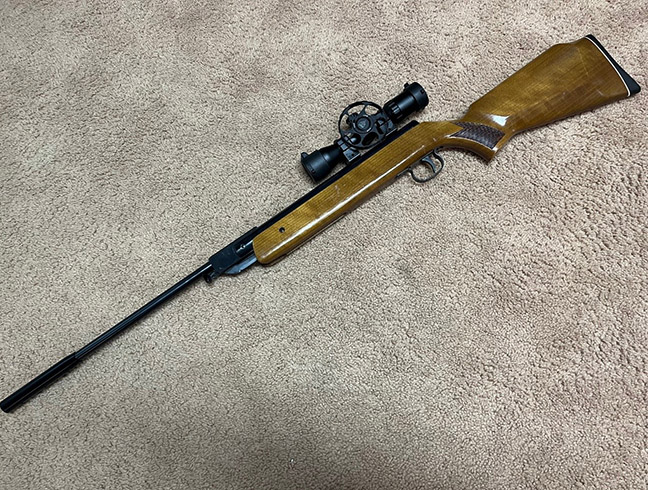
Anschutz 335.
This report covers:
- Lubrication and assembly
- Trigger…to disassemble or not?
- De-burring the compression tube
- Inserting the seal into the compression tube
- Back into the spring compressor
- WHAT WAS THAT????
Lubrication and assembly
Today I’m going to put the Anschutz 335 breakbarrel springer back together after de-burring some surfaces and lubricating some parts. I first put moly grease on all the moving parts. With moly over all the sliding bits, I then needed to address the spring. I used a 1/2” hobby brush to “paint” Almagard 5732 onto the spring. It’s the same grease that’s in the Tune in a Tube applicator. I didn’t put it on too thick — no gobs, but also not too thin. The whole length of the spring should have a nice even coat of grease to deaden twang. I painted one end of the spring, stuck it in the compression tube after the piston and then finished painting the part that was protruding. It’s just less messy that way.
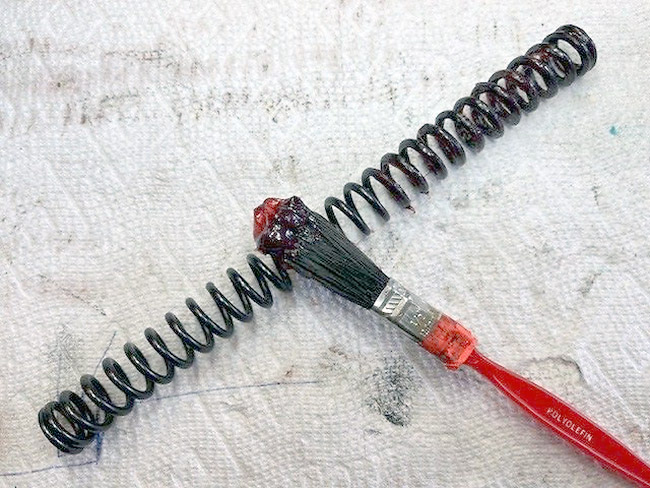
I lubed the mainspring with a thin coat of Almagard 5732 grease.
Trigger — to disassemble or not?
Okay, I’m a coward. I REALLY didn’t want to disassemble the trigger assembly, even though the trigger pull measured 3+ lbs. The thought of all those springs and bits flying all over was terrifying. I am convinced that small black holes exist that open up and swallow odd, flying bits. In addition to my indoor work space, these black holes also haunt my garage. I had a 10 mm socket disappear into one of these mini-black holes about ten years ago and it never HAS re-appeared.
So I blew the trigger assembly out with brake cleaner and simultaneously scrubbed the cracks and crevices with an old toothbrush. I put a little moly on the sear mating surfaces and lubed the rest of the assembly with Ballistol.
There’s a YouTube video about a guy that does an Anschutz 335 trigger adjustment. He replaces the factory trigger spring with one from a small spring assortment that can be bought at Harbor Freight or Amazon. You don’t even need to disassemble anything. Just hook the old spring out and push the new on in its place.
I shortened up the first stage but didn’t eliminate it. The resulting trigger is about 1 lb. 9 oz. on my Lyman trigger gauge which I find perfect for a sporting rifle. Is it as good as that gold standard — the Weihrauch Rekord trigger? No, but it lives in the same neighborhood!
De-burring the compression tube
Before the compression tube was ready to re-assemble I wanted to de-burr the inside of the cocking slot and trigger slot. To prevent me from gouging the inside of my freshly-honed compression tube with the ends of the file, I wrapped some duct tape around the ends. That’s always better than saying bad words when I slip.
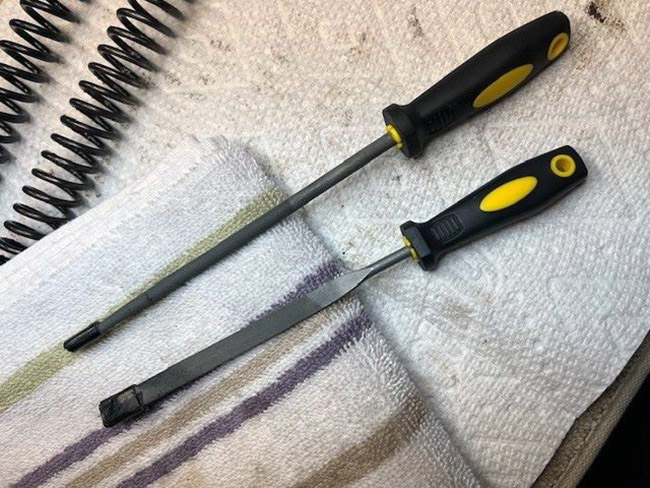
Wrapping duct tape around the ends of files that are used to de-burr things in the powerplant prevents nasty accidents.
Inserting the seal into the compression tube
At this point I’m ready to start assembling the gun. First to go in, of course, is the piston with its new seal. I always have a difficult time trying to get the seal into the compression tube without cutting it or me! So, this time I thought I’d try making something to help smooth the exercise. I cut a strip of milk bottle, wrapped it around the seal and secured it with an automotive hose clamp. I screwed down the hose clamp enough to have the seal slide right out of the milk bottle material and into the compression tube. I don’t think it could have gone any easier!
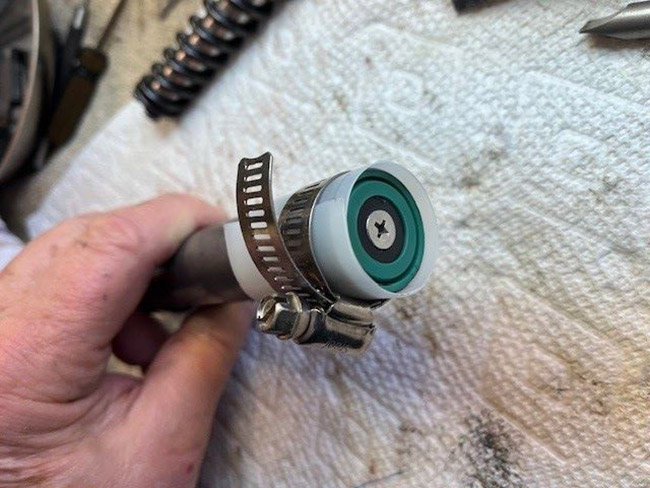
This trick helps the piston side into the sporing tube without cutting an edge of the seal.
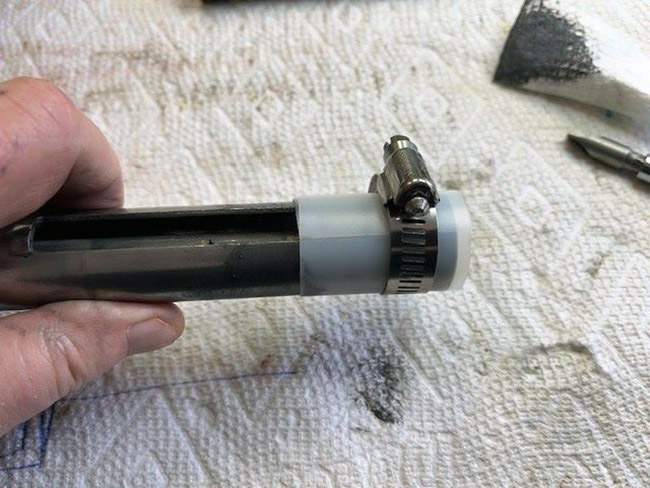
With the piston seal compressed like this, align it with the spring tube and push straight in.

Back into the spring compressor
I popped the spring in followed by the spring guide with its new washer and the trigger assembly. Then I put the whole thing into my spring compressor (see my 5 March 2018 report on the spring compressor).
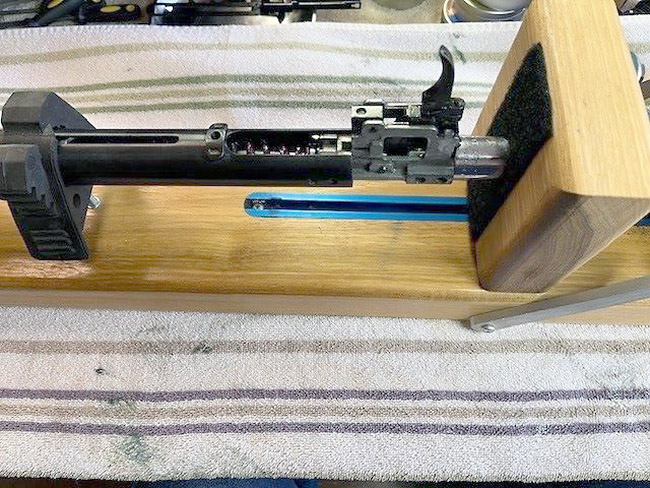
The 335 is in the spring compressor and going together.
The compressor pressed everything back into place and I inserted the trigger assembly retaining pins. I had to get my wife to help me wrestle the cocking link security strap and spring/tab retaining system that constitute the anti-beartrap device all back into place.
I figured out how the three barrel pivot washers went into place and moly’d them good. Having already blown everything out with brake cleaner I made sure to re-lubricate the barrel pivot lock release linkage with Ballistol. With a small amount of fiddling I got the pivot bolt back into place. I tightened it down, backed it off enough that the barrel moved freely and installed the security bolt to lock everything in place.
WHAT WAS THAT????
Then I popped the barreled action back into the stock. When I cocked it the first time something went “CRACK” about half way thru the stroke. WHAT WAS THAT??? I worked the barrel through the cocking arc, but no further dramatics. What was it? I guess all the internal parts just found where they wanted to be. Why do I mention it? Again, anyone that attempts rebuilding their sproinger should be prepared for stuff like that to happen. Happens to all of us.
Next time we’ll see how the new tune performs!

Motorman,
Thanks for this cliffhanger part three of your Anschutz 335. Couldn’t you at least have put in a sentence that the rifle performed functionally after that reassembly crack that you heard? Looking forward to Part 4 for the velocity and accuracy report.
Siraniko
Siraniko:
Yeah, the cliffhanger thing was kind of accidental. Not that I wouldn’t have done that on purpose if it had occurred to me!
O.K., to relieve the suspense, the rifle was fine. I don’t know what the “CRACK” was and probably never will, but it’s shooting great as we’ll discuss in Part Four (velocity). I’ve not done the formal accuracy testing (Part Five) although I’ve now put at least 300 or 400 shots thru it. At the end of Part Four I’m going to ask the group for some suggestions about the accuracy testing. There will then be a slight intermission while I test and write the last part.
Motorman
Eastern MO
Motorman,
All good. I would also be very spooked by a CRACK where none was expected, especially just when the assembly has just been finished and you are expecting everything to work smoothly.
Siraniko
“The resulting trigger is about 1 lb. 9 oz. on my Lyman trigger gauge which I find perfect for a sporting rifle.”
Motorman,
I concur; I’d be happy with that, and glad that I hadn’t taken the trigger apart.
Also, I really like your “strip of milk bottle and hose clamp trick”…neat! 🙂
I’m looking forward to seeing how she shoots.
Blessings to you,
dave
Really enjoying this series. About trigger lube. An old champion Three Position Smallbore match shooter taught me a trick on trigger cleaning and lubing. Only clean and lube with Zippo or Ronsonol fluid (maybe some light compressed air after soaking for really dirty ones)as these are clean , light and after evaporation leaves a light lube that will not attract dust or any other detritus that could muck up your trigger. This advice has served me well.
SSCajun:
As stated at the beginning of Part One, one of the reasons I wrote this series was to share how I’ve been doing things and get others to share THEIR tips with the group, so your comment was right on! Thanks!
Motorman
Eastern MO
That seems reasonable. Just do NOT attempt that if the piece has a plastic trigger…..
B.B.
Typo in the last paragraph. “rebuilding their springer should be prepared”…RR did not write the article!
Motorman, excellent report!
-Yogi
Yogi,
That was Motorman’s word and I left it in.
BB
Hah!
RR & Yogi:
My apologies for the typo! Thanks for your kind words, Yogi!
Motorman
Eastern MO
What is wrong with sproinger?
Motorman, thank you for another installment in this very interesting series.
I looked at the you tube video you linked and saw a great explanation of the trigger. You said, “I shortened up the first stage but didn’t eliminate it.” How did you accomplish that? Do the two trigger adjustment screws work independently from each other or is there an interplay between them? Did you replace the spring as well?
Roamin:
There are two adjustment screws, one to the rear of the trigger and one actually IN the trigger. The former adjusts how much first stage there is and the latter is the sear engagement (how light the trigger is). I like a little first stage trigger movement to tell me “O.K., Dean, we’re about to let the shot fly!” followed by a nice crisp second stage let-off. The second stage doesn’t have to be feather light, just crisp and predictable. For a target gun I like the feather light stuff, but for a sporting rifle like this I actually prefer things right about where they landed.
Motorman
Eastern MO
Thanks for the reply, and I agree with you on all counts. I am looking forward to this.
I really liked the tip about the duct tape on the end of you file. Use no. 3,472,126 and counting!
Roamin,
You ARE including the duct tape wallet I made, right? 🙂
Of course! That was use number 3,327,432, IIRC (if I recall correctly). Or was it -431? Drat! Now I have to go back and recount them all!
;o)
RG,
You are also including the many uses that those two fellers on that there TV show came up with also, are you not?
You mean MacGyver? That was one of my favorites. But my favorite episode didn’t feature duct tape. It was when he replaced a broken belt in a car with his female companion’s pantyhose. The look on her face when he asked her to take off her pantyhose was priceless.
MacGyver? Please.
I was referring to Jamie and Adam on Myth Busters.
MacGyver? Really?
Funny thing is, I initially thought you meant Mythbusters, but I recalled MacGyver from my younger days and wanted to share the memory. Mythbusters is admittedly unscientific, and I got bored with those two just blowing stuff up every episode. MacGyver used science and knowledge to solve problems. That is what appealed to me.
RG,
I thought just the opposite. I watched one episode of MacGyver and knew, like everything else in Tinsel Town, he was full of it.
You should buy my waterfront land I have in Florida. We can look at it at low tide. 😉
Sounds like I have to go back and watch all the Mythbusters reruns and count up some more uses for duct tape.
Roamin: the first myth that there are inanimate objects. Having done repairs on bicycles, mowers, automobiles, and air guns, as well as appliances, I KNOW that they are alive and waiting to mess with us.
One REALLY experiences this if one has ever crawled under a vehicle to change oil in the crankcase. If one does NOT catch that pesky oil pan bolt, that SOB will run away to the darkest part of the car. Every damned time. It seems inanimate, but what it REALLY is is patient; waiting for the opportunity to bedevil us.
There is concern today about AI (Artificial Intelligence), but I think Inanimate Intelligence has been haunting us all along.
Think what you want on the subject, but I’ve had dirty tricks pulled on me while doing mechanical work for most of my life. It’s not the aliens “out there” we need to worry about, its the plugs and fastener bits in our own homes. Nothing is worse than the runaway wheel lug nuts changing a tire on a rainy night, the bastards REALLY try and escape! You’ve been warned…..
There are at least two episodes they use to explore the uses of duct tape.
Remember – TV is Googlepoop-free. Not necessarily poop-free, though.
Give me some duct tape and baling wire and I can fix the space shuttle!
Motorman
Eastern MO
Ha ha.
Astronauts actually do use duct tape to seal air leaks in the case of emergencies.
“I am convinced that small black holes exist that open up and swallow odd, flying bits.”
And after the trigger assembly is put back together, what to do with the thingamajig that got left out?
Deck
Motorman,
I thank you for all of the little tips you have included in your Part 3 report. I have used the hose clamp on the piston seal tip myself. Your illustration of all of these tips can be of a big help to so many.
Agreed; now some tips on acquiring Round Tooits and Courage to tackle these projects, sez FM The Cowardly Airgunner.
LOL! Round tuits just happen to show up every once in a while.
As for courage, well…
Borrowing some from the Cowardly Lion is an option.
He did eventually find some.
Fawlty:
Every time you fail and get back up, you get stronger. Every time you fail and stay down you get weaker. Me? I’m a knot-headed old German that is too dumb to know when to quit. The persistence that my boss used to admire is the stubbornness that frustrates my wife!
Motorman
Eastern MO
Motorman,
Vielleicht ein bisschen mehr Gelassenheit mit Weibchen, nicht wahr?
shootski
Sie ist seit fast 50 Jahren mit mir verheiratet. Sie kann mich tolerieren. Außerdem ist sie noch sturer als ich!
Motorman
Eastern MO
Google Translate is fun to use! HA!
FM has some of those knot-headed Teutonic/Nordic genes in his DNA – which in the past has landed him in trouble with bosses and Frau FM. Passed down from Celtic/Scandinavian ancestors via N Spain and possibly Denmark, as there was a Danish raider known as Ulv Galiciefarer who raided Galicia, where my dad’s family came from, during the Viking era. When we did his Ancestry study, turned out he was 10+ percent Scandinavian. He had a very nice disposition but leavened with a pretty strong stubborn streak.
FM has picked himself up after getting his arsch knocked to the ground more than once. So far, not the case with the Casa FM sproingers because they’re all youngsters and working very well so, “first, do no harm, FM.” Do believe, as RR suggested, it would be a good idea to secure a spring compressor for the inevitable day when one or more of the springy beauties needs attention from FM or his heirs. Appreciate the advice, Motorman!
Motorman,
Thank you for another enjoyable segment in your series. Our springers really do need to be serviced every now and then and it’s good to get elbows deep when you’re doing it. I got all my tips in doing this from reading BB’s blog and things have worked out well. Your tip on protecting the piston seal as it goes into the compression tube is one more to keep in mind! It’s great for us readers to see how things get done so that we too might get up the nerve to do it ourselves.
One thing I have to ask, did you grease the piston below the seal and at the skirt, before reinstalling? I ask because recently I didn’t do that and the piston started scraping the inside of the tube and soon it began to gall. Eeek! A worse sound than fingernails scraping a chalkboard. I didn’t figure out what was happening until I got inside. It’s OK now, with four old school buttons centering the piston skirt in the tube and moly dabbed all around. I would rather have avoided all that.
My guess is the scary CRACK sound was the washer settling in with the spring guide. Just a guess.
Looking forward to reading how things turned out mechanically and you’ll show us how she groups! Nice write-up!
Regards,
Will
Will:
Yes, the piston seal, piston head and piston tail all had a thin coating of moly before they went in, as well the inside of the compression tube had moly burnished into it. EWWW! The sound you described sends chills up my spine! Glad you figured out what it was and installed the buttons!
You know, I think there’s a good chance you are right. Something obviously wasn’t seated the way it wanted to be and when I started compressing the spring it all suddenly snapped into place. Scared the **** out of me when it happened, tho!
Motorman
Eastern MO
For those of you who have not yet braved building or acquiring a spring compressor. Do it.
BB many years ago bought one from someone whom I cannot remember at this moment. I bought a slightly improved copy from Sun Optics a while back. Of course it is no longer available. But fear not. There are several companies, including Air Venture/Pyramyd AIR who offer readymade spring compressors. In Europe, there are several companies that make spring compressors for the masses. There is a very nice-looking one coming out of the Netherlands.
If you have rudimentary handyman skills, you can build your own spring compressor as Motorman has done. There are geegobs of plans on the internet. Check them out and pick one. Being able to rebuild these “old gals” is an experience you should not pass up.
RidgeRunner,
hear, hear !
I agree to the main spring compressor’s usefulness for all airgun owners. 🙂
————
Would you remember the name of that Dutch mainspring compressor, or other details about it, to help me find it please?
You see, the thing I have been using is my very own bodge. Too embarassing to show even! 🙁
I could do with a better one, especially if it’s safe to use too! 🙂
The one we see in use in the above article, is the “Spring Doc” that Motorman purchased from the maker, Greg Lindsey. Though very nice, a source closer than California would be nice for me, and other Europeans. 🙂
3hi,
Pooky. I am unable to find that one now. There are a few other ones on the market. If you have a look see you might find one somewhere.
If you have made one that works, who cares what it looks like.
I FOUND IT!
https://www.springcompressor.nl/en/
RidgeRunner,
WOW, THANKS – bookmarked !
Looks quite compact but as long as one of those plastic discs fits the action it should work. I need to peruse some more… 🙂
Thanks again!
PS By the way, the beauty of my home built thing begins with the raw wooden palette plank and ends with a weld that has long since failed (it was my first). Also, I was interested to experience what happens when the airgun’s action is not secured against sideways movement… 🙁
I read somewhere that trigger adjustment screws on this rifle can be easily turned beyond the point of no return.
Deck
Deck:
Absolutely! That’s an additional reason why I’m content with the 1 lb., 9 oz. adjustment of this trigger.
For that matter, I’m sure this is NOT the only gun (springer, CO2, firearm, crossbow or whatever) with a trigger than can be adjusted to the danger point. In my not-so-humble opinion, moderation is a fine idea when tinkering with triggers. When you’ve got a reasonable result adjusted in, take it somewhere safe, cock it and bump it around some to see if you can get it to discharge accidentally. This stuff is only fun when you can do it safely!
Motorman
Eastern MO
Motorman
A good reminder to all of us. Thanks for your excellent report.
Deck
I am confused by that milk bottle plastic:
Is the clamped-on plastic collar itself also meant to enter the compression tube opening, ie is it supposed to work as a funnel to shoe-horn the piston-seal past the edge of the compression tube opening? If so, then that must be quite a tight fit and somewhat of a struggle to squash it all in… and yet, Motorman claimed it was easy.
I need help, please!
Hix3
I can’t be sure because MM didn’t mention it in the text, but it looks, in the pictures, like he had two pieces of milk jug and two hose clamps. One on the piston, around the seal, and another on the end of the spring tube. The one on the spring tube would guide the piston and the one on the piston would compress the seal.
Getting the seal past the slot in the spring tube wasn’t mentioned, but as he did chamfer those edges, it must have worked out well.
Ed
I think he’s just sqeezing the seal to be the same diameter as the piston. When you butt the plastic strip up against the cylinder, lining up the plastic with the cylinder opening, the seal and piston will slide through the plastic strip and right into the cylinder. Not quite like a funnel, but almost. More like a bridge.
Once the seal is inside the cylinder, it will expand to the inner diameter of the cylinder and the piston follows along. Care must still be taken along the cocking slot so as not to damage the seal, but hopefully, the sharp edges have all been dulled well enough.
Hi3:
A funnel was not the intent. The milk bottle does not go inside the compression tube.
When I was in high school I worked in a VW repair shop where we actually rebuilt engines. From time-to-time they’d re-assign me from grease jobs and brake repairs to helping the guy that was doing the engine work. There I was introduced to the idea of a ring compressor…a tool that compressed the rings into the piston so it could be slid into the cylinder.
That was my inspiration for the milk bottle and hose clamp idea. I’m just trying to squeeze the piston seal’s diameter down so it’s slightly smaller than the compression tube and it slid right in as hoped. Amazing! Something went right!
Motorman
Eastern MO
hihihi,
Picture worth thousand of words:
Sorry bad LINK.
Just do a web search on Piston Ring Compressors
Motorman reminded me of these since it has been years since i rebuilt a Karmann Ghia (VW) or Porsche engine.
shootski
shootski,
Please stop listing that website. It is redirecting folks.
BB
B.B.,
Sorry!
Edited it out of my reply.
shootski
Thank you gentlemen,
I really appreciate all your help. And yes, I think I’ve got it now! 🙂
My old old cranial ballast must’ve shifted so I wasn’t looking straight, ie now that I understand, I see that Motorman had actually written, “With the piston seal compressed like this, align it with the spring tube and push… “.
Thanks again! 🙂
We are going way off subject here, or are we?
I just attempted to do a search on Pyramyd AIR. What a mess. I do not know who is in charge of that site, but they should probably be fired.
I also noticed this morning that they cannot leave the blog site alone.
What was your specific problem?
I have suggested in the past that they allow you to sort the ammo selections by lowest cost per shot. That helps to counter those who sell at a low price per tin, but put fewer pellets in the tin. So far, they have not taken up my suggestion.
Just getting to the pellet selection is almost impossible. It has become almost a worthless effort. They have become a company that is too busy selling other junk that airguns are quickly falling to the wayside.
Junk is relative.
Here’s a link you can save to your favorites bar. One click and you’ll be in pellet world.
https://www.pyramydair.com/ammo/pellets?sort=asc
RG,
Thanks, but no thanks. I would rather communicate with them and see if they can straighten out their mess rather than have a work around. If not, I will just move on and find someone else to spend my money with.
Motorman,
Very nice write up, thank you for sharing. I especially enjoyed your good clear photos and technical explanation. I like your tips on covering the ends of your files and for inserting the piston seal into the chamber. I usually lightly chamfer the rear opening of the receiver to help this process, and then tuck the seal under with a small screwdriver before passing the end of the cocking slot.
Feinwerk:
Thanks to you and all the others that have made such kind comments about this article. Frankly, I’ve got hours and hours into this effort, but it’s worth it when others are benefited and find pleasure in reading about it.
Even with the milk bottle and hose clamp, it’s probably an excellent idea to chamfer the rear of the compression tube as you suggest. See, I just picked up a great idea to incorporate into the next rebuild I do! That, boys and girls, was much of the point in doing this article!
Motorman
Eastern MO
Motorman,
Would a Ring Rider be of any practical use?
Have very much enjoyed your guest blog.
Looking forward to the shooting.
shootski
After you get the trigger adjusted I recommend that you apply a little Vibrotite to the trigger adjustment screws. I had a 335 and those screws kept moving out of adjustment.
I may have missed it but what power level are you looking for with your rifle. I read that they were made in three different power levels. I think this was to be legal in different countries.
David Enoch
How would one engineer the same model of springer with different power levels? Would it be simply a matter of spring specs? If so, then one could get a low power version and tune it up to a higher power level with a different spring. Or would there need to be different size transfer ports and cylinder sizes as well?
Roamin,
Different piston strokes. Look at the Beeman P1.
BB
Not to suppose I am any kind of expert on these models, but I believe the factory specification for the U.S. version was 700 FPS (about 215 meters / second?).
Motorman
Eastern MO
Motorman, you are in the range. Here’s a link to the Crosman owner’s manual for the 6300 and 6500 Challenger (see page 4):
https://support.crosman.com/hc/en-us/articles/203361324-6500-Owner-s-Manual-EVP-1986
Motorman
I get 696 fps with a range of 9 fps on 10 shots with my Crosman 6500 using AA Express 7.87 grain pellets.
Deck