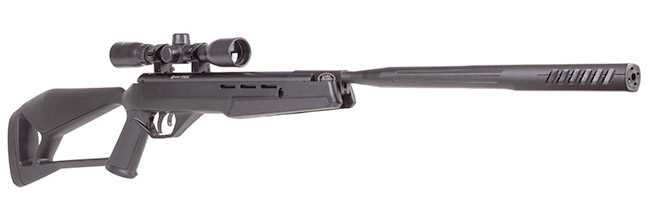

Crosman Fire breakbarrel air rifle.
This report covers:
- My motive
- Mounted the scope
- Sight in
- 10 meters
- Whole target
- First group
- Adjusted the scope
- Second group
- Adjusted the scope a second time
- Third group
- Air Arms 8.44-grain dome
- Trigger pull
- Discussion
- Summary
I have a report today that goes way back to the start of this blog. Today I scope the Crosman Fire and shoot it — EXACTLY AS CROSMAN SENT IT. In other words — no funny stuff and aftermarket parts. The rifle, scope and mounts as sent from the factory.
My motive
I’m doing this for a reason. Sometimes this is the only rifle a person can afford. They have to use the scope because there are no open sights and for sure they don’t have any other scopes or rings to use. This is it!
And in all likelihood they have never read this blog. None of the stuff I would normally do is known to them. They are using the rifle exactly as Crosman sent it. And that is how I will test it.
Don’t worry — I have a plan. And it isn’t to say bad things about the Fire, so you can relax. What I’m doing is starting at the beginning and doing what needs to be done to wring out all the goodness the Fire has to offer. And I believe there is a lot.
Mounted the scope
The first step was to mount the scope.

This is what comes with the Fire.
The scope mounts differ in a way I will now show you. There is a definite front and back mount.

Here you see the underside of the rear scope mount on the left. That pointed thing is the end of an adjustment screw and it goes into the spring tube hole seen on the right. That keeps the scope and mounts from walking backward under recoil.

And here you see another difference between the front and rear scope mount. The rear is held by two screws while the front is held by just one. The two screws are needed because of the stop pin you just saw. Both ring caps have two screws.

And there you have it. The scope is installed.
I will not go into how to “level” the scope’s reticle because we have discussed it so many times recently. I will just tell you that I made the vertical reticle appear to bisect the spring tube when I brought the rifle to my shoulder.
Sight in
Now it’s time to sight in the Fire. I will do that with Crosman Premier 10.5-grain domed pellets. Before I sight in, though, I have something to tell you.
In my experience this rifle will shoot too low at all distances and will not be correctable with the scope adjustments That is one big reason I’m doing what I’m doing today. It’s not to embarrass Crosman. It’s to demonstrate to all the new guys what breakbarrel air rifles are like.
I actually wrote this section of the report before I shot the rifle the first time. I was almost certain it would shoot low and not be correctable. I swear that I did it because of my experience with breakbarrels and not because I shot the rifle first and saw.
Normally I would have put one or two shims under the scope tube on the rear ring saddle to elevate the rear of the scope. That makes the scope “look” down, and that brings the point of impact up. I have seen it hundreds of times. It’s just experience. Been there, done that, got the t-shirt and wore it out!
Today I didn’t do that — just to see what would happen. But since I was so sure it would shoot low, I mounted the target paper up and down to give me the maximum room to see the pellet hole.
Now let’s get back to the sight in. I stood 12 feet away and aimed at the center bullseye on the right side. The pellet hit the paper 2-3/4-inches below the aim point — from 12 feet!

I aimed at the center bull on the right side. The shot is aligned pretty well left and right but impacted 2-3/4-inches below the aim point. Remember, I’m shooting 10.5-grain Premiers.
10 meters
Now I backed up to 10 meters and shot the rifle off a sandbag, using the artillery hold as best I could. With the Fire’s thumbhole stock you can’t get away with the classic artillery hold.

Whole target
But before I show you that first group I will show you all the shots in this test. That will make it easier to follow along.

There is every shot fired in this test. You can still see the first shot on the right. It touches the outer ring of the bottom right bull at almost 12 o’clock. I will talk you around the target as we go.
First group
I then shot five shots without adjusting the scope from the first shot. I thought the group would rise, but instead it sank lower by more than an inch. It also went more to the left. The five shots landed in a 0.673-inch group, which isn’t bad for reasons I will share in a moment. I’m still shooting 10.5-grain Premiers.

The first group of 10.5-grain Premiers dropped lower than the sight-in shot and also went to the left. It measures 0.673-inches between centers.
Why is a 0.673-inch group good at 10 meters?
The group is good because the 4X32 scope that’s on the Fire isn’t parallax-adjusted for 10 meters. The bullseye appears somewhat fuzzy. I’m doing my best, but it’s hard to be precise.
Adjusted the scope
After seeing this group I adjusted the scope up. How many clicks I can’t say — a couple full turns of the adjustment wheel. I also adjusted the scope 7 clicks to the right. The clicks are there and positive. Since both of these adjustments relax the tension on the erector tube return spring, I watched for stiction and scope shift.
Second group
For the second group I aimed at the center bullseye on the left. This group of five Premier heavys went two inches higher but was still that much below the aimpoint. And it was still left of center. This group measures 0.983 inches between centers.

Five Premier 10.5-grain domes went into 0.983-inches at 10 meters.
Forget the group size. We’re learning stuff here.
Adjusted the scope a second time
This time I adjusted the elevation up until the adjustment wheel stopped. This is as high as the scope will go. I expected to show you a blown (wide) group, but that did not happen. I also adjusted the scope 6 clicks to the right.
Third group
The third group was also shot with 10.5-grain Crosman Premiers. The first shot landed in the bull I was aiming at. The group measures 1.008-inches between centers — BUT — the last 4 shots are in 0.284-inches at 10 meters. Ladies and gentlemen, the Crosman Fire can shoot! That group tells me it can be accurate because the scope is adjusted as high as it will go and the rifle is still grouping. In fact the first shot may be from stiction and the last 4 are the real group. I have more testing to do and you are witnessing every wrinkle in the fabric.
The third group is large, at 1.008-inches between centers, but the last 4 shots are in 0.284-inches at 10 meters. THAT, my friends, is a group.
Please note that although the first shot did hit the bull I was aiming at, the main group is still too low, even when the scope is adjusted up as high as it will go. So, my comment about always shimming the scope is valid.
Air Arms 8.44-grain dome
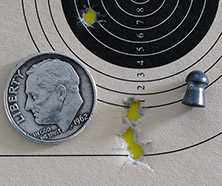
I then shot a final five-shot group with the Air Arms 8.44-grain dome with a 4.52mm head. I wanted to see if it might go higher than the Premier. But it didn’t. It landed two inches below the aim point, which was the center bull on the right. Five shots went into 0.591-inches at 10 meters, which, given the fuzzy aimpoint, isn’t bad.

Five Air Arms 8.44-grain domes went into 0.591-inches at 10 meters. The pellet is next to the very first shot from 12 feet.
Trigger pull
The trigger pull is long and vague. And, when coupled with the fuzzy bullseye, it did make shooting accurately difficult because I never knew when the rifle was about to fire. This is one case where I have trouble with the trigger. I do think it can be learned though. My old Beeman C1 had a bad trigger until it broke in. I suspect that’s what is needed here.
Discussion
I hope you have seen that a breakbarrel will almost always shoot low unless the scope is adjusted for it. I hope you have seen that the Crosman Fire has a lot of potential. I’m going through this test step-wise so everyone has the opportunity to see what can be done when these things happen.
Summary
I think the Crosman Fire is a great buy for those who are willing to put in the effort it takes to make it perform to its potential. That’s another reason I will go through this test slowly and reveal everything I’m doing as we proceed. I think this is a good one! And no, I didn’t clean the barrel before the test. A newbie wouldn’t so why should I?


Tom Gaylord (B.B. Pelletier), what an interesting idea, to deliberately treat the unboxing and first use like a newcomer, but I doubt that is who Crosman intended the Fire breakbarrel for.
Surely, for a “newbie”, they would have packaged the air rifle, ready to shoot right out of the box, ie scope attached and sighted in, shooting glasses and some pellets included?
hi3,
I hate to burst your bubble, but this is exactly the way a newbie would get their first airgun from Crosman or just about any of the other companies. All of that mounting and sighting in would take time. Time is money.
They would also find out that the scope they tossed in with the air rifle is useless for such. Crosman knows that, but the newbie doesn’t. The newbie has likely looked at the price of scopes and knows “cheap” scopes are likely more expensive than this entire setup. “What a bargain! A free scope and mounts included with this purchase!”
To help them mount the scope properly, they have to go out and buy one of those scope mounting kits with all the levels and other bells and whistles to help confuse the buyer even more.
They try to adjust the focus of the scope so they can see the target clearly until the eye piece falls off in their hands. Oops! “Maybe nobody will notice” as they screw the eye piece back on. They do not know that if they are lucky, the ocular lens can be adjusted to make the parallax useful. They also have no clue on how to do that.
You might also discover that good quality open sights are more expensive than the cheap scopes and will require more engineering and manufacturing time to install.
Safety glasses? If the newbie should figure out that they are not a bad idea, this is an accessory that the airgun company can make another outrageous profit on.
Pellets? Besides adding to the cost, which ones should they include? The inexpensive domed pellet that actually works or should they include the “fisherman’s” model. You know, the pellet that is “guaranteed to expand to forty times the caliber on impact”, assuming you can even hit the side of the barn while standing inside.
Summary. Most of the companies that sell such things only care about the profit margin, not the newbie’s shooting experience. Many of them have probably not shot their own product and have no clue on how to go about it.
RR,
your story sounds *very* familiar. I wonder why that is 🙂
Stephan
RidgeRunner, it appears that Crosman offer their “Crosman Fire (.177)”, either as “(REMANUFACTURED)”, whatever that means, or, “Bundled with a FREE pellets and spinning target”.
Looks like we’re both wrong. 🙂
hi3,
I had a very hard time finding what you were talking about until I went to Crosman themselves. Take note that PA sells the Fire for $139 and Crosman sells the Fire with the Crosman pellets and Crosman spinners for $155. That is with no distributor or dealer charge added to the cost.
Remanufactured in this case likely means it was returned for some reason and rebuilt by the factory. It should be “as good as new”. I have purchased remanufactured items from PA. Absolutely no regrets there.
As far as buying directly from Crosman, I have always found a better deal elsewhere. Not that I have a lot of Crosman brand stuff here. Overall, I have not been impressed with their offerings. There was a time when Crosman offered some real nice airguns, but I do not know whether they have been through something like “Six Sigma” since.
A newbie is likely going to purchase the Fire or similar from Wally World or such and will buy the “awesomest looking” pellets available there. The newbie is not likely going to hunt around for a deal like this online and would likely discover that this is not that great a deal anyway.
BB,
interesting coincidence that you’re testing a “beginner” setup.
A friend (who has shot my airguns before) told me he had access to an outdoor property where he is allowed to shoot some days ago. He also asked me to recommend an air rifle..
At first, he was considering models like the Diana Eleven, but I was able to convince him to spend a little more and get something with a Rekord or T06 trigger. We found a Diana 35 with a metal front sight for a reasonable price and he went for that.
I think models like the Diana 34/35/350, Weihrauch HW30S and HW50S are probably the sweet spot for value if you’re looking for an adult airgun.
Today’s report also shows why I wouldn’t start with a scope, especially not a cheap one. You’re going to have problems like BB had. But a beginner doesn’t know what BB knows and he doesn’t know how to shoot yet. So there’s going to be endless tinkering, doubting your abilities and equipment when you should be learning how to shoot (ask me how I know…).
So, I’m now looking forward to trying the Diana (I expect it to be very similar to my 31(34). I’ll also definitely join the outdoor shooting if I get the chance.
(And if my friend decides airgunning isn’t for him afterall, he shouldn’t have much trouble selling a Diana 35…)
Stephan
Tell your friend I’ll take it. Of course, that is assuming you do not take it first. 😉
Stephan
I could use a second Diana 35. They do not disappoint!
Deck
BB,
Probably for your last part of the series you could explore what a newbie might do to make it better? Although I would suppose that would void the warranty. Things like shimming the scope, any trigger modification (if possible), adjusting the scope at the front lens to accommodate a closer range and maybe filling the hollow stock (if accessible).
Siraniko
Siraniko,
I think what I’ll do will accomplish what you asked but I don’t know if I will wait until the end to do it. My plan is to back up to 25 yards and shoot again, then shim the scope and show how that fixes things.
As for the stock remember that I said this one doesn’t feel hollow? I don’t think anything needs to be done there. I wouldn’t have chosen a thumbhole stock to begin with, but a lot of people do so I went that way.
I will watch the trigger to see what can be done. If there is anything I will report it.
Now as for adjusting the scope’s parallax, i’m on the fence. It would void any warranty, so I need to think about it.
BB
You know the newbie is not going to figure out to shim the scope. If they do, they will crimp and/or bend the scope tube.
Likely this thing will end up in the back of the newbie’s closet or in a yard sale where they will swear they can shoot out the eye of a newt at 500 yards with it. Either way, they will never touch an airgun again.
Truthfully, I am glad you are taking this approach with this airgun. It helps to remind us “old geezers” of the growing pains we went through.
Some old geezers are still going thru growing pains but fortunately they’ve got access to good “resource people” who help ease the pain. 😉
BB,
Did the scope come with any indication of where it will be parallax free? I think too many none adjustable scopes are set much too far out for airgun use. Also, is it one of those scopes marked “1 click = 1/4″ @ 100 yrds”?
Because the pellet is traveling in an arc, isn’t it possible that the impact point will be much higher as yardage increases. Is the scope mounted fairly high above the bore?
Half
Half,
No indication of parallax distance that I have found.
Yes, at greater distance (25 yards) the groups should rise. That comes next.
BB
B.B,,
The scope could be a Center Point CP4032. Parallax setting of 30 yds, 1/4 moa per click. -Don
https://www.crosman.com/product/centerpoint-4×32-riflescope
https://support.crosman.com/hc/en-us/article_attachments/201667964/4032A515.pdf
Don,
Thank you. I would have guessed 25 yards.
BB
BB,
You want to know a cheap trick to reduce parallax on this scope without re-parallaxing to your shooting distance?
Tape a piece of cardboard over the objective lenses- side. Now cut a small circular hole into the middle.
The image will appear darker, but much sharper.
It’s s exactly the same principle as the tiny holes of match aperture sights make you see front sight and target sharp, but darker.
The smaller the hole, the darker but sharper your target’s image will be.
By the way: This shows how large objective lens size is not always a good thing. The tiny 4×20 scopes have less parallax blurriness due to their small objective lens.
Mel83
Wow!
Deck
You can see photos of Marines in Iraq and Afghanistan who covered their scope’s objective with plastic pieces with a small hole cut in the middle. Probably not to improve their depth of field, but to reduce the brightness when operating in daylight conditions.
B.B.,
The most interesting group was the third group, since it was shot with the scope at the end of its vertical adjustment, yet the scope still allowed the pellets to group. It makes one wonder if, perhaps, someone at that scope manufacturer read this blog, then though to himself, “Hey, that B.B. fella said many scopes don’t work at the end of their upward vertical adjustment…maybe we should put more ‘sproing’ in our springs so that doesn’t happen with our scopes.” It will be interesting to see just how much you need to shim that scope to get it to be on target at 25 yards. 🙂
Thanking you for all you do,
dave
Dave,
I was going to say something but refrained. It seemed to me that the vertical adjustment knob is limited in how far it will adjust. If so, it’s a great way to solve the problem.
BB
A low cost solution, for sure, hahaha! 🙂
B.B.,
I thought (dangerously) that scopes are manufactured limited to being able to still ‘box the reticle’ at full throw of Elevation and/or Windage?
Maybe not, huh!
shootski
Much appreciate this series on a modern lower cost springer. To me the Fire is an example of an airgun that could be in the “good enough” category for many. Kinda like getting a first car that provides transportation with a warranty or the “starter” home concept , which may longer be viable, more prevalent a few decades ago.
I agree, but in light of yesterday’s blog, it has to deliver on it’s promises or it will ultimately be a disappointment.
I seem to have lost a day. I though yesterday’s post was today’s, but my comment [/blog/2022/07/whats-important/?swcfpc=1#comment-491768] and others’ would work just as much here as there.
I was thinking this week of guns that had so much promise but never were successful and why. Bronco, Walther Terrus, Diana 34 EMS, Sig ASP20. Only the Diana seems to be still sold, and I don’t hear much fanfare. These are all described by us over the last week, but why aren’t they commercially successful?
B.B.
I wish you had started with blog off with the last paragraph. It would have save me from having to read about a rifle with a bad trigger. Deal breaker for me. Do not pass go, do not collect $200.
-Y
BB
Do you believe triggers could be vastly improved at a reasonable cost for airguns under $250? Triggers that can pass the lawyer trigger test? Could the 2 blade trigger like the Bronco for example be designed so that the first blade required a 3-4 pound push forward before the second blade could be pulled back with a 1 pound effort? I know that double set trigger guns are expensive but somebody needs to think outside the box. I’m not thinking about match triggers, rather those airguns that often wind up in the hands of a novice. I’m speculating there are thousands of folks that read this blog alone who would be buyers if also accurate. Barrel accuracy seems to be getting better in this price point.
Deck
Deck, I agree that even a moderately good trigger will increase the accuracy potential and overall satisfaction with the airgun. Which, in my opinion, is what you need for an intro airgun. My new (to me) Walter Terrus (a budget airgun as well) does not have a “target” trigger, and it is pretty heavy, but it breaks cleanly. Actually, it reminds me of my Remington 700 bolt action deer rifle trigger. Ignoring the Walther’s first stage, which is only adjustable for length, you just build up the pressure on the trigger until the sear releases. You don’t really feel much travel in the second stage. I am pleased with that for hunting and pesting purposes. So far, I am getting 0.4 inch groups at 10 yards with certain pellets.
I was inspired by recent blogs to pull out our family’s first air rifle, an Umarex Embark. This is supposedly designed to be the official rifle of SAR competitions, but the trigger has a looooong second stage pull. After about 1500 shots, the grit and creep are much reduced, but as B.B. describes this gun above, you really never know when it will go off, and it takes a LOT of concentration to get it to shoot accurately.
What is the standard for accuracy of an intro airgun? I think it depends on how it is marketed. If you are going to market it for plinking, perhaps minute of popcorn at 20 yards is enough. If for hunting, you need to do better.
Pop can, not “popcorn.” Spellchecker got me again.
BB and everybody,
Is there any practical way to short stroke this powerplant to decrease the power output?
Siraniko
Siraniko,
A practical way? I don’t know of one.
BB
BB,
I’m thinking that an extension of the front of the piston would decrease the amount of swept volume of air. This would also decrease the distance the piston travels, hopefully decreasing the vibration felt on firing. I wonder if somebody (maybe Ed Schultz?) can make this into a double cock power plant? The first cock at around 11 fpe while full cock develops full power. Since this is a gas spring piston I suppose the sear connects to the outer rim of the piston body. Shifting the position of the sear to accommodate two locations might necessitate a sort of bull pup configuration with accompanying spongy trigger though.
Siraniko
When I first read about that very low first group and after employing some rough calculations I thought wow at four meters that would require approximately 393 clicks to move the center of that group back up to that center bullseye!
After thinking about it a little more I thought that doesn’t sound right and re-read your description of the group and noticed you did back up to 10 meters which would require approximately 143 clicks to move it back to center and 23 clicks of windage. LOL
Chachoze,
Don’t overlook the height of the scope above the centerline of the bore. At 12 feet it matters. At 10 meters, not as much.
BB
BB
Tom,
You wrote that while I was writing another NOVEL!
shootski
Chachoze,
I agree that rereading the target process that B.B. used takes more than one read to be sure you follow the breadcrumb trail with NO deviation, LOL!
BUT 2-3/4″ LOW at 12′ not really all that WOW….
The WOW is that when B.B. backed up to 10 the POI (Point Of Impact) didn’t climb and actually dropped a bit more! I used a mensuration technique on the scope. and ring photograph to get the scope Objective size at approximately 2″ diameter and then the rifle and scope mounted photograph to get approximately 3/4″ of height of the bore center to scope center. So at twelve feet having the projectile hit 2-3/4″ below the apparent POA (Point Of Aim) even though we don’t know IF B.B. started with an optically centered scope. The fact that it dropped more at 10 could be ‘stiction’ or something else.
Mounting and Sighting in an optical system is a challenge for most new to shooting folks and can be very FRUSTRATING as I’m certain many retailers know all too well with returns and BAD reviews.
I think that is why those 10 shots and scope mounting options that PA offers is all about!
I mentioned that B.B. didn’t tell us if he started with an optically centered scope or at least one mechanically centered with click counting from turret stop to turret stop; he did however write, “The rifle, scope and mounts as sent from the factory.” so probably not.
Because he does this scope mounting so often he already “knows” the STUFF to do to get on paper at the DNA level and hopes new readers will search his Blog for the How To pieces.
I think a not optically centered scope is a possibility…we shall see.
I noticed that some airgun manufacturers are providing 20 MOA scope rails and that is a good thing. Doesn’t add much to cost and helps with scopes shooting to POA especially. right out of the box and at typical sight-in distances new folks (to shooting/airguns) use; if they bother at all with sighting-in!
We will see what B.B. finds in his future parts to this airguns review.
shootski
I agree with Chachoze, that based upon the angle between line of sight (POA) and POI, the second group did rise.
The first group, shot from 12 feet (4 yds), was 2.75 inches below POA. This is an angle of about 91.7 moa (367 clicks) low.
The second group, shot from 10 meters (10.94 yds) was “lower by more than an inch.” For discussion, if it was 1.25 inches lower, this group was 4 inches below POA. This is an angle of about 36.6 moa (146 clicks) low.
The second group rose by 55.1 moa,
I used the estimate of 1 inch at 100 yds is 1 moa and the shooting distances as muzzle to target.
Don
B.B.,
I think you are doing a great service with this report, to both the manufacturer and the potential new buyer, by telling it like it is. It’s hard to imagine a more clear cut case of failure and buyer’s remorse in the making.
Let me sum it up: you will not hit anything you’re aiming at with this combo, unless it’s literally the side of barn!
This would have to be extremely damaging to Crosman in the case of new buyers who don’t know about scopes or shimming.
Pyramyd Air’s description of their 10-for $10 service, listed on the sale page for this rifle, says nothing about mounting the scope and sighting it in. They DO have a 20-for-$20 service that states that it includes sighting in the scope, but it is not listed on the page for this rifle, apparently not available. Is this an oversight? Or do the techs already know that shimming would be required, and they do not include shimming in the 20-for-$20 service? It certainly does require more set up time and may not be practical for the stated $20 price.
I did a quick spot check on the PA website, and quickly found another Crosman nitro piston offering, the Vantage, that is bundled with a scope and DOES show the 20-for-$20 service as an available option:
/product/crosman-vantage-air-rifle-with-nitro-piston?m=2806#PY-S-14
If they did offer this service for the Fire, and if it included shimming of the scope, then the lucky new buyer who chooses this option might actually have some fun with it.
Regards,
Feinwerk
Feinwerk,
Hopefully we’re going to make several new buyers happy with this report.
BB
Hello BB
I hope so too. Shimming was not something I knew about early on when I started as an airgunner. I think it would be very helpful if you could include a link to one of your blogs describing the shimming process, for those who have bought this rifle or one like it, and need to know what to do.
Somewhere in my box of airgun accessories, I have a baggie with some extra rectangles that I cut from plastic soda bottles for use in shimming. I have a couple of rifles where I put one or two shims between the rear of the scope and the bottom curve of the rear scope mount to provide extra scope elevation without dialing the up turret close to its counterclockwise limit.
Regards,
Feinwerk
Feinwerk,
Tomorrow.
BB