by Tom Gaylord
Writing as B.B. Pelletier
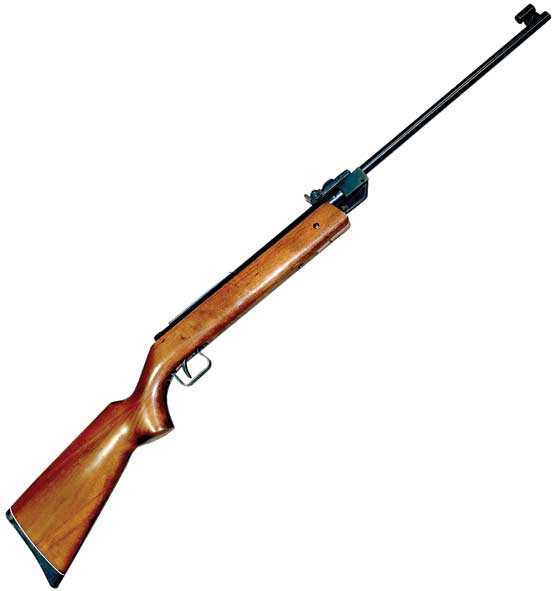
Diana 27S.
This report covers:
The ball bearing cage spring and guide
TW Chambers
Assembly
Assembling the anti-beartrap
The first test
How much lube?
Here we go!
Air Arms Falcons
JSB Exact Heavy
RWS Hobby
Cocking effort
Summary
Today I finish assembling the Diana 27S, and we test it for velocity. Since I’m using the same mainspring that it came with, this will be a good test of how Tune in a Tube affects velocity. Let’s get started.
The ball bearing cage spring and guide
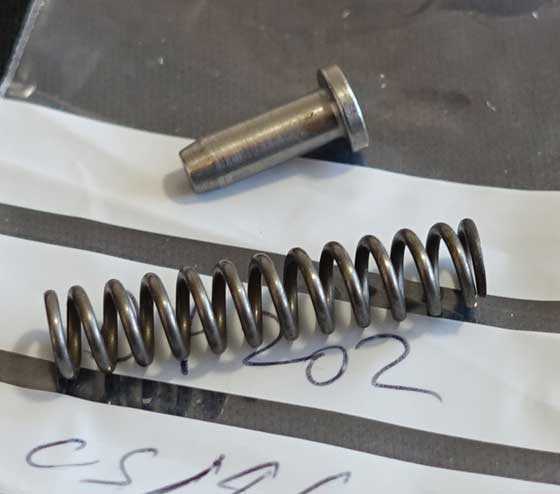
When we left the rifle I told you that it didn’t have a spring guide for the spring that fits between the inner and outer ball bearing cages. These two cages control the movement of the three ball bearings that are fundamentally the sear of the rifle, and that spring is essential to their operation. I could have assembled the rifle with just the spring, because that is how it came to me. But that’s a sloppy job and, since I don’t plan on taking this powerplant apart again, I wanted it to be right.
TW Chambers
I ordered the parts (a new cage spring and the spring guide) from T.W. Chambers & Company in the UK on February 20. They arrived on February 26.

The Diana 27S trigger cage spring and spring guide.
Assembly
It took me only 15 minutes of actual work to complete the assembly of the rifle, but I took an hour in which to do it. The extra time was for taking pictures and looking at pictures of the gun taken during disassembly as I went.
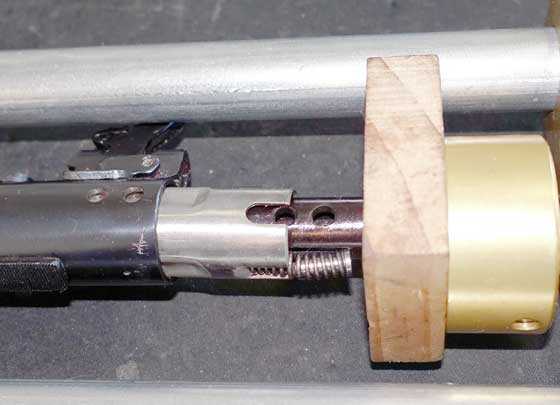
This photo shows the cage spring being compressed as both the inner ball bearing cage and the outer cage are pressed into the spring tube by the mainspring compressor. See the two holes in the black inner cage? The pins that hold the action together pass through them. See the slot at the rear of the silver outer cage? There is another one on the other side. They allow that silver cage to move forward and backward over the inner black cage, which is how the ball bearings get pressed down into the groove in the back end of the piston rod.
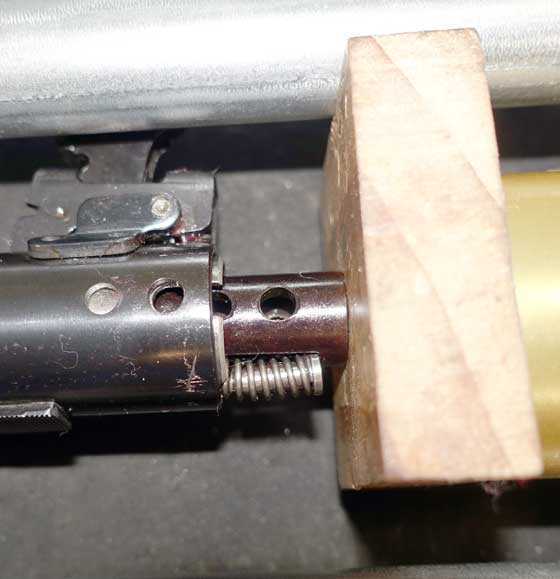
The compressor has pushed both cages nearly all the way inside the spring tube. Those two holes in the inner black cage must line up with the two holes through the spring tube.

The holes have been aligned and the two pins are in place to hold the action together. See how the black ball bearing cage sticks out of the spring tube a little when the powerplant is together? A steel end cap covers this.
Assembling the anti-beartrap
Now that the powerplant was together all I had to do was assemble the anti-beartrap and put the action into the stock. The articulated cocking link makes it possible to assemble the anti-beartrap with the barrel on the gun.

The articulated cocking link makes it possible to insert the end of the link through the spring tube and into the piston (arrow) without removing the barrel.
I had to examine a photo I took while disassembling the anti-beartrap to figure out how the parts are supposed to go.

This picture was taken before I disassembled the anti-beartrap mechanism. It’s dusty, but it provided the detail I needed to assemble the beartrap after the powerplant was together.

After cleaning all the parts the anti-beartrap mechanism looks much better!
After that the barreled action went back into the stock. It was now time to see if I got it right.
The first test
Back in my office I cocked the rifle that did seem much smoother than before. Remember I removed the barrel and lubed the base block washers and pivot bolt with moly paste. I also oiled every joint in the cocking linkage.
Then I loaded a .177 caliber pellet and fired the rifle into my pellet trap. Success! And now the rifle feels dead calm, which was what I was after. It was quite buzzy when I started.
How much lube?
I only put a thin coat of TIAT on the mainspring. I put it on a week ago and never added more. In fact none of the parts I lubricated a week ago needed any more grease today. The parts have been stored in plastic bags, including the open barreled action.
I did put a thin coat of TIAT on the new trigger cage spring and spring guide, but that was as much to hold the parts in place as it was to lubricate them. That TIAT is fantastic! In fact I dropped the black inner cage twice on my tile kitchen floor with the ball bearings inside and they never moved. TIAT held them in place.
Here we go!
And now for the big test. Since nothing has been changed, other than to clean and lubricate the parts in this Diana 27S, and since we have good pre-lubrication velocity data available, it is possible to determine what affect lubing with TIAT has had on velocity.
It is important to remember that in Part 3 I replaced the breech seal with a new one. We saw a large increase in velocity from that. The pre-lubrication velocities I will be giving are those obtained after the breech seal was replaced.
Air Arms Falcons
The 27S shot the Air Arms Falcon pellet at an average 689 f.p.s. before the lubrication. The spread was 38 f.p.s.
After the lubrication the same Falcon pellet averaged 664 f.p.s. That’s a decrease of 25 f.p.s. The spread after the tune went from 659 to 672 f.p.s. — a range of 13 f.p.s. That’s about one-third what it was before.
JSB Exact Heavy
Before the tune the 10.34-grain JSB Exact Heavy pellet averaged 555 f.p.s. The spread was 8 f.p.s.
After the tune the average was 532 f.p.s. a difference of 23 f.p.s. The spread this time went from 525 to 537 f.p.s., a difference of 12 f.p.s.
RWS Hobby
The RWS Hobby pellet averaged 660 f.p.s. before the tune. The spread was 31 f.p.s.
After the lube tune Hobbys averaged 638 f.p.s. That’s a decrease of 22 f.p.s. from before the tuneup. The spread went from 631 to a high of 645 f.p.s. — a difference of 14 f.p.s. Once again a noticeable increase in consistency.
Cocking effort
Before the tuneup the 27S cocked with 24 lbs. of effort. After the tune it cocked with the same 24 lbs.
Before the tune there was a slight scraping noise during cocking. After the tune the scraping is gone.
Summary
In this rifle it appears that Tune in a Tube has reduced the average velocity by 22-25 f.p.s. The consistency increased dramatically with two of the three pellets and only decreased by 4 f.p.s. with the other.
The firing behavior before the tune was buzzy with a strong forward jolt. After the tune the jolt seems quicker and lighter and there is absolutely no vibration from the powerplant. I could not be happier!
It is important to note that neither the anti-beartrap mechanism nor the trigger need to be removed to disassemble the powerplant for replacing the mainspring, the piston or the piston seal. Almost all the work I did in this report could have been done with the anti-beartrap mechanism and trigger left alone. I strongly advise that you leave the trigger alone unless there is a compelling reason to take it out.
The trigger in the 27S is more like the trigger in the Diana 35 than it is like the Diana 27 trigger. The 27S trigger return spring is extremely strong. Also the trigger in the 27S does not hinder removal of the piston.
This has been an interesting project so far. Now it remains to see how accurate the 27S is. I will try the open sights first and then mount a Diana peep sight for a final test. Not all Dianas have a peep sight base, but this one does and I thought I’d take advantage of it.

B.B.,
This will be a good one to see if tuning will significantly improve accuracy. The tuning definitely improves the enjoyment.
Siraniko
Section Cocking effort 2nd paragraph 1st sentence: “Before the tune there was a slight scraping noice (noise) during cocking.
Siraniko,
Got it. Thanks,
B.B.
B.B.
Love the reports on the old gals. Keep them coming….
-Y
BB,
Is it not a great feeling to help these old gals be fit and trim again? Also, there is so much to learn along the way. The designers of these ladies were pioneers in the airgun industry. Some do not realize that sproingers have not been around that long when you consider how long airguns have been in existence. The glimpses you give to us of the inner workings of these old jewels not only show us the growth of airgun design, but also the growth of the industry that produced them.
I am looking forward to the peep sight test. I picked up an old FWB peep to try on my grandson’s HW30. I think he will like it.
RidgeRunner,
I think your grandson will LOVE it! In my opinion that’s the perfect sight for an HW30.
Michael
Michael and RidgeRunner
I’m hooked on the combination.
The peeps are working real well with the modded FWB 300 too I have.
GF1,
You do not like that air rifle. You are really getting bored with it. You are even thinking it may be time for it to retire. Perhaps it should move into an old airgun’s home somewhere.
RR
Give it a couple months. You never know. Maybe a gun swap for a while could happen.
Right now the 300 and the other gals are have’n fun together. They are still catching up on time when they left home.
GF1,
LOL! I do understand.
The reason you like her is she is sooo accurate. The reason you do not like her is she is a single shot with a slow rate of fire and a limited range.
Maybe Carel will come through for me.
RR
With the modifications I made the range isn’t that limited. When I owned it before I had a scope on it and it shot just as well as my .177 caliber Tx200 does at a 100 yards. Yes not a typo 100 yards..
GF1,
My rememberer vaguely recalls you mentioning that range.
RR
The 300 needs about 2-1/2 to 3 mildots hold over at 4 magnification at that distance depending on the day.
But that’s beyond the point. Even if I aim dead on with the center of the reticle the gun still groups good enough to hit a 2 liter soda bottle repeatedly at that distance.
What would that be. Less than 4 inches at that distance.
You know what. It makes me think people doubt theirselves and their guns more than they need too.
You just got to try and see.
I do understand. I have had rifles that I just could not seem to miss with and others I could not hit the broad side of a barn when standing inside.
RR
Yep I like those guns that never miss.
One of these days I need to learn to not get rid of them.
GF1,
Well, here is a good start.
RR
Right.
Michael,
Peep sights work well on any long arm. That is why the U.S. military uses them.
On an air rifle they are “the cat’s meow”.
B.B.,
Things really came together (pun intended). Given all the difficulty you had with this particular version of the ball-bearing mechanism, I imagine you are relieved to get to accuracy testing.
By the way, an excellent sequence of photos to show how it all went together.
Michael
This has turned into a really interesting series BB, and the best part is that we are all learning with you. Thank you for that!
I think that an important lesson from this project is that we should avoid removing what doesn’t have to be removed while doing repairs, tuning or simple maintenance. However, in my experience this is something that we often re-learn after the fact. oh well.
I think that with the smooth cycle and a peep this one is going to make you smile. Looking forward to the accuracy test.
Henry
B.B.,
In line with today’s report, I thought you might find this ad from 1965 interesting. =>
Take care & God bless,
dave
I remember having one of those HY-Score air rifles when I was a kid. As I recall, it wasn’t very accurate though. Seems like it shot both BBs and pellets. I probably didn’t try pellets as they were not a easy to find back then.
Geo
Geo, did it actually have “silent smashing power”? Hahaha! =)~
I guess there was no one like B.B. around back then to keep the marketing guys honest!
Dave
Cool ad.
Thanks, Gunfun1; I got a real kick out of it, especially the “silent smashing power” part! =>
Dave
Right.
Hi B.B. !
It’s with great joy that i found this series of articles!
I inherited an air rifle from my late grandfather and I have been trying to fix it ever since. It was the first air rifle i ever shot and one of the few activities we shared.
The rifle stopped shooting a few years before his passing and he tried to fix it. He was a very skilled handyman but at that point in his life dementia was already at the helm.
At some point in time he even sent it to a local gunsmith but the quote was just to high for him.
The result was a rifle with a few parts broken and a few more missing.
When it reached my hands i immediately wanted to restore it but couldn’t find any information on it.
It is marked on the barrel “Geco” “mod. 54R” and if it wasn’t for these posts i would have never known it was a Diana 27S.
It was a huge breakthrough but i’m still left with a few questions.
Specifically some part numbers and if the parts i have are the correct size/condition.
It would be fantastic if i could have your help answering these questions!
You can get in touch with me on ric.teixeira18@gmail
Best regards,
Ricardo Teixeira
Ricardo,
I live to read comments like yours!
Let’s do everything online. I have about a quarter million readers who also need to know this stuff.
Good shooting,
BB
Thank you for the quick reply!
Ok then. I’ll try to post the pictures here.
So, I’m missing and can’t find the part numbers for the following parts:
-Cage spring and cage spring guide.
-Breach seal
-The three ball bearings
-Rear pin
Are these compatible with other Diana models? The 27 for example?
The anti-beartrap is also missing most of its parts but from my understanding it is not needed for the rifle to work. Am I right?
I’m also not sure if the outer cage and the piston are in good working order.
Pictures below.
Many Thanks,
Ricardo Teixeira
2.
3.
If these pictures aren’t sufficient i can take more.
And once again thank you for your availability!
Ricardo,
Okay, most of the parts you name are the same in the 27S and the 27. Just the cage spring is different.
The piston seal is a mother bear to replace. That pin is a blind pin that must be drilled out to remove the piston head to get at the seal. It’s easier to buy a new piston wioth s3eal than the replace a seal. I have a piston on my desk that’s been awaiting a new seal for two years because of this.
Try TW Chambers for the parts you need. They don’t use Diana part numbers, they use their own. Also try T R Robb. Both are in England and I have gotten parts from both.
BB
Thanks. I’ll message those shops for the parts. They don´t have them listed for the 27S.
Regarding the piston:
Either i didn’t understand what you meant or your description of the seal and piston doesn’t match what i have here.
On my piston the seal unscrews quite easily. There is a threaded hole on the face of the piston where the screw from the seal threads into.
Album with all the pictures I have of the rifle:
https://photos.app.goo.gl/vrKDup158PGN1Mfb7
Ricardo,
I hope you can find all the parts you need to get that old rifle up and shooting again. I also hope you check in with the progress as you move through this rebuild.
Mike
Ricardo,
Okay, that piston head has been off the gun before. You are lucky!
BB
Ah! Ok. I think i understand it now.
In that case, do the piston and outer cage look usable or should i buy new ones?
Ricardo,
As best I can tell they both look good. The angle on the silver outer cage that holds the cage spring looks a little distorted in one picture, but I can’t tell for certain. As near as I can tell it looks like it should work.
BB
Excellent! Thank you so much for all your help and guidance!
I’ll order the broken parts and while i wait i might as well start cleaning all the rust.
I’ll post any updates!
Ricardo