by Tom Gaylord
Writing as B.B. Pelletier

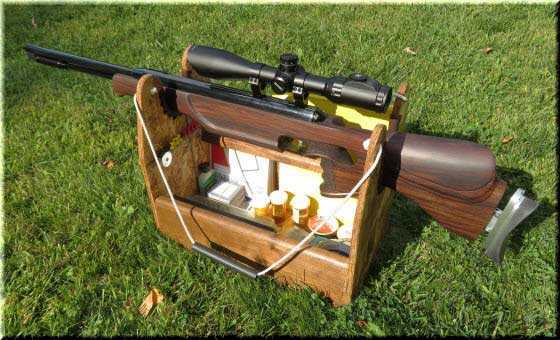
The Range Box set to go.
Today’s report is written by blog reader Vana2. He thought that a nice range box was needed by many shooters and he decided to show us how to build one. Here we go!
If you’d like to write a guest post for this blog, please email me.
And now, over to you, Vana2.
DIY Range Box
This report covers:
- The New and Improved Cardboard Box
- The Range Box Design
- The Requirements
- The Materials
- The Basic Construction
- Finishing up
- Summary
The New and Improved Cardboard Box
OK, so it doesn’t look like a cardboard box but that is how it started out. Initially the small cardboard box was a convenient way carry a couple of cans of pellets, some targets and a screwdriver to adjust the scope.
It didn’t take long to start adding other essentials – note pad, pen, push pins, a roll of tape, calipers, insect repellent, sunscreen, more tools, etc. etc. requiring a much bigger box.
I finally decided to make something more convenient to carry that would hold my stuff and a rifle besides. I did a review of what I needed to carry, the materials I had at hand and put together my custom Range Box in a couple of hours. I thought I would share what I have come up with.
The Range Box Design

The overall design of the Range Box is developed from my rifles and the stuff that I use at the shooting bench.
Getting organized to shoot involved juggling rifle, targets and the rest of the stuff while carting it out to the bench. That usually meant several trips into the house to get everything and inevitably having to go back to get what I had forgotten.
The Requirements
For convenience, so I wouldn’t have to be putting things down and picking them up while opening and closing doors, I wanted something to carry the rifle with (so I didn’t have to lean it or put it on the ground) and something to hold my shooting stuff that I could carry in one hand. One coffee and a couple of doodles later I was ready to start.
I took measurements from the forearms and the grips of my rifles to determine the size and width of the notches needed for the cradle and the distance between them. The box needed to be tall enough to allow easy access to the insides with the rifle sitting in the cradle and it needed to be wide enough to be stable.
For my needs the overall size of the box is 10 inches wide; 17 inches long and 14 inches high. A quick survey of the things I would put into the box confirmed that it would be big enough to hold everything and still be easy to carry in one hand.
The Materials
I wanted to use 1/2-inch OSB because it was rigid enough, light enough and I had lots of it. The problem with (thin) OSB is that it is difficult to put a screw into the end-grain without splitting it. To work around that I used 5/4-inch thick spruce “deck board” sides that the OSB could be glued and screwed to. The 5 1/2-inch wide deck board too tall for the sides so I ripped off a 3/4-inch strip and used them as supports to hold my note pad and targets up against the side of the box and out of the way.
Solid wood, plywood or whatever you have available can be made to work… the scraps of deck board I had were ideal for the sides but a 2×4 ripped in half would also work well.
The Basic Construction
I wanted to keep things simple so I cut the sides and bottom to 10 inches wide and cut them to length. Then the cradle notches on the sides were laid out; cut out and a series of holes drilled along the edges. Next the rope handle holes were drilled and the final shaping of the sides was done. The side pieces and supports were cut to length, and everything was glued and screwed together.
A comment on drilling holes in OSB… for best results use a Forstner bit or a sharp Spade bit (the ones with “spurs”) and with light pressure, drill from both sides to minimize tearing out chips. A drop of Super Glue will reinforce the hole nicely.

Drill bits for OSB.
I rough-sanded (60 grit) to remove splinters and round off the edges then gave the whole thing a light coat of clear gloss water based finish. The OSB is very porous and absorbs a lot of finish so it is best to avoid oil based finishes as they will take a long time to dry.
Finishing up

Here is a detailed view of the inside of the Range Box, showing the handle attachment, leather padding, magnetic strip and how the two supports are installed to hold my targets up out of the way.
As final touches, there are just a couple of things to be done; add the handles, the cradle liner and the optional magnetic strip.
I made my carrying straps from 3/8 inch nylon rope with a couple of pieces of plastic tube for handles. An overhand knot was used to secure the ropes and then I trimmed the tag end short before fusing it with a flame. It is good to add drop of Super Glue on the knots to be sure they don’t slip.
I wanted to have something to protect the finish on the rifle from being abraded by the wood in the cradle. Initially I used a rope threaded through the holes I drilled as an edge protector but didn’t like how it turned out so some leather from an old belt got stitched into service. It needn’t be fancy; a couple of layers of duct tape would probably suffice.
On a whim, I added a magnetic strip to hold my push-pins, a couple of Allen keys and the washer I use to adjust my scopes. Works great as I don’t have to grovel around in the bottom of the box to find these small items.
Summary
So there you have it, how I made a quick range box. After using it for a while I wonder why it took so long for me to get a round tuit. Hope this is of interest!


Vana 2,
Great looking range box and thanks for posting about it! I’m just getting into HFT and it seems a “gun carrier” is the way to go. Most of the gun carriers that I see are side mounts. I love your center mount idea. I never could get the whole idea of the ideal balance point with a side mount. Want to carrier to be level when carried.
FWIW-I reminds me more of an old shoe shine box than a cardboard one. For those old enough to remember shoe shine boys.
-Y
Yogi,
Glad you liked it!
Yes, remember the shoe-shine boxes …vaguely LOL!
Hank
Nice box! I just started working with OSB. Been usually a plywood guy, but it so far for me is lighter, flatter and more rigid for a given thickness. There are some marine plywoods that are fun too, but the box doesn’t need to be a boat.
I’m totally going to make something like this with my flooring scraps.
Edw,
I find OSB a bit cranky to work with as you have to take care the way you cut so not to lift the chips. That being said you can get some very nice results when it is sanded and finished.
I did some (very low budget) OSB furniture for a friend that turned out well. I mixed “floor leveling” powder (it’s like a plaster) with latex paint, applied it as a filler and then sanded back to bare wood. The end result was a smooth surface with the off-white filler accenting the wood chips.
Hank
Very nice box.
Hank,
Very nice. I opened the article this morning and seeing Vana2 (Hank),….. (and),…. wood,…. and immediately thought of exquisite work with exotic hardwoods,…. embellished with inlays and such! 😉
Well done. For now, I use one of those small soft side coolers with the hard, removable liner. It has some pockets too. Soft side tackle bags are similar and usually have more pockets.
I can relate to multiple trips and the for-sure given trip back in. The rifle is always carried out last and always by itself (to avoid any door way/door banging). From my front door to my bench is about 10-15 steps.
Thanks for sharing,………. Chris
Chris,
Sorry, just a quick project – nothing fancy on this.
Sure beats the cardboard box though!
Hank
Hank,
There is no way I could (with your woodworking skills),… not to make a nicer box. Dove tail? or fingered corner joints with (real) wood, would be real nice. Custom rout the edges. Plane the planks thinner to reduce weight,… etc. Even keep the same design. Fancy up the leather accents and the rope handles. For me,…. that would add real enjoyment to the range time.
Chris
Chris,
I’ll do mitered corners but don’t do dovetails or finger joints …not my thing. Agree that they are nice and classy but I have always found that a nice square butt joint is quick and solid.
Hank
That (the gun) is a TX200 ya’ all,….. in case anyone is wondering.
Good Day to one and all,………….. Chris
Chris
If that’s a Tx 200 it’s wearing a different stock.
GF1,
Likely one made by Hank.
GF1,
The FT stock on the TX200 is a custom jobbie made by “Ginb” that I recently refinished.
Hank
Hank
Ok thought it was a 200, wasn’t a 100% sure though. Can’t make out the action real good. But I do like the stock.
Vana2,
Thanks for a nice guide to making a simple range box. With young users they might have to add a cup holder too though. 😎
Siraniko
Siraniko
Young or old. 😉
Siraniko,
Cup holder!!! Darn, forgot that!
Oh well, there is another trip back into the house to get it!
Hank
Hank,
Nice box! Right now I have a cloth bag with pockets I carry my rest bags, pens, pad, target dots, etc. in. The rest I shuttle down from upstairs as needed. My 10 and 25 yard range is off the back porch and my 50, 75 and 100 yard range is off the front porch. I do not have to tote stuff far. It is also a rare occasion I will shoot only one air rifle during a range session, so I am going to make multiple trips anywho.
Now once I complete my range with the shooting bench I will need a tote of some sort as the bench is over 50 yards from the house. I have been considering a rig I have seen used by several FT shooters utilizing a large wheeled baby buggy modified to carry a tank, tools, ammo, etc., along with a couple of air rifles. A golf bag cart would work also. My compressor is already mounted on a garden cart. Maybe I will bet another of those and modify it. Hmmm.
Thanks RR!
My shooting sessions are usually scattered through the day whenever I have 15 – 30 minutes to relax and shoot so grab-and-go is the name of the game. Having to run back into the house to get something can get annoying real quick.
My backstop is 55 yards from the bench and I use portable “shooting stations” (a log mounted on three legs) to setup at random ranges. I’ve just started clearing some bush and it looks like I can go another 65 – 75 yards to a natural backstop.
I like the golf bag cart idea, was given one of those “fold open” designs that I want to convert into a gun cart. Figure that it would be useful when I go pesting on some of the farms I hunt on.
Seen some guys using an ATV to carry their stuff on the range – talk about the ultimate gun carrier LOL!
Hank
Hank,
The ATV is a little over the top, but the golf bag cart is doable.
Thanks again for the blurb!
RR,
ATV?,…. “over the top”? I thought rather well of it. Of course,… that would be when I hit the lottery, buy a 500 acre ranch, with a 1/2 mile long driveway,… etc., etc.. In fact,… I was thinking of one of those hard roof tops,.. with rails,… with a swivel gun rest,… and a comfy shooting chair,… of course! 😉 Like you see on the African safari hunting shows mounted on Range Rovers,… ya’ know?
Maybe a candy apple red, metal flake paint job? Camo-ishly done,.. of course. 🙂 LOL!
Chris
Chris,
Candy apple red?! Oh yeah, you bought a “Red” Wolf. You want to be color coordinated.
Vana 2 ,
Great idea, it is open to access everything. I like the magnet trick , would be good for magazines also. Reminds me of the old style Bullseye cases with the spotting scope attached . That is a good size also because You won’t get carried away and take Your hole workbench with You !! I got so out of control my range kit became a Craftsmen 3 drawer toolbox that became ridiculously heavy . I went back to a standard bag with a pouch of tools and cleaning gear. This way You have the essentials with easy access.
Gene,
Thanks! Attaching a spotting scope to the range box is a great idea. I’ll take a look at that later.
Yeah, carrying “everything” can be a problem for me …you should see my fishing tackle box LOL!
Hank
Great idea with the magnet! Never wood of thought of that.(sorry bad dad joke)
Rk,
The magnet is a necessity as it is where I keep my extra push-pins.
I have a habit of destroying the ones holding up my targets when I get bored punching paper and always need to bring replacements down range with me. LOL!
Hank
Vana2/Hank,
Right from the moment I saw the first picture of your range box, I knew I was going to like it. The rounded edges and slightly burnished finish remind me of cabinets my great uncle John made. I still have a small chest of drawers that he made. He did it all by hand, no power tools, and he was entirely self-taught and a weekend warrior with a hammer and saw, but his work had a wonderful Old World look to it. Don’t get me wrong. I don’t mean to suggest your range box looks unprofessional. I mean it has a sort of hand-made, what’s-truly-important look to it. On the other hand, my Grandpa made a carpenter’s tool box by hand, and it did not look like your work or my Uncle John’s work. I did look amatuerish, although quite rugged and functional.
Your range box looks wonderful, and I’m sure it will be wonderfully functional, too.
Michael
Michael,
Yup, handmade – though I did cheat and use a table saw.
The range box is a made from scraps, designed for convenience sort of thing. Nothing fancy, just rugged, functional and quick to put together.
Glad you liked it Michael!
Hank
Hank,
Nice!!! I had a cheesy box when I shot Field Target that was nowhere near as nice as this. I could use a range box like this on my new mini-farm (once I find the right location for my outdoor range). Thank you!
Take care,
dave
Dave
So you found your new house. Mini farm sounds promising. Bet it’s nice.
Gunfun1, it’s getting there! We are 95% moved in, but I’m picking out a spot for the airgun range. =>
Dave
Looks nice. Looks like a nice flat area.
And I say the 60 yard range. I like distance. 🙂 And it looks like you will be shooting from the house at the 60 yard range which has its benefits as I’m sure you well know. But again I like it. Looks nice.
I lack Hank’s level of woodworking skills, but I did make a shelf for indoor shooting:
Dave
Shelf looks nice to me. And I’m not a real good wood worker. I make stuff out of steel and plastic. 🙂
Funny thing is, no matter where we live, or what size house we get; I ALWAYS only seem to get 16 feet for an indoor range! *shrugs* I guess I should be happy; a lot of wives wouldn’t even allow shooting indoors.
Here is my new 5-meter range, which requires me to shoot from the diagonal opposite corner of where the closet is located; and I do have to shift the targets around; I can only see two out of three due to the angle; so I just put the one I want to use in the middle of the shelf. =>
Dave
You got to do what you got to do.
But I have to ask. What if you miss your target? Probably highly unlikely at 5 meters. But still. What if?
Gunfun1, if I miss, I will just punch a hole in the sheetrock; the house is brick, so the pellets aren’t going anywhere; but still, thanks for the reminder; I do have another wooden backstop that I could set behind those targets. Even though it’s my room (my wife has her own office at the other end of the house), it would be nice not to have to spackle over any holes… and there WERE a few on the old range! =)~
P.S. There will be a large backstop outside in front of the tree; and both directions are shooting down into dirt, backed up by dense woods (on our property) for any ricochets.
Dave
Sounds like you got it thought out good to me.
=>
Vana2, I like your design! Field target shooters use carriers a lot, to move between lanes and carry pellets, simple tools, a cleaning rag, etc. Many of these are home-made, and quite clever. I have one that is pretty commonly seen, an MTM Case-gard RMC-1. About a $35 item. It’s 11×23 inches. Drill some holes in the corners of the base, feed in two nylon straps or ropes, tie knots, and you have a very handy carrier with sliding covers and removable cradles that can stow in the base. If you (like me) are not as handy as Hank, it works pretty well and can be used for a cleaning station.
Thanks Jerry,
Like the MTM tote – unfortunately, you don’t find stuff like that around here.
Cheers,
Hank
Jerry
What stock do you have on your Marauder?
It’s a Steve Corcoran walnut stock.
Jerry
Nice.
I used a Tipton Gun Butler for my FT caddy. I never though about using one around the house but it is such a good idea. Here is my current caddy. I may try making one for shooting at the house.
Vana2,
I like your KISS range box!
Winter is coming or already knocking on the door so a minor project for brutal nights to come and a classic touch:
https://www.amazon.com/LolliBeads-Genuine-Leather-Braiding-Assorted/dp/B01MRGG9NP/ref=asc_df_B01MRGG9NP/?tag=hyprod-20&linkCode=df0&hvadid=167138488952&hvpos=1o28&hvnetw=g&hvrand=225054714799693651&hvpone=&hvptwo=&hvqmt=&hvdev=t&hvdvcmdl=&hvlocint=&hvlocphy=9008163&hvtargid=pla-307014839495&psc=1
Replace that Nylon rope with something natural to the touch.
A little bit of fireside braiding:
https://www.pinterest.com/pin/36873290680300393/
and it will be totally harmonious with the wood.
shootski
Shootski,
Like the leather touch! Great idea, I have a couple of yards of leather that I can use. That reminds me that I want to make a couple of rifle slings to replace the nylon ones.
Yeah, winter is coming – had a serious frost here the other morning – beautiful today (mid 50s sunny and calm). Heading back outside to do some more shooting!
Hank
Off topic,…. but does anyone know if,…. when a reply to a post is edited,…. that the original poster (also) gets the (new) edited post? Or,… do they only get the original post and only the “blog” post is shown as edited?
Chris
(replies to my post’s show up in my E-mail inbox). Like everyone,… I am assuming?
Chris,
First post only.
B.B.
Chris USA,
Let’s find out!
I’m going to edit out all the shouting in my edit in 4 minutes from this posting!
There that is so much kinder on everyone’s ears.
shootski
Shootski,
Oddly,.. neither of yours showed up in my E-mail, but B.B.’s did. Well, now we know as B.B. said that the recipient will only see the (1st/original) unedited post.
B.B.,…. Thank you too for the response as well.
Chris
Really cool box! Simple, yet straight to the point. Well thought out and and overall good looking design.
Ray
Hank,
That is a great totem box I said tote but the speller said totem and I like it. Thanks for the blog! I do need a range box too many trips back and forth.
I must say I have not finished a project in a year or more. Somehow I started too many and have lost focus. I keep taking on side jobs and have about 4 major construction projects, bathroom, barn, garage, and equipment shed. I know time management and how to set priorities but keep getting on a side track. I have made a decision not to take on any more projects till I finish these. Hope it works.
Well now I am also doing repairs and refurb on my 1958 Ferguson TO-35 tractor and my 1968 Ford 4-wheel drive dump truck. The John Deere 450B and Case 480LL better hold up for a while.
Don
Benji-Don
If you remember, you had looked for a couple of parts from my old Crosman 147 muti-pump. I needed the lever rivet pin and bushing. Well, I bought those parts from Rick Willnecker and repaired it. Then I got to thinking about the airgun being over 50 years old and thought that I should probably disassemble the rifle and replace the seals. So I ordered all new seals and a new piston cup seal and proceeded to rebuild the old gal. The disassembly had some challenges, especially replacing the piston cup seal, but I figured it all out and reassembled the rifle. I shot it a few times and it’s as good as new again. I still want to shoot some groups with it, take some photos, and post them here in the blog. I have had this rifle since I was a young teen and have really enjoyed rebuilding it. Thought you might like to know how that project turned out.
Geo
Geo,
I am so glad you got her working. It is a fine classic airgun and I am partial to the vintage multi-pump guns. Please post some of your results after the refurbishment. There is great pride in getting an airgun from when you were a youngster back up to snuff. Congratulations. And thanks for sharing.
Don