by Tom Gaylord
Writing as B.B. Pelletier
Today’s report is Part 6 of reader Vana’s excellent report on stock making. This is the completion of his very thorough report on stockmaking.
If you’d like to write a guest post for this blog, please email me.
And now, over to you, Hank.
Part 1
Part 2
Part 3
Part 4
Part 5

This is my original 55 year old Slavia 618 in its new “firewood” stock. I made this one in a “camo” style, using cherry and maple blocks in a random arrangement of the pieces.
This report covers:
- Finishing the finishing
- The first rule of applying a finish…
- Put a handle on it!
- Dyes and stains
- Finishes
- Oil products
- Other potions and elixirs
- Polyurethane
- Precautions
- Summary
Finishing the finishing
We’ve covered theory, materials, carving the stock, personalizing it and the preparation for finishing. This is where people get anxious and start rushing to be done – that’s a bad approach.
First is to decide what level of finish you want. A Try-Gun stock may be left “au naturel” where a fancy burl walnut stock looks awesome under umpteen coats of hand-rubbed linseed oil.
Take the time to get properly set up… Take a deep breath! Tidy up your work area, vacuum up any dust and think about what you will need — brush, cloth, rag, paper towels, gloves, cleaner, the finish, and — oh yes — the stock. Arrange a quiet, clean place where you can hang the stock to dry – preferably where the cat can’t rub on it. It can take as much time to finish a stock as it took to make it.
The best thing is to take your time, relax and enjoy the process. I would suggest to practice on scraps of wood to get familiar with the materials, but I know that isn’t going to happen! LOL!
The first rule of applying a finish…
Anybody who has read the instructions on paint cans knows that they say “two thin coats are better than one thick one”. That is absolutely true! The best advice I can give is: Believe it! Do it!
On flat, horizontal surfaces you can get away with applying a thick coat because the finish is just going to sit there quietly as it dries. On a stock there are few horizontal surfaces and whatever liquid finish you apply will show a strong preference for running away and hiding in big sticky blobs under the stock.
For stocks, less is best! The goal is to just wet the surface with a thin coat of finish that will set-up quickly and stay put. A thick coat of finish will skin-over on top but the liquid finish underneath will still ooze downhill creating runs and waves in the surface. Multiple thin coats are the easiest and quickest way to a beautiful stock.

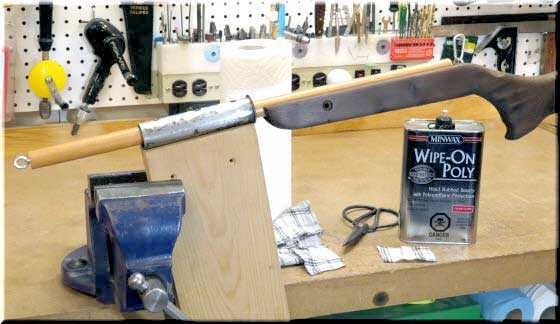
Necessity is the mother of invention… Some odds-n-sods cobbled together make a nice cradle to hold the stock while I work on it.
Put a handle on it!
It is very awkward to hold a stock covered with a sticky wet finish. To help with this I mount a long dowel “handle” to the stock (in place of the receiver) and use a cradle to hold the dowel handle. My stock-cradle consists of a piece of pipe mounted on a block of wood and clamped in the vice at a height and angle that is comfortable to work at. To steady the dowel and provide a bit of friction, I lined the pipe with rubber cut from a computer mouse-pad. It’s not fancy but it works and only took five minutes to make from some stuff I had lying around. Adding a screw-eye to the end of the dowel provides a means of hanging the stock up. It’s a good idea to wrap the dowel with “cling-wrap” plastic to prevent accidentaly gluing it to the stock with dried finish. LOL!
Now that we are ready, let’s review some of the options for finishing a stock.

These are all stains with different properties. It’s best to read the fine print and test products on scraps before committing them to your new gunstock.
Dyes and stains
There is an incredible array of dying and staining products on the market. They can be oil, alcohol, or water based, opaque or translucent, thin as water or in a gel. Some claim to be a stain and a sealing finish.
The best I can suggest is that you do some research. Woodworking forums are a good place to lurk and gather information. Finishes are a personal preference, asking for “the best finish” will probably net you dozens of different opinions.
If all else fails, read the labels on the cans and try the products that are available to you to see what you like.
I wanted to mention to keep your eyes open for other possibilities — dyes for leather and cloth will also work on wood and surprisingly, unsweetened Kool-Aid drink mix (powder) makes a good dye — ask any kid with a blue tongue! I have used the Kool-Aid color charts (found on the web) for reference to make dyes to color fur and feathers for my fly tying — the results have been excellent.
Finishes
Like stains, it’s best to do some research before purchasing a product. Because of the sheer volume of products available this is the most difficult section to write about. Instead I will talk about the products that I use. Being old-school, I have the most experience with natural oil and polyurethane based products so I prefer them and stick to (no pun intended) the products I know.
There are other options like lacquer, shellac or spar varnish but I personally don’t care for them on gunstocks.
Oil products
There is a major difference between pure and prepared oil finishes. Pure oils penetrate into the wood but don’t dry to a film; prepared formulations have proprietary ingredients that control the drying rate and the type of finish that will result.
Most linseed oil based products create a satin-sheen finish. In addition to their traditional beauty, oil finishes are easy to apply and it’s easy to touch up scrapes and scratches.
There are several products that are readily available as well as many home-brew recipes, each with their own properties. Some of the ones that I have used are Danish Oil (a pure polymerized linseed oil with no additives), Original Wood Finish (polymerized linseed oil with pure beeswax) and Varnish Oil (refined polymerized linseed oil and pine-sap resin).
I wanted to specifically mention Birchwood Casey Tru-Oil which is a linseed-based product formulated specifically for gunstocks. It seems that people making musical instruments are fond of its durable, high-gloss finish as well. Though it is thicker than I prefer, I have used it several times with good results.
Other potions and elixirs

Here are some products that I use on my stocks. Found these in the housewares department.
You never know where you might find a product that you can use for gunstocks. In addition to the paint department, the automotive department and housewares stock various lacquers, oils and waxes that can be used on gunstocks with nice results. You probably already have a supply of furniture and car polish at home that is just begging to be tried on a scrap of wood. Spray furniture polish is great for cleaning and adding a shine on most surfaces.
On a different note, Aqua Fortis is a traditional stock finishing reagent that chemically reacts with the wood to create a rusty-brown color accentuating the grain. The pale grain of maple reacts particularly well making for a really awesome looking stock. I’m not going to get into it here but I thought I would mention it in passing.
As a sidebar — There are videos and instructions on how to make the Aqua-Fortis reagent on the WEB; it is a dangerous process and I strongly recommend that you buy it rather than making your own. [Editor’s note: Aqua Fortis is nitric acid and is extremely dangerous to handle. Even the fumes are caustic and can cause bodily injury.]
I found Howard Feed-N-Wax in the housewares department of the local hardware store and have been very pleased with it. It’s a combination of orange oil, beeswax and carnauba wax that penetrates deep into the wood to leave a beautiful matte finish. It’s ideal if you are in a hurry (or impatient LOL!) to get a nice protective finish on the wood — no fuss, no muss. One application and half an hour later you are good to go. The firewood stock featured in this blog series was finished with Feed-N-Wax, I chose it because I wanted a matte finish to compliment the camo theme.
Generally, oil products are applied, allowed to soak in, wiped off, buffed and then set aside to cure for a time before applying the next coat. Two to three coats are typically required to seal the wood with an occasional reapplication and buffing to maintain the sheen. A top-coat of paste wax can add another level of protection and shine as well.

These are the polyurethane products that I use on my stocks. The Wipe-On-Poly is my current go-to favorite. Behlem Rottenstone is a fine abrasive powder I use to create a satin finish when I want tone down the gloss.
Polyurethane
Polyurethane creates a durable high-gloss finish that builds quickly and shows off the depth of the wood grain very well. It is easy enough to use on a flat surface but the curved surfaces of a stock present some challenges. Being so smooth and clear, urethane will magnify the presence of dust particles, brush-strokes, runs/drips and scratches. Any scratch or dings the stock suffers will be quite noticeable and can be difficult to repair.
Polyurethane is marketed in gloss, semi-gloss, and satin finishes. In truth, the semi-gloss and satin finishes are really a pure gloss formulation with some pollutants added to blur the grain. I always use the gloss product and buff the surface with rottenstone or pumice to take some of the shine off if I want to — I have more control that way.
This is another of those “Believe it — Do it” things printed in the directions on the can. When working with polyurethane (lacquers and varnishes etc.) be aware that they will shrink and pull to a smooth finish as they dry. It is very important that the surface be totally free of contaminates like dirt, finger oils, grease or soap to prevent the finish from de-wetting and pulling back into a “fish-eye” spot. I wipe down the surface (and my hands/gloves) with a paper-towel and rubbing alcohol (and let it completely evaporate) just before applying the finish. Don’t use a cloth, as even if it has been thoroughly rinsed it will contain soap residue that the alcohol will dissolve and transfer to the stock causing trouble.
I have always thinned my polyurethane with mineral spirits or paint thinner (up to 10 percent) to get better penetration into the wood and to make it easier to apply. For the past couple of years I have been using clear gloss MINWAX Wipe-On-Poly and have been very pleased with the results. It is thin enough to penetrate well, applies with a cloth, is easy to work with and dries quickly to a smooth, hard finish. The wipe-on-poly dries in 3-4 hours but l prefer to leave at least 12 hours to harden between coats — makes sanding/steel-wooling easier. Also, I have found that the more solvent that evaporates before the next coat is applied the better the end result.
This is my process… For the first filling coat I like to saturate the wood by keeping it wet until it has sucked in all it can hold, then I mop off everything that has not soaked in and let that dry completely – usually 24 hours. Then I steel-wool the surface with #0000, dust it and wipe it down with rubbing alcohol before applying the next coat.
Softwoods usually “fill and shine” with the fill coat plus 3-4 coats, close grained hardwoods like maple and birch need the fill coat and 2-3 coats. More porous hardwoods like walnut will take numerous coats to completely fill to a smooth finish.
A comment on filling the grain; I re-did the walnut stock on my FWB 300 with a coat of the wipe-on-poly followed with a couple of coats of thicker polyurethane to fill the grain. Two months later the thick urethane had dried completely and left tiny depressions where it shrank back into the grain. It doesn’t look bad — real wood does have a grain texture, but it was not what I had intended. I wonder when/why I started thinking a stock had to have a perfectly smooth finish — guess it is that we live in a smooth “plastic world”. Anyway, I wanted to point out that it takes a long time for thick finish to totally cure and for a smooth finish I think that multiple thin coats of the wipe-on-poly left to dry thoroughly between coats is a better solution.
The trick to using regular polyurethane is to apply it and spread it as quickly (and thinly) as you can, “flowing it on” rather than brushing it over the wood to minimize air bubbles and then don’t mess with it — let it dry thoroughly in a dust-free area. Over brushing or touching-up a spot is sure to make a mess — don’t ask me how I know this!
Forget cheap brushes for regular polyurethanes — they leave hairs, bubbles and make a mess, use a quality brush meant for oil finishes for best results. Surprisingly, the foam brushes do an excellent job of applying polyurethane.
The advantage of the Wipe-On-Poly is that it is very thin (it is best applied with a small piece of flannel cloth) and flows easily to leave a smooth, wet surface. The Wipe-On-Poly feels oily when you first apply it and its tolerant of being touched-up; you have a bit of working time before it starts to go tacky but once it starts best to leave it alone and hang it up to dry.
Another option is to finish the stock with regular high-build polyurethane and when you are ready for the final coat, clean up the brush marks, bubbles or flecks of dust with #0000 steel wool and use a can of spray polyurethane to restore the gloss. The final coat needs to be very thin as the spray polyurethane in the can is low viscosity and will drip if too much is applied.
Precautions
I’ll mention a couple of common sense safety precautions about working with finishes. Work in a well ventilated area when using stains and finishes – a sniff of the fumes is not bad but breathing them for an extended time is not good. Wear vinyl gloves as the chemicals in these products can be absorbed through the skin. Be aware that the volatile fumes from most stains, finishes, and cleaners are flammable.
The biggest precaution is: don’t throw a used wadded rag into the garbage — the curing process of the finish can generate enough heat to cause the rag to burst into flames! The best way to dispose of rags you have used for applying finishes is to lay them flat on a non-flammable surface to dry.
Summary
So there you have it, stock making 101, start to finish. Sorry to be so long-winded! Star Trek fans will recognize this as my attempt of a Vulcan “mind-meld” for making your own stock. I hope that I have been successful and you will give it a go.
In addition to having a custom fitted stock, making your own is a satisfying experience. One warning — stock making can be addictive …can you make just one?
Cheers,
Hank

Do you use the oil based wipe-on poly or the water based one?
I see them both in the store. Can you apply the water base poly over an oil stain and vice versa?
Good report! Thanks for sharing…
-Y
Yogi,
I use the oil based wipe-on-poly as I am most familiar with that type of product, how it “works” and the results that I can count on.
I wouldn’t put oil over water or water over oil based finishes – it is best to choose the base you want and stay with it the whole way.
Ideally, you would stay with one manufacturer’s line of products to ensure compatibility (the manufactures like to promote this as well – its good for sales – LOL!) but I never had any problem using oil based products (stain and finish) from different manufacturers on the same project. I do have a habit of testing the finishes/stains on scraps of wood to see how they will turn out.
To be perfectly honest, I keep on intending to try the water based stuff but never get a round tuit.
Hank
Hank,
Thanks for sharing your process through this series. Personally I have only used white paste floor wax with acceptable result as a finish. It did take a while for the smell to tone down though.
Siraniko
Siraniko,
Ditto on the paste wax!
The product I used on the firewood stock has a pleasant orange smell to it when fresh. Happily, the smell fades after a while which is better for a hunting rifle.
Hank
Hank,
Thank you for this fine series. You have taken something that seems insurmountable to most of us and have broken it down into an easily understood tutorial that will serve as a good launch point for the novice. All of the “insider” tips are great as well and will serve to prevent us from making common newbie mistakes.
Well done,…….. Chris
Glad you liked the series Chris!
You hit it right on! Any “big” problem or project is easier to manage if broken down into small bit-sized pieces. That is exactly what I wanted to do with this series – to cover the steps simply, share my experience and guide people through the easiest/safest path.
Lots of ways to make a gun stock, think that this is a good way to start out.
Hank
Very informative series. I have an old Webly Vulcan that is crying for a new finish. I liked the idea about the “cling-wrap” I’m guessing you learned that trick the hard way.
Rk,
Yes, I have inadvertently “glued” things together with unexpected drips of varnish – I TRY not to repeat such mistakes LOL!
My friend had a Webly Vulcan (his fathers’ actually) and I had lots of opportunity to shoot it. Great gun and much more powerful than the Slavias that most of us had.
Refinishing the Vulcan would be a worthy project – please post a picture if you do!
Hank
Hank,
This was very informative!
Again, I wish I had read this 50 refinished guns ago, hahaha!
I learned the hard way that one thick finish coat is…not good. #_#
The thing I really like here is your idea for a stock “handle.”
What I have usually done in the past is to use the two butt plate screws to hold a loop of copper wire.
That works well for hanging the finished stock so it can dry.
However, it is mediocre for holding the stock while applying the finish; a firmer handle would work better.
I have a stock to be refinished in the next few weeks, and will try these improved methods; thank you!
Cheers,
dave
Dave,
Yeah – the “one thick coat” (to be done varnishing quickly) always takes ten times as long as putting on a couple of thin coats and (patiently) waiting for them to dry thoroughly. Learned that the hard way – several times!! =>
A firm handle is the only way to go! I’ve tried other ways but they don’t work as well. The “cradle” is nice as it allows you to work on the stock with both hands. Amazing how awkward and heavy a stock can be when it is half varnished.
Hank
Yes, using the “loop” only gives me one hand to work; I’m trying your way for this next stock! =>
Hey Dave – check mail!
Hank, I just saw those emails; two weeks is awesome!
I will post a pic of that cool piece of hardware here when it arrives; thank you. =>
Hank,
Thanks for all your little “tricks” that you have passed on to us. Like Dave said above, the “handle” is an awesome thing to keep in mind.
What is the best way to strip old finish off of a walnut stock? I believe it is a poly.
RR,
I have been using a gel product called “Super Remover” ( https://www.superremover.com/products/super-remover/ ) with good results. Lots of info on the website.
I like that it is water soluble and non-corrosive.
Hank
Hank,
Thanks!
Hank,
I used to work at ‘strip joint’. There was a cold tank, for nice wood, and the hot tank for most everything else.
I am in the oil finish camp,I hear ya about the 300s stock. I always felt the glossy Weatherby stock look a bit too slick. In England, youngsters will season their cricket bats with linseed oil, if you do it right they get a curve. It takes time. I lament the loss of easy to use paint and stain products of days gone bye, like nitrocellulose lacquer and good old fashioned oil paint and varsol. I will stain the the front deck, and then a few coats of a tinted, thinned oil based urethane on top. I am curious if flaming with a torch is a good way too make boring wood more interesting?And that’s not the same thing as a nice flamed maple top, i think. Guitars used to be nitro finish, cars too, but now a really nice guitar will have a poly urethane finish. I think oil finishes allow the user to work with the product more than water based, where once the finish is down, you cant touch it untill it dries, but I don’t have much experience with newer, water based finishes. I have been interested in tatooing wood, with a stain or,nitric acid? Maybe use a stencil. Anyway, thanks for sharing. I once took a class on refinishing furniture,my boss paid. It was at the Smithsonian Institute of all places. It is there that I discovered that lacquer does not in fact come from the “lacq” beetle. best, R
1stblue,
Your comments put us at a similar age LOL! I tend to shy away from super glossy finishes as I find them to be a bit too “plastic” to suit my tastes – makes real wood look “fake”.
The old finishes (especially the stains) did a good job if you knew them but I find the new products to be nice to work with as well.
I have used the Shou Sugi Ban (burnt wood) finish for years and you can get some very nice results with it – particularly with softwoods. Its not suitable for laminated/glued-up stocks as the heat plays havoc with the glue joints so I didn’t include it in this series. The You-tube channel “Inspire Woodcraft” has a nice series of videos if you are interested.
Haven’t “tattooed” wood. Think that the porous nature of the wood will cause stains to “bleed” into fuzzy shapes. Adding stain to a textured surface would be interesting. Nitric acid (and heat) can be used for some beautiful finishes but I don’t think it would lend itself to stenciling – its dangerous (unhealthy) stuff to work with.
Hank
Hank,
Thanks for your very informative series. One tip I learned before everything was available on the internet. Most of the time you only need the half pint of stain but to know how to use it pick up the gallon in the store and read the label. The instructions on the half pint are in a font too small to read for many of us.
Gerald
Glad you enjoyed the series Gerald!
Yeah – microscopic print on product labels is a pet peeve of mine. I bring a small magnifying glass when researching labels on locally available products.
Hank
Hank,
Wonderful series. Hope it empowers many.
Since this part is about finishes I think it’s important to minimize the intimidation factor by emphasizing final steps that can fix many mistakes made during the process. Mistakes like fish eyes, uneven layers of applied finish, removing dried on/dried in debris from the finish, etc. can be minimized or even eliminated by CONDITIONING your finished stock. This also applies to older finished stocks that have minor scratches, are dirty from use, etc.
0000 steel wool is a good step followed by spray on poly. The final, easier steps are to polish and blend the finish using a Stock Rubbing Compound applied with felt pads. Felt pads unlike cloth or steel wool are more forgiving for novices leveling the finish. A final step would be to use an even finer stock rubbing compound like Brownells Five F applied with felt pads. If you don’t like the sheen, knock it down, as Hank says, with pumice or rottenstone or thinned stock rubbing compound.
https://www.brownells.com/gunsmith-tools-supplies/stock-work-finishing/stock-rubbing-compounds/original-stock-rubbing-compound-prod1126.aspx
https://www.brownells.com/gunsmith-tools-supplies/stock-work-finishing/stock-rubbing-compounds/sheet-felt-pads-prod12713.aspx
https://www.brownells.com/gunsmith-tools-supplies/stock-work-finishing/stock-rubbing-compounds/five-f-compound-prod1131.aspx
Thanks for chiming in Kevin!
Agreed! “0000 steel wool is a good step followed by spray on poly” is a great way to touch-up a finish.
Things rarely turn out exactly as we wished. Stock making/finishing is no different. If there is an “oops” it’s no big deal – just fix it and keep on smiling!
Hank
Hank
Did a oil stain on one of the FWB 300’s I had. I do like that oil stain finnish. Definitely makes for a smooth feel when you hold the gun. Not only a satin finish but also a satin feel. A very soft feel is what I guess I mean.
And years ago here on the blog I mentioned using Lemon Pledge as a wax. My dad used that on certian guitars he made and had. And notice I say certian. The polyurethane coated woods really like the pledge. But watch out on stippling and checkering. It will load up the divits with wax. The smooth sealed wood likes waxes.
And I notice you say Orange Pledge now. I guess they changed the smell. Shows you how long it’s been since I have got a new can of Pledge. And you mentioned the smell. Maybe your polished stock might attract what your hunting. You know what I mean. 🙂
One thing I can say I have learned from painting cars and other things as well as stains is the prep work. The more time you spend getting the painted or stained or dyed surface smoothed will give you a better finish.
Do you remember RDNA. He used some tattoo dye on some stocks he messed with. He made a cool blood vien stock. Wish I still had the picture of it. But when it comes to finishing a stock I think it’s a wide open book if you know what I mean. In other words make it how you want it. Make it unique.
GF1,
I always have a can of Pledge in the workshop – so many things that you can do with it as it is both a cleaner and a wax. Use it on lots of stuff – it’s great for protecting the tables on the saws and drill press.
I clean/wax my fishing rods (and the reels) with Pledge a couple of times a year – having a base coat of wax minimizes the dirt and makes it quick/easy to clean off all that fish slime (at least I hope there is a LOT of fish slime to be removed!!).
Hank
Hank
Have you ever tryed it on your fly rod line?
My dad used bees wax on his fly lines. But I remember he used lemon pledge at times.
Was Lemon Pledge made different back then? Does it still work the same for wood?
GF1
Good idea for using Pledge on fly lines – I will give it a try.
Don’t know if the Lemon flavor is different from the Orange Pledge.
Hank
I imagine this would depend on the fish you are after – some might prefer orange to lemon, no?
Fred formerly of the DPRoNJ now happily in GA
Fred,
I’ll tie up some yellow and orange flies to go with the lines and let you know what the fish prefer LOL!
Hank
Hank,
A really nice guest blog you made for us, thank you! Your presentation was very enjoyable to read and is chock-full of useful information. Plus there are enough of us who want to make their own stocks that it’s good to have a fore-runner to show us ways to start. I’ll start with a Try Stock out of two-by pine and section it together like you did. That method makes perfect sense. Then see about finding some nice Teak for the more advanced model.
My B3’s broken wrist repair is glued and screwed, but I have some detail painting to do yet, it needs a shark mouth and eyes. Thank you again Hank, great job! Also thanks RR for your input to my wrist repair problem.
Glad you liked the series Will!
The Try-Gun stock is a good place to start – it will give you experience in machining the pieces and seeing how they go together. Have fun and don’t hesitate to contact me if you have any questions.
Please post some pictures of your stocks when you are done.
Cheers!
Hank