by Tom Gaylord
Writing as B.B. Pelletier

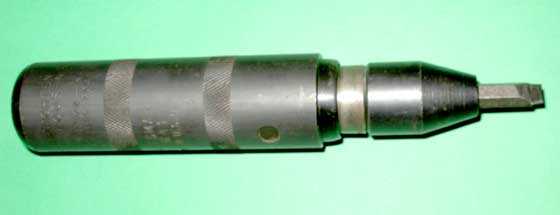
Michael’s Winchester 427 is a Diana model 27 by another name. The rifle pictured is my Hy Score 807/Diana 27.
This report covers:
- The piston seal
- Tractors
- Hierarchy of removing a stuck piston seal screw
- Time to move on
- Remove rust
- What’s next?
- Have to make a breech seal
- How to make the seal
- Summary
This is a continuation of the report on overhauling reader Michael’s Winchester 427 that is a Diana 27. Today I’m showing you the details of working on a spring gun.
The piston seal
When Diana chose a threaded screw to attach the piston seal to the piston body, they couldn’t have selected a worse method of fastening. A screw was a common way to attach spring-gun piston seals in the 1950s and ’60s, but it wasn’t a good way, because over time the screw threads corrode and cement the screw in place. In the case of Michael’s rifle, the corrosion is particularly bad, so that screw wants to stay put.
Tractors
Those who have worked on older tractors know what I am about to say. When you have a stuck fastener, don’t force it. You work on it again and again over time until what was stuck no longer is. If you force it you will have the even worse problem of removing a broken fastener. So you come at it again and again and again, and time is usually on your side.
Hierarchy of removing a stuck piston seal screw
1. Try to unscrew with a screwdriver. Be careful to not deform the screw slot.
2. Soak in penetrating oil and then try to turn the screw.
3. Use an impact driver with a bit that fits the screw slot precisely. In the 1960s, Honda motorcycles had aluminum heads that deformed when heated and cooled repeatedly. The fasteners on those heads were Phillips screws — a bad combination. What bike owners who did their own maintenance did was purchase impact drivers to get the screws out the first time. Then they replaced all the screws with fasteners that had better heads for maintenance — Allen capscrews, for instance.
The impact driver works by inserting the correct bit in the screw you wish to remove, then turn the driver in the direction of loosening as far as it will go (usually righty-tighty, lefty-loosey).Then, smack the end of the impact driver with a hammer. That drives the bit into the fastener head tightly and also imparts a slight turn in the direction you wish to go.

An impact driver is for freeing stuck screws.
4. Apply heat to the screw. I used a soldering gun to keep the heat confined to the screw and not the leather seal or fiber spacers, because I didn’t want to destroy them — yet. Now, immediately follow the heat with the impact driver.
5. Squeeze the piston seal assembly with a large set of pliers and attempt to tun the screw that way. I tried that but all it did was mark up the spacer behind the piston seal.
6. Cut away the seal and both spacers, then put the head of the screw in a vice and turn the piston body. This should free the screw. If it breaks you will have to drill out the stub and either use an Easy-Out or just drill and tap a new hole for a new larger screw. Use a stainless steel screw if you go this way.

Michael’s old piston seal is held on by a screw that’s rusted in place. In this picture you can see the fiber spacer inside the seal as well as the spacer behind the seal. The back spacer was crushed by pliers when I tried to unscrew the entire seal assembly, but it should straighten out if I can get the piston seal off. Before I used the pliers the inner spacer was flush with the top of the seal.
Time to move on
I spent about two hours getting the bit for the driver ground and then working on the screw. I didn’t grind the bit myself. Cory at AirForce Airguns ground it for me. Not only did he have access to much better equipment for this; he also did excellent work. This bit now fits the screw slot exactly!
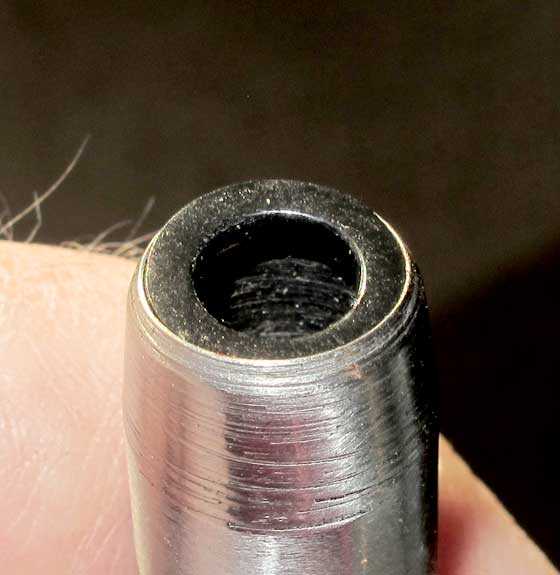
Remove rust
I am faced with removing a lot of rust from the inner parts of this rifle. To take the picture of the piston rod end that I showed in Part 2 I worked for 15 minutes on the tip of the rod with stainless steel wool. It was actually a pot scrubber pad that has now moved into my toolbox.
While I was doing that I scraped the outside of the piston body with a knife blade. That removes the rust and scale better than anything I know of. The piston body still looks discolored, but it’s free of rust on the outside. The rod and inside of the piston are another thing. They will take a lot of time scraping, and there will be some rust I can’t get. I might try a rust remover once I get the piston seal off.

Here you see the outer piston body that I have scraped smooth and the inner piston rod that is still rusty.
What’s next?
I have spent a lot of time already and not accomplished much. What more can I do? Well, there is that breech seal that needs replacing.

You can see how flat the rear seal was. It is also dead, as in not resilient. The groove in the breech on the 27 is shallow, so a leather seal should do well. Whatever doesn’t fit inside the groove will squash out to the sides. Keep it oiled and it will last for decades!
Have to make a breech seal
I looked through my airgun repair box for a breech seal that might work, but they were all too small. So the next step is to get out the raw material!

I have been making breech seals from this old leather belt for several decades!
How to make the seal
You can make the new seal with a sharp razor hobby knife by cutting around the old seal placed on top of leather and then cutting out the center for the breech. But several years ago I found a better way. A set of cheap hole punches from China now help me make my seals.
The old Diana breech seal fits into the hole punch perfectly.

This punch is just right to make the breech hole.
You can make either hole first. I use the largest punch first and it doesn’t matter where I put it on the leather — also long as there is leather all around it. The smaller punch can then be carefully positioned and turned several times to make a mark on the leather. That will tell you if it is close to being centered. Do your best, but also bear in mind that leather is a natural product. With use it will squash out in all directions and fix any slight misalignments.
I have a 3-inch square wooden post that I put under the leather for this. I use the end grain of the wood to absorb the punch’s blow. That keeps the punch from dulling.
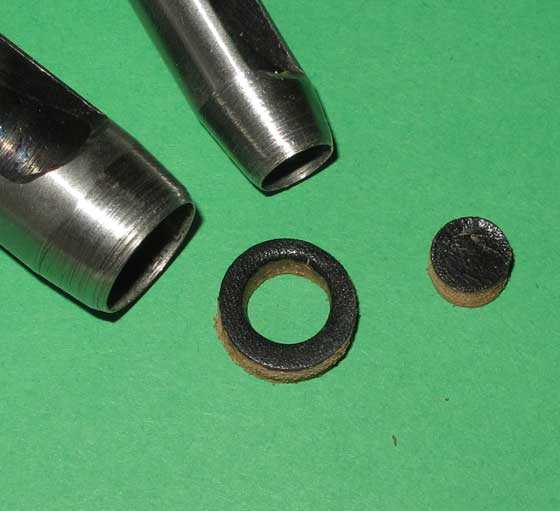
Two hole punches cut the breech seal from the leather belt. It isn’t perfect — just close as I can get it.
When I put the breech seal into the groove I tapped it in and started squashing it with a rubber hammer. It squashed out and looked larger on one side. It was also standing way too tall. So I trimmed it down with a razor knife.
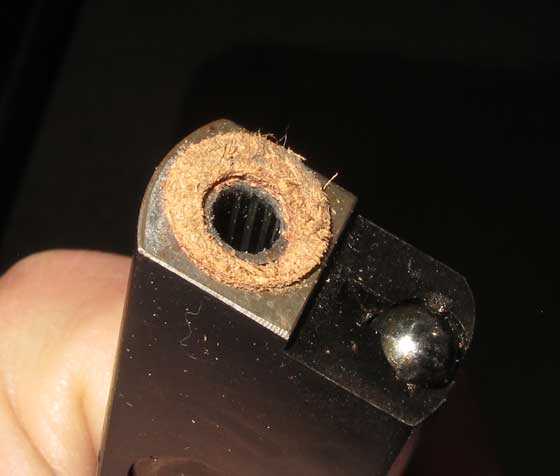
Even after some trimming the seal looks too wide on one side. I kept trimming it carefully and then I oiled it in preparation for assembly.

Here is the new breech seal, nice and juicy and ready for assembly.
Summary
I have accomplished a lot in this report. I will continue to work on the piston seal screw over the next several days. If I get it — fine. If not I will order the other parts (the fiber spacers and a new screw) and just cut the old seal assembly off the piston.

What kind of oil did you use on the breech seal ?——Ed
Ed,
Crosman Pellgunoil.
B.B.
B.B.,
Do you install the breech seal dry or do you put some grease first? I guess lithium grease is what you use for the low powered break barrels but what would be suitable in the higher powered ones?
Maligayang Pasko sa Inyong Lahat! (Merry Christmas to All of You!)
Siraniko
Siraniko,
I installed it dry.
Merry Christmas,
B.B.
B.B.
Truly a labor of love. At what point is it no longer worth it to do the restoration?
-Yogi
Merry Christmas all!
Yogi,
As long as it can be restored it’s still worth it.
Merry Christmas,
B.B.
B.B.
Hang in there; you’ll get that screw out eventually.
This gun is going to be great by the time you’re done.
Take care & God bless,
dave
And to all I say…
Dave,
Merry Christmas,
B.B.
Thank you! =>
B.B.,
I admire your tenacity with regards to getting that screw out. Stubbornness, experience and past successes’ are the driving forces for you to press on, I would imagine.
Q: Is getting a new piston completely out of the question?
Good Day to one and all,….. Chris
Chris,
Getting a completely new piston is not out of the question. And they are available.
B.B.
BB,
If I am not mistaken, it is your intention to replace the piston seal with a leather one and personal experience assures me that a leather seals in low powered airguns work great.
However, If this were mine I would be tempted to try a Vortek synthetic seal kit. I myself have been giving very serious consideration to trying these. If I do, I will let you know how well they work. 😉
Have a Most Blessed Christmas!
RR,
I though about the Vortek kit. It will certainly be a good one.
B.B.
BB,
Oh no, here we go. 😉
If you decide to get the Vortek kit, perhaps you could make a velocity/power comparison with a leather seal on this rifle?
B.B.
Sorry to hear that you are having troubles with this restoration but I’m really am really enjoying this series – you learn a lot when things don’t go smoothly. Great details!!
You could try freezing the piston/screw assembly and then dunking in in boiling water a couple of times to break the corrosion-weld. I have had success doing this when nothing else worked. Good luck!!!
I wanted to wish you Tom, and all my fellow blog readers a very Merry Christmas now as things are going to get busy with family coming today. We have our Christmas dinner on the 24th so that on the 25th everyone can relax and enjoy the day.
As a “Christmas Card” I would like to share my desk-top image of “Blondie”. Eighty percent of our local squirrels are the black melanistic phase of the Eastern Gray Squirrel, Blondie is not albino, she is leucistic – the opposite of the black phase. Here she is enjoying crab apples in the tree in my front lawn. Hope you like the picture.
Hank
Hank
Pretty much what we are doing for Christmas too. Dinner tonight. Matter of fact I’m up right now just getting ready to start making the food. And tomorrow we will eat again and for sure shoot guns. Everybody usually brings their new toys to try out. 🙂
And that is a nice color on that squirrel. What months of the year do they change color there?
And Merry Christmas.
Hank,
Blondie is a pip! 🙂
B.B.
BB
Yep those impact drivers work. Used mine for years. And your screw fiasco is what I deal with at work from day to day. You decribed it pretty dead on.
And we even have to make diffirent seals from time to time out of various material. The hole punch’s do the trick. I have even made hole punches out of old barstock and old tubing even. Once you know your inside diameter all you have to do is sharpen a chamfer on the outside diameter of your hole punch.
And are you taking the day off tomorrow for Christmas or will there be a new blog tomorrow?
And Merry Christmas to you all.
GF1,
Five days a week means no day off. But what else do I have to do? 😉
B.B.
BB
I’m sure your well busy enough. 🙂
And ok thanks. I figured there would be. Guess I should of looked back and seen what blogs you done on past Christmas days.
Hey I think I will do that right now just to see what you wrote about in the past. And you know what you didn’t do a blog this year about the different products Pyramyd AIR has that we could be getting under our Christmas trees. I just realized that.
B.B.,
Nevertheless, have a Merry Christmas.
I am feeling the Christmas spirit of generosity a bit more this year because of all of your toil on my air rifle here. Thank you for providing me with that spirit. Your gift of all of this work is actually moving.
Also, thank you very much for the detailed and clear lesson in fastener-loosening. I know very little of what you wrote there, and i intend to bookmark this blog with a title describing that, for when I next have a stubborn, rusty screw to loosen.
Michael
Michael,
I have kept a lot back from you on this. And it should be very good, but we’ll have to wait to see it. At any rate, know that your rifle is being properly cared for.
And Merry Christmas,
B.B.
B.B.,
I have absolute confidence in you. :^) As others have written, this will be one special-shooting air rifle when you are finished.
Michael
B.B. et al.,
Merry Christmas to those who celebrate such as I and my family. I’ve come to understand the international reach of this blog. So to those who don’t have Christmas in their tradition my familiy’s earnest best wishes to you for the coming year.
Regarding experience, I’ve been slogging through replacing the timing belt on our ancient Toyota Sienna. Lots of penetrating oil and breaker bar. Also learning more than I really wanted. But it beats paying the tab at our local dealer. I’d rather spend the money on Grandchildren gifts.
To quote Chris USA, “Stubbornness, experience and past successes’ are the driving forces for you to press on.” Indeed dear Chris, Indeed.
Blessings to all,
Dan
GrandpaDan,
Good luck with the timing belt replacement on your Toyota van. I recommend you try to find some YouTube videos demonstrating the procedure. I replaced the timing belt on my wife’s 2008 Volvo S40 a couple of years ago…PITA! I had to buy a couple of special tools, one to lock the cam shafts in place, and a special spanner to hold the crankshaft to torque the nut when replacing the pulley. As long as I had it apart, I also replaced all the other serpentine belts and idler pulleys. I replaced the spark plugs as well. The car had 113,000 miles at the time. Be sure to mark the old timing belt before removing it. This will help make sure you have the timing correct. If the belt is off just one tooth, you will have an issue. After I completed the job I listed the special tools on ebay and sold them. That was a one time experience I do not want to repeat. I saved a ton of money doing the job myself. All the parts came from RockAuto and cost me less than $300. The Volvo dealer charges over $1200, not including the extra belts and pulleys I replaced, or the spark plugs. The most difficult part of the job was getting the crank pulley nut off to remove the pulley. Took a lot of hammering with an air impact wrench to finally break it free. Be careful to not allow those cam shafts to turn on you when you remove, or replace the timing belt either.
Geo
A very merry holiday to all.
An old vehicle restorer once said to treat every screw and bolt you remove in the restoration process as if were the last one on earth. Because when you break one you will find out how close to true that is. With that advice I try to not break any part that is not broken.
Gerald
Gerald,
Well said.
Sometimes, even being very careful, stuff just gives in to age and corrosion. I sometimes will work on a vintage guitar and an old wood screw — and they usually have soft steel, shallow-domed slotted heads — will give up its head with just the lightest pressure, no matter how careful you were with it.
Then there are many options, but some of them are expensive (a specialty replica screw). Others involve a lot of careful work. Using the right tools a restorer can sometimes shape a new screw head to be indistinguishable from the original. I know a restorer who even went so far as to leave a very slight rise, or ridge, on one end of one side of a screw slot and another such ridge180 degrees from that to give the appearance that it had been removed and reinstalled in the past.
And there are a number of household-product treatments to age and discolor the screw to make it appear the right vintage.
Michael
Off topic, I know, but I took the opportunity to ‘zap’ the compression cylinder for a FAS6004 with a hand-held PMI gun at work today – it fires x-rays at a sample, and by analysing the absorbed and re-emitted radiation gives the composition.
This is actually on a spare cylinder I ordered a little while ago (as they were available), I have had the gun itself apart once but it’s not something to do lightly ‘just to see how it works.’ Now bearing in mind Chiappa themselves say, in the manual, “the stainless steel cylinder is designed to achieve a consistent air pressure …”, the results were:
Nickel 54%
Copper 41.7%
Zinc 4.2%
Regards, and Merry Christmas, from a long-time reader.
lain,
Cool! 🙂
Merry Christmas,
B.B.
BB,
I’m thinking you may have to remove a portion of the seal adjacent to that screw to make sure the penetrating fluid is able to reach the screw hole and spread out down there via capillary action. Just a thought – perhaps a hand turning drill bit?. The other thing I can share with you and everyone else here is that those old/new Japanese Phillip head screws are shaped differently than our USA screws (JIS vs SAE). As I recall, our screws allow our drivers to be able to “cam” out of the head of the screw so as not to overtighten or strip the threads. Japanese or JIS drivers don’t have this slight curve which is part of the reason our SAE hex head screw drivers always destroyed those side cover screws on all Japanese branded bikes. You can pick up a set of JIS screwdrivers fairly cheaply on the internet. They work great on American and Japanese screws, especially old Mikuni and Keihn carburetor screws :). Just do a search for JIS screwdrivers on the internet.
Fred formerly of the DPRoNJ now happily in sunny if chilly GA
For all,
‘Twas the night before Christmas, just playing around ~ The lead it was flying, one holer’s abound
My ammo it dwindled, of this I was ‘ware ~ For some I must save, to shoot the next year
So out came the cloth and wiping ensued ~ As B.B. has taught us, it keeps them like new
All tired and weary, I stumbled to bed ~ The smell of the Ballistol, still fresh in my head
Now was it the fumes, the Nog or the brew? ~ But as slumber came on,.. (strange) dreams did ensue
First was small pistols, dwarfed by huge scopes ~ What could be the purpose? Of none, I would hope
Next up was the pellets, some even had teeth ~ The tin clearly stated, “They’ll chew up the meat!”
From there it got worse. A nightmare it seemed ~ So many strange things. What did they all mean?
Startled awake, feet hit the cold floor ~ My heart began slowing, bad dreams were no more
Still groggy and shaking, I poured a strong cup ~ The Nog and the brew,.. I just might give up
I clicked on “The Blog” and soon it was clear ~ With B.B. and crew, I’ve nothing to fear
So blessings I counted, the big and the small ~ To be part of this bunch, is the best-est of all
Merry Christmas to one and all,….. Chris 🙂
Excellent, Chris. Enjoyed your poetic skills here. Mine are on par with my wood working.
Fred formerly of the DPRoNJ now happily in sunny GA
Chris
Nice poem. 🙂
GF1,
Slight “tweakage” from prior years, but overall the same.
Have a good one,…. Chris
Chris
Do you mean Slight “modding” from prior years but overall the same.
😉
And you have a good one too.
Wow Chris! That’s a really cool poem you wrote…made me smile 🙂 Thank you.
Geo,
Thank you. That was from 2016, with a few minor changes. It’s kind of my annual Christmas Eve gift to all my air gunning mates here on the blog.
Chris
B.B.
It might not be kosher, but, good ol’ T.B. cleaner that has Hydrochloric acid in it
will get that rust in short order. You could tape up the finish on the spring tube, and carfully bore mop that too.
Rubber gloves for harsh chemicals.
A rinse with a water/ baking soda solution will neutralize the surfaces. dry with heat, and lubriplate on the new piston seal screw, for the next person who overhauls it. I live in a house that is almost 100 years old, and if a fire or earthquake or termites dont take it, it will last another 100. Water is the enemy on it as well. The Diana will last a long time too,hopefully. Thanks for sharing about this smooth shooter!
Blessings and a happy holiday to y’all
Rob
An interesting aside…
I too dealt with fasteners on the Japanese motorcycles (1980s vintage), and discovered that they appeared to be Phillips head, but were JIS head screws. JIS for Japanese Industrial Standard. The screw usually had a dot between the legs of one of the cross slots. You would be amazed at the reduced difficulty when a JIS bit was used instead of a Phillips, on those fasteners. If I searched enough I could probably find one. I know I lost some JIS tools when one of my motorcycles was stolen, along with my toolkit in the bags, back in the 80’s in San Diego.
MMCM13,
Well, nobody told me or anyone I knew. So we just blundered along.
B.B.
BB and MMCM13,
you would be surprised and amazed at how many motorcycle mechanics do not know about JIS screws and the appropriate drivers. My friend, who is a Gold Star Yamaha mechanic (highest industry standard mechanic for Yamaha) and a BS in Mechanical Engineering, was unaware until I showed him the difference.
Fred formerly of the DPRoNJ now happily in GA
To Tom and all the readers of B.B.’s blog,
Merry Christmas! or Happy Holidays!
and a Happy New Year!
With a wish to all for more standardized parts and tools (where it makes sense,)
the use of quality materials, more great inovative design and most importantly;
great quantities of fun shooting accurately throughout the new year!
Santa shootski
For that piston screw: the one sure-fire (!) method is heat… and a lot more than you’ll ever get out of a soldering iron. Besides, you don’t want the screw itself, but more the material around the screw hot so the threaded hole will expand and give you some clearance. Fair chance it would have to get red hot.
Some years ago I was trying to disassemble the innards of an 1849 Sprague and Marston pepperbox, which required removing an extremely rusted and seized screw from an interior lever. You wanna talk about never being able to get a replacement…
But the torch came to the rescue. That ancient pistol now works, incidentally.
Side note: just got a tube of Almagard 3752. I figgered it’d be something like Lucas Red-n-Tacky… but nooooooo… much tackier and stringier. I love the consistency of the stuff… not real stiff like tar or the open-gear lube some use. Don’t know how effective it would be on a super-magnum, but it really helped on a Gamo Sporter 500 I was trying to tame.
From what I understand, a gunsmith screwdriver has straight edges to engage the slot of the screw.
Hollow ground they call it.
SAE slotted screwdrivers look like a wedge, causing them to ” cam” out of the slot.
I certainly see the need for BB o have a driver tip to be custom ground.
You will never be disappointed with quality.
He’s so good.
Merry Christmas to all. Shoot straight and be safe.
BB,
An impact screw driver is a must-have tool. I had to repair the starting clutch on my wife’s weed trimmer; one screw had some type of thread locker, and I broke one of my Wheeler bits trying to remove it. I had to make the slot a little wider with the dremel and then used the impact driver to finally get the screw out. Amost took an hour to get that stupid screw out.
Merry Christmas from Southeast Georgia!
Paul in Liberty County
Paul,
Merry Christmas,
B.B.
To B.B & all
Wish you a Merry Christmas. Thanks for all the extremely interesting articles & hard work. God bless you Sir.
Errol
Errol,
Merry Christmas,
B.B.
Hi B.B I know I’m a day late on this but as a machinist with a bit of experience with stainless steel I would recommend against using a stainless fastener without some kind of anti seize coating. Stainless screws and bolts will gall and lock up better than any lock tight can in my experience.
Red Beard Forge,
Thank you. My plans for that have been overcome by events anyway, as I have ordered all the parts from Chambers in England.
B.B.
RBF,
Quite correct. We use 3/8″ Stainless bolts at work all the time. Use a SS bolt (and) a SS nut and I have hand tightened them and then come back to wrench them and they will not budge forwards or backwards. We use just a wee dab of Stainless Steel Never Seez on the bolt threads. Not a problem if the nut is of a different material. The craziest thing you have ever seen to be sure.
Chris
BB ,
If You have access to a metal lathe . Put the piston in the chuck and use the tailstock chuck to hold the screwdriver bit . Use the chuck to turn out the screw . – I only do this when I unplug my lathe !! This has such tremendous holding power and torque . Good thing is You wont get hurt hammering or turning something – I have done this a few times on the old Weihrauchs.
Gene Salvino
Gene,
Thanks. I got most of it out. The rest will be another story.
B.B.