by Tom Gaylord
Writing as B.B. Pelletier
This is another guest blog from reader Dennis Baker. He sent this to me based on the comments several of you made to his last guest blog.
If you’d like to write a guest post for this blog, please email me. Now, over to you, Dennis.
Determining muzzle velocity
By Dennis
This report covers:
- Introduction
- Background
- Trajectory
- ChairGun Pro trajectory calculation
- Comparison of observed and calculated trajectories
- Error assessment
- Conclusion
Introduction
How does one determine muzzle velocity? Well, mostly with a chronograph. But if you don’t have a chrony, and don’t want to spend the hundred or so bucks to buy one, use it once, and have it sit around the house taking up space and using up air for the rest of its life, there is another, though less convenient, option. Read on …
Background
In my recent review of the BSA GRT Lightning XL SE (.22 caliber), I reported in Part 1 that the ten-for-ten chrony test of the gun on initial purchase had indicated an average muzzle velocity of 767 fps with 11.9-grain pellets. In a comment, I discussed several issues and showed results of several groups shot at 15 yards. I was encouraged to shoot at greater distances and show results in Part 2. Blog reader Yogi noted that the reported velocity was about 100 fps higher than he had seen in other reviews. In response to Yogi’s comment I mentioned how the free application, Hawke ChairGun Pro, could be used to infer the muzzle velocity. Using this application it was possible to infer that the muzzle velocity of my Lightning was indeed about 100 fps below the ten-for-ten measurement: about 665 fps. Note, that my review used a heavier pellet than the one used in the ten-for-ten test. I found the 14.66-grain, H&N Field Target Trophy to be a good pellet for my gun, so this is what I used in the reviews.
Another blog reader, Chris USA, suggested that it might be of value to post a blog article showing how to use trajectory to infer muzzle velocity. So you can blame Chis for this post!
If you wish to read the original review articles here are the links.
Revisiting the BSA GRT Lightning XL SE: Part 1
Revisiting the BSA GRT Lightning XL SE: Part 2
Trajectory
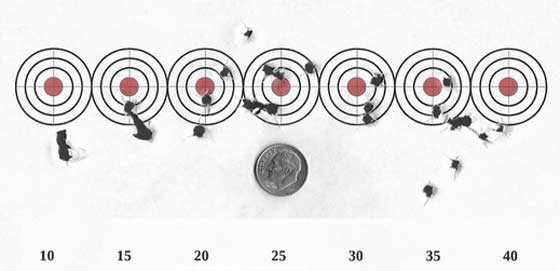
The first step is to determine the actual trajectory of the pellet. This is done by shooting groups at intervals throughout the ranges of interest. In my case, as I am interested in backyard shooting, the ranges of interest were from about 10 yards to about 40 yards. After zeroing at twenty yards, shooting four shot groups (for the most part) at five yard intervals yielded the following trajectory.

Trajectory — 10 top 40 yards.
Eyeballing a curve through these groups shows the pellet trajectory through the ranges of interest. The trajectory shows that the POI was about one inch low at ten yards and 40 yards, and about 1/8 inch high at 25 yards.

Trajectory, 10 to 40 yards with curve.
ChairGun Pro trajectory calculation
Now, if one can fit a similar trajectory curve using a mathematical calculation (or a computer application), one can determine the muzzle velocity of the pellets. Turns out, there is an application that permits this. It is ChairGun Pro from Hawke. Here is the link to the downloaded page.
The application allows you to play with input parameters in order to attempt to match the trajectory curve. You get a visual response in real time. The critical input parameters are as follows:
• Pellet weight and ballistic coefficient – The application has a database, or you may be able to get these from the manufacturer web page as I did for the H&N FTTs.
• Muzzle velocity – You play with this parameter last as you attempt to match the trajectory. My final result indicated a muzzle velocity of about 665 fps. This compares well with the manufacturers stated velocity of 670 fps. Go figure?
• Zero range – The range at which your rig is zeroed on target.
• Sight height – The distance between the center line of the bore and the center line of the scope. I found this parameter to be very critical.
• Start range/End range – The nearest and farthest ranges to the targets. In this case 10 and 40 yards.
The following image shows the parameters (circled on the image) and the resulting trajectory curve.

Screenshot of ChairGun Pro showing critical parameters
Comparison of observed and calculated trajectories
The following table shows a comparison of the POA/POI differences measured in inches from the actual target set (using the curve) and those calculated by ChairGun Pro.
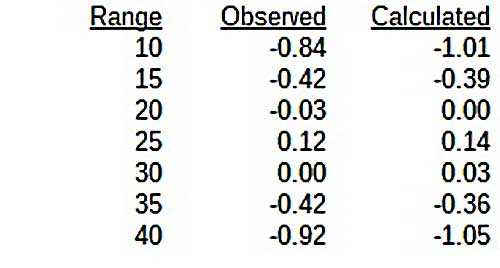
Comparison of observed versus calculated differences in POA and POI at ranges from 10 to 40 yards.
For a visual comparison, here is an overlay of the ChairGun Pro trajectory on the targets image.
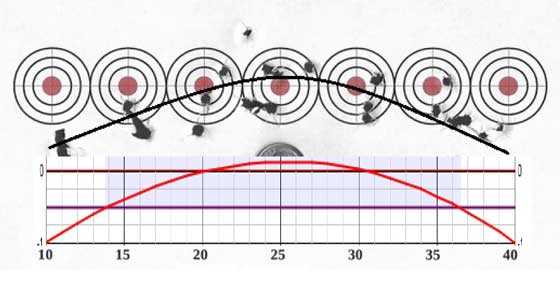
Overlay of ChairGun Pro trajectory on targets image.
In this overlay, the scale of the ChairGun Pro image was adjusted to match the scale of the targets image, i.e. the length equal to the 10 to 40 yard scale and the 1 inch vertical scale equal to the 1 inch targets. As can be seen, the images are not an exact match. The observed trajectory (targets image) does not fall off quite as quickly as the ChairGun Pro trajectory (red) at 10 yards and at 40 yards. This will be discussed in the error assessment section that follows.
Error assessment
There are quite a number of possible sources of error in this demonstration. Here are a few.
• All of the distances were paced out, not measured. So each may be off by a foot or so either way. This includes the zero distance.
• The curve fit to the trajectory shot in the field was not calculated but only eyeballed in using a simple graphics application – so not the most precise fit in the world.
• Some error may be introduced in the visual comparison when trying to match the scales of the two trajectory curves.
• The scope height was difficult to measure with precision, and this parameter impacts the velocity used to best fit the target image.
There are uncertainties introduced by each of these possible sources of error. For instance, one can show a flatter trajectory with ChairGun Pro by decreasing the scope height 0.2 inches and increasing the muzzle velocity to 685 fps. This better matches the trajectory that was realized in the field, but it doesn’t match the measured scope height.
All-in-all, I feel pretty confident in saying that the muzzle velocity of this rifle with this pellet is in the neighborhood of 665 to 685 fps. This is pretty close to the 670 fps velocity reported by the manufacturer. That’s my story, and I’m sticking to it!
Conclusion
Clearly it is much easier to determine muzzle velocity by measurement with a chronograph. But if you don’t have one, or if you want the challenge of working it out yourself, or if you just have a lot of spare time on your hands, it is possible to get a good approximation using the approach demonstrated in this article. If you feel I’ve wasted your time here, don’t blame me! As I said in the Background section, blame Chris USA!

A very good, and extremely useful article Dennis.
Well done Chris USA for conning Dennis into writing it.
Thanks, Sean. I’m glad you enjoyed it.
Sean,
Dennis gets 110% of the credit!
Dennis,
🙂 x10! Blame away!
Superb job there Dennis! I was not sure how you were going to bring it all together, but you did it in a very effective manner. Nice job on the graphics as well.
As you pointed out, there is lot’s a parameters within Chairgun that can be input. The (first) thing is knowing the fps of your pellet and gun combo. Your report illustrated how to do just that without a chrony.
… From that,.. a person can see what a different scope would do, (scope center to bore center).
… What a different set of scope rings will do, (height change).
… What a different mag. level will do, (holdover and hold under will change).
… Playing with the “kill zone” and “zero range”,.. will allow a person to keep their pellet in a 1″ kill zone the longest. That is good info. for pesters.
… Lots more
Multiple data collecting sessions, 10 shot groups and measured distances to target would give people more confidence should they care to do so themselves. As you know, Chairgun can be configured to show the hold over required for different distances. Best of all, Chairgun allows a person to understand ballistics better and makes changes in real time and see the results in real time. I find it to be very accurate,.. at least 90-95%.
Again,.. fine on the report. No hard feelings,.. I hope? 😉 You did that in rather short order too. I hope that you get lot’s of comments and questions today.
Chris
No hard feelings, Chris! Glad you enjoyed the report.
Dennis
Dennis,
That is good. You did a splendid job and kept it simple at the same time. It is the type that I would have done, if I had the skills. Then again,.. by the time I would have got around to draft 10,… it would be overly complicated and long and B.B. would have to bust out his red correction pen. 😉
Hopefully you have given others the confidence to give Chairgun a go. It is pretty simple, but kind of daunting at first glance. Well worth a little time.
Chris
For those that do not understand what changing the zero range (the range you choose to sight in your rifle) will do,..
By increasing the zero range, (going out further), the pellet will enter the kill zone (purple/blue line) sooner, not leave the top and exit further. In this case, enters at 14, exits at 20*, re-enters at 30* and drops out at 36.5. Once I know the fps of my pellet and gun, I choose the zero range that will keep my pellet in the 1″ kill zone the longest,.. regardless of what ever that distance may be. I let Chairgun tell me what that needs to be.
Looking again, it does (not) leave the top. It rises above the center. There is still 1/2″ above that black (0) line. By zeroing out further, the enter and exit points could be greatly spread and the top of the arc pushed more to the upper limits.
Hi Chris,
I do the same thing as you with slightly different parameters (I use a 3/4″ kill zone). Thought I would provide an image from Chairgun to show where that command is located.
A comment for other readers… Because pesting, plinking and hunting are done at random ranges I have set up all my rifles for a 3/4″ kill-zone and zero the rifle at the range that Chairgun calculates. The result is that the POI for all my rifles will be within 3/8″ of the POA within their Point Blank Range (PBR). The PBR is the range that requires no hold over/under to stay within the kill zone. The benefit to this setup is that I don’t have to memorize the trajectories of each rifle.
Great blog Denis! Thanks!
Hank
Thanks, Vana! Glad you enjoyed the report. Interesting thought about setting up your several rifles so that you don’t have to worry about holdover throughout the effective range – no matter which gun you are using. Cool thought!
Dennis
Hank
Read this earlier and couldn’t comment at the time.
But yes that’s exactly how I try to set my guns up.
I want my mildot holds to be pretty close to the same on each gun I pick up that’s scoped.
Magnification comes into factor also.
Oh, sorry, I see you signed “Hank” – not Vana2!
No problem Dennis – I answer to both 🙂
Hank
Hank,
3/4″ (would be) better for hunting small critters. By the way, enjoy retirement! 🙂 I have a ways to go yet. Nice close up pics the other day too. Thanks for taking the time and effort. Nothing beats a pic.
Chris
Hey Chris,
I like to use a 3/4 inch kill zone because I prefer to use a head shot on squirrels and rabbits so not to lose any meat.
Thanks, I am enjoying my retirement! Finally getting to those projects I have been putting off for so long.
Hank
Dennis,
Great write up! I enjoyed this very much. Even if you have a chrony, this is a great method to double check it. It is also a wonderful procedure for those of us who tend to over think things. 😉
Thanks, RidgeRunner! I’m glad you enjoyed the report. Is it possible to overthink things? 😉
Dennis
Dennis,
Yes indeed. We call it Paralysis by Analysis.
Siraniko
Siraniko,
That must be what’s happening when the light turns green and the guy in front of you just won’t move!
Dennis
🙂
Siraniko,
Nice little phrase. I like it.
Dennis,
Great job on this, and nice job on the graphics. I enjoyed seeing your single 10-to-40-yard target again, and was fascinated by the velocity calculation. I’ve got a small collection of guns, but it was definitely hard to bite the bullet (so to speak) and buy my Shooting Chrony over a new gun purchase. I’m getting my money’s worth from the Chrony but for those only needing a little velocity data I can see how helpful this would be.
Thanks, HiveSeeker. I’m glad you enjoyed the article.
As this is an airgun blog, I wonder if the expression should be, “bite the pellet”?
Interesting screen name, by the way. Does it have anything to do with honeybees? After a few years of seeing no honeybees in the yard, finally this summer I have seen a few taking water at the birdbaths. I wonder if wild honeybees are making a comeback or if I’m just seeing some escapees from man-made hives placed in the area? I hope it’s the former.
Dennis
Fantastic! Thank you, Dennis and ChrisUSA!
Thanks, Javagonzo! I’m glad you liked the report!
Dennis
Dennis,
Thanks for posting!
How did you determine that all the targets were level with each other? If you put them all on 5 foot stacks, but the ground topography changed, you would be off. Did you use a laser level?
Sorry to be so difficult…
-Y
Dang! Yogi!
Another source of error, and of course legitimate – although I had not considered it! The back yard does have a gentle slope upward as the range increases.
I suppose I’ll have to measure the slope, determine the effect on shooting angle, and do a ChairGun Pro study to determine the magnitude of the effect.
Hold your breath – I’ll be right back! 😉
Dennis
Dennis and Yogi
And a whole nother realm of air gunning kicks in.
Yep been there too.
🙂
Dennis,
First, let me say that I’m jealous as heck that you can plink in your backyard out to 40 yards. Second, thanks for putting the time in on this report. Very well done. I have had Chairgun for quite some time and never really knew that it could be used for this purpose. Again, Good Job
Thanks, Halfstep! Glad you enjoyed it!
Well, yes, the yard goes out to 40 yards, but I don’t know that I’m an effective plinker out that far! 😉
Dennis
Measuring The Distance Of Your Scope Height To Center Of Your Bore
One of the important “fine print” data points of ChairGun refers to sight line above bore line. The following method has been shown to be the best measured for all rifles and most particularly for springers. It accounts for all the little things that matter between trigger sear break and pellet muzzle exit. It also takes into account shimmed scope rings and droop mounts. If any shooter has not read this, now is a good time:
1. Cut a square of Aluminum foil and by my method or another, make a circle on it the same size as your scope objective bell.
2. Poke a ~1/16″ pinhole in the center.
3. Place the foil circle over the scope bell, aligning it as accurately as possible. Adjust the scope to its shortest parallax range and lowest magnification settings.
4. Make a suitable target, mount it on a guaranteed-zero-bounceback backstop (!), and illuminate the target with a very (very) bright light. A lot of light is needed, because the tiny aperture will greatly attenuate the brightness of the target. I try to use direct sunlight, but a high wattage halogen might suffice.
5. While wearing good eye protection take the shot with the muzzle as close to the target as the quality of the backstop makes prudent. Be aware that it make take some patience to position your eye properly to find and see the tiny image of the pinhole aligning with your target/aimpoint.
6. Measure the distance between POA and POI as the true scope height.
I’ve tested the method with several different scopes, and find that it seems to work with any normal eye-relief (e.g., ~3″)
I have wondered myself how to accurately measure sight or scope height. This seems easier than fiddling with straight edges and scales, and like you point out with a break barrel you still don’t really know where the muzzle is in relation to the scope or receiver mounted sight. Excellent simple quick way to measure this thanks.
Thanks, Kevin!
I hadn’t tried this. I did try shooting at very close range, but was not confident in my aim point – so I didn’t trust the result. I’ll certainly try this approach!
Thanks,
Dennis
Can we use the same procedure for measure height of a peep sight or an open sight.
What I am trying to get to work is have the pellet stay in a one inch or half inch area of its trajectory, taking advantage of .177 calibers flat trajectory.
Thanks for the info
Manish
Manish,
I’ve never tried it with a peep sight but don’t know why it wouldn’t work.
I’m not clear on exactly what you’re trying to do but based on your screen shot from chairgun showing trajectory it appears you’ve accomplished your goal of keeping your pellet inside one inch at the distances of 15 yards to 33 yards (your zero point).
Dennis,
Great job, I definitely have a better understanding of the ChairGun Pro and how to understand the information in the trajectory tables. Definitely one of the best tools for air gunners and the price is right to boot.
Thanks Coduece! I’m glad you enjoyed the article.
Dennis
Great way to measure scope height. I was wondering “what about droop mounts”. Good job, even I understood it. The chairgun application is a great was to measure without chrony. I need to do both and compare. Thanks,
Jim
Thanks for the comment, Jim!
Dennis
Great job Dennis, and thanks to Chris and B.B. for their part. I was thinking that this method could also work in reverse. If you measure the speed with a Chrony at the muzzle and the pellet trajectory at two or three different backyard distances – say 5, 10 and 20 yards – then you can use ChairGun Pro to deduct the ballistic coefficient for that specific pellet, even if it is not listed anywhere. This in turn would allow you to calculate the trajectory beyond the backyard limits, say 40 or 50 yards. In theory at least.
Henry
Thanks, Henry.
Sounds like a plan on the ballistic coefficient.
Dennis
Yep
Brought that up many times over the years on the blog when the subject arose.
I put targets out at 10 yard increments from 0-60 yards and aimed at the bullseye. What that also does is give you your hold over and hold under at the different distances.
Oh and forgot I would mark on the target paper what yardage it was at. I would collect them all and lay them side by side on a table. Then circle the group and draw a line to each group. It’s very easy to see the pellets flight path doing that. You can also see if the group shifts left or right of aim point using that method.
Another way to measure scope hight is lay a ruler at the center of the scope tube and measure down to the center of the barrel. You can get pretty precise that way.
Thanks for the comments, GF1! All good stuff!
Dennis
Dennis
And thank you. 🙂
And just to say. I’m a big fan of Chairgun. I have it on my phone now for a couple years. So got it with me all the time no matter where I’m at.
But I use to just set at my laptop and punch in different perimeters on those cold late winter nights when there is not much else to do. I like that if you have a scope that has a reticle that is in the drop down in the program you can select and print out a scope veiw with the yardages noted next to the mildot reticle or half mill dot reticle. Basically a cheat sheet to reference your hold overs and understand.
And like you did comparing your target trajectory to the Chairgun trajectory. I like verifying my holds with the targets placed at different distances for the hold over and under compared to what the scope veiw showed in relation to the Chairgun trajectory graph.
And as it’s said basically Chairgun is a estimating tool. And that’s all ok in my book if you know what I mean. It’s another way to help you get better shooting results.
Fun stuff is all I can say. Oh and Chairgun did help my two daughter’s visualize holds and how the pellet flew before we got outside on paper. They been shooting now for somewhere around 10 years and been using Chairgun for at least the last 5 or so years maybe longer now. Can’t remember. But I do know it helped them.
And good article today. Enjoyed reading it.
Dennis,
Great job on explaining another use for Chairgun.
Siraniko
Thanks, Siraniko! Glad you enjoyed the report!
Dennis
One of the interesting things I learned from long range air gun shooters who do all the rocker science like methods — is that ballistics coefficient varies with speed and distance.
They take 2 chronographs and put them at a measured distance along the trajectory of the pellet. Then they use the 2 pellet speeds and 2 distances to calculate the ballistics coefficient.
They find that advertised ballistic coefficients are no more accurate than advertised muzzle velocities…
John
I think what I’m getting out of your comment. Is that in the end you have to shoot to see the true end result.
Is that what you mean?
If so that’s what I believe. Nothing beats true hard shooting facts of the pellet hitting the paper. For one thing variables are enormous.
It can change from shooting session to shooting session. Where the pellet meets the paper is what counts.
Thanks for the comment, John. So many variables! Nevertheless, the results seem to hold together pretty well in this instance, and it was a fun experiment.
Dennis
G’day Dennis,
I guess you are basically measuring the effect of gravity on point of aim and point of impact over measured distances.
See if we can get you or BB to test the MagnetoSpeed for velocity.
Cheers Bob
Dennis,
Thanks for your work figuring this out and sharing it with us. I’ve made a folder and am cutting and pasting useful information into documents. I think Chris USA said that he does something like this. Anyway this one is a keeper.
I doubt that I’ll ever invest in a chronograph and AFAIK no one near me has one, so your method gets me a practical substitute.
Off topic: I bought a Walther LG55 off Craigslist. The seller found that the seal was rotted and had a new OEM seal installed. I’ll sell it eventually, but I’m going to enjoy it for a little while. So smooth shooting cycle and light trigger with no discernible creep. Does a .22 cal, more powerful springer ever get this good?
I wish that there was an airgun “library” so to have hands-on experience with a number of airguns. A range of power plants, different velocities, experience the pros & cons without buying gun after gun. The CO2 guns have some desirable qualities, essentially a PCP with a different gas powering it. Multi-pumps too,no recoil, can leave it by the porch door charged and ready for a pellet for a quick shot.
I’m determined to sort out the pump/Maximus matter and I have high hopes for the RWS model 94. The 94 is a much more finished/refined than the Gamo hunter. I think it will provide a better return on time invested than trying to upgrade/tune the Gamo into a very accurate shooter.
We’re celebrating our oldest daughter’s birthday this weekend out of town, No Sat PM Dan time. I won’t disclose her age, but I’m far too young to have middle-aged child. I’m a most fortunate man.
Best wishes to all
Dan
Hey Dan,
Really great comment on the report! Thanks so much.
Seems to me that I’ve seen some kind off airgun database online somewhere, can’t remember where.
Congratulations on the children. That’s what’s really important!
Dennis
Yep Bob,
It’s just working with the observed trajectory.
Dennis