by Tom Gaylord
Writing as B.B. Pelletier
Part 1
Part 2
Part 3
Part 4
Part 5
 Diana 45 is a large breakbarrel spring rifle.
This report covers:
• Piston head swaged
• Eliminate sloppy tolerances
• Buttons
• Tighter spring guide
• Remove all burrs
• Clean the spring tube
• Lube the spring tube
• Lube the piston, piston liner and mainspring
• Lube the leather piston seal
• Leave the trigger alone
Today, I’ll show you all the things that have been done to the Diana 45 parts; and I’ll clean, lubricate and assemble the rifle. This will be a long report, so I am breaking it into two parts — today and tomorrow.
Piston head swaged
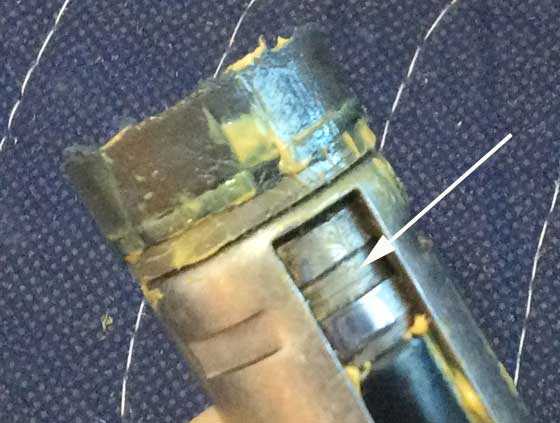
Before we get to the job though, I was asked by one reader to show how the piston head is attached to the piston body. If you want to replace the leather piston seal, the piston head has to be removed — and that isn’t going to be easy, because it is mechanically swaged onto the piston body.

Looking through the cocking slot, we see the piston head has a groove cut around its base (arrow). The piston body is swaged into this groove by several mechanical punch marks around the end of the piston body. This is a fast way to assemble the head to the body, but the piston head will be difficult to remove.
Eliminate sloppy tolerances
There were two concerns about the internal parts of this spring rifle. The piston was a little loose inside the spring tube, and the spring guide fit the mainspring a little loosely. The body of this Diana 45 piston swells wider at the rear; but even with that swelling, it still had a little play inside the spring tube. Normally, though, the spring guide and spring will keep the piston body centered and out of contact with the inside of the spring tube. However, when the rifle fires, there can be points in the piston’s travel where it bumps into the spring tube for an instant. The swelled spot at the rear of the piston takes care of that on a factory rifle, but we’re looking to remove all possible vibration from this rifle, so that slop has to be eliminated. We did it with three Delrin bearings — so-called “buttons” — placed 120 degrees apart near the rear of the piston.
Buttons
To install the buttons, the rifle’s owner, Johnny Hill, drilled the piston body just in front of where it swells out. If he had drilled it right at the swelling, the buttons’ surfaces would have to be only a few thousandths of an inch high. As it was, they were only a couple hundredths of an inch high when the hand-fitting was completed.
Johnny reports that the Diana piston is extremely hard — so hard that a steel drill bit does not want to bite into it. He drilled it on a mill and used pilot drills to start the holes. He said it was a real chore to drill those 3 holes, because his bits tried to walk, and it was impossible to center-punch the holes. Johnny is a skilled machinist, so if he’s complaining — I’m listening!

Three holes were drilled around the circumference of the piston at the rear, just ahead of where it swells. Then, 3 Delrin bearings — called buttons — were tapped in with a hammer.
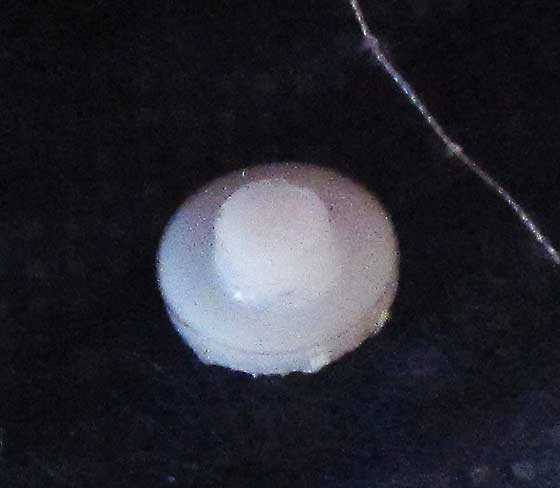
A Delrin button before fitting.
The buttons, which are actually bearings, are made from Delrin — a type of engineering plastic. Their shafts just fit the holes in the piston, and each had to be tapped in with a hammer. No attempt was made to bond them with the piston, because the spring tube will hold them in place.
Each button was then ground or filed down to a few hundredths of an inch higher than the piston body at the swelling. As this work was done, the piston was inserted into the spring tube many times to gauge the progress of the fit. This work was done by eye and feel, alone, but the finished product (the respective height of the 3 buttons) is probably not more than 0.02 inches different.
Grinding the buttons went faster; but for the final fit, a file was used. I was looking for a tight fit that would still let the piston slide in the spring tube. When there’s no play between parts, we call it an interference fit.

The button is filed to fit the spring tube.
Tighter spring guide
The other thing I did to eliminate tolerance/vibration was ask Johnny to make a new rear spring guide that tightly fits the new mainspring. In fact, it fits so tight that the mainspring will not slip on. It has to be twisted on in the direction opposite of how it’s wound. That causes the spring coils to open slightly — something they will also do as the spring is compressed during cocking. Airgunsmith Jim Maccari refers to this type of fit as the spring guide being “nailed on.”
The new mainspring was selected to be as close as possible in size to the original spring. It fits inside the black sheet metal liner of the piston quite well, so nothing was needed there. We know that the mainspring will get a little larger on the outside as it compresses, so some room has to be left for that. Now that the buttons were hand-fitted to the spring tube and the new spring guide was made, all the other parts were gathered and the tuneup could begin.
Remove all burrs
This is when you inspect the metal surfaces of the parts and remove all burrs. They’re found around the edges of the cocking slot and at all places where metal has been cut. I inspected the entire rifle and found no burrs anywhere. This isn’t common, though I will say Diana airguns are burr-free more often than many others. The worst guns are the lower-priced Chinese airguns, such as the B3 sidelevers and the inexpensive breakbarrels. In contrast, I’ve never found a burr on a TX200 of any vintage. Finding no burrs to remove from the Diana 45, I moved on to cleaning the rifle.
Clean the spring tube
The first task is to clean the spring tube. Although this rifle is very old, it has never been apart before, and the inside of the tube is still rather clean. To clean it completely, I folded a strip of paper towel over the end of a long dowel rod and attached it with a rubber band. I soaked the paper towel in alcohol and swabbed out the entire spring tube.
Lube the spring tube
Next, I lubed the inside of the spring tube with Air Venturi moly grease by applying it with the same dowel rod method. I spent some time making sure the moly was completely and evenly spread around the inside of the tube.
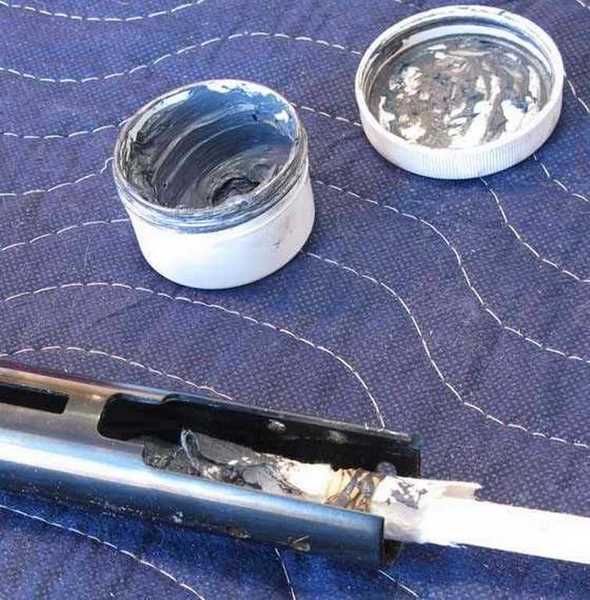
I’m applying moly grease to the inside of the spring tube — front to back. The rod is a dowel, and the grease is on a strip of paper towel that’s held on the dowel with a rubber band.
The Delrin buttons will get impregnated with the moly as the piston slides back and forth, and that will make them slide better in the tube. The leather piston seal will burnish some moly into the forward end of the spring tube that serves as the compression chamber. The gun will probably burn grease for a while during the break-in period of this tune, but it will also be lubricated for the next 10 years, minimum.
Lube the piston, piston liner and mainspring
Next, I lubed the piston rod (a rod that runs down the center of the piston) with lithium grease. Then I lubed the outside of the piston liner with the same lithium grease. I also lubed the inside of the mainspring with lithium grease, but I coated the outside of the spring coils with black tar. That will cut any tendency to vibrate. The coating was very thin, because I’ve tightened up all the other tolerances in the powerplant and didn’t need to dampen much vibration. Put on too buch black tar, and you’ll slow down the rifle.

I spread lithium grease on the piston rod. This rod keeps the mainspring from kinking too severely when compressed, but it doesn’t have much contact with the spring at any time.

This is the sheet metal liner that fits inside the piston. Among other things, it prevents the cocking shoe from dropping into the piston. Lube it on the outside with lithium grease.

I lubed the inside of the mainspring with lithium grease, but I lubed the outside that comes in contact with the inside of the piston liner with black tar — a viscous grease that dampens vibration.
Lube the leather piston seal
I also lubed the leather piston seal with lithium grease. That needs some explanation. You know that moly grease was spread on the inside of the spring tube, which includes the compression chamber. Isn’t that enough lubrication for the piston seal? If this was a synthetic seal, then yes, that would be enough. But this seal is leather.
Leather needs to have oil to keep it soft and pliable. That’s how it seas the piston. I used the lithium grease on the leather because I knew it will last (provide oil to the leather seal) for a very long time. I have a Diana 27 that I lubed this way over 15 years ago, and it’s still going strong.

I applied lithium grease to the outside of the leather piston seal to keep it soft and pliable.
The lithium grease allows all those parts to slide against each other with reduced friction. The piston liner fits the inside of the piston very well, so the lithium grease is all that’s needed. The black tar on the outside of the mainspring dampens any vibration between the mainspring and the piston liner. I have now removed all tolerances from the inside of the mainspring (with the larger spring guide) and from the piston (with the buttons). This thin coat of black tar should finish the job.
Leave the trigger alone
Here’s a question that comes up all the time: Should we try to “tune” the trigger? I say, “No.” Unless you know the Diana 45 trigger unit very well, I advise you to leave it alone. This is not some straightforward trigger from a Mauser. This trigger is complex. There are things going on inside that swarm of parts that would take weeks to fully understand.
I knew from the earlier testing that this rifle’s trigger worked well, and that was good enough for me. How bad would it be if I tuned the rifle, only to put it out of commission by spoiling the trigger?

The trigger is adjustable. Let that be all you do to it.
I’m going to stop here, because the next thing is to assemble the parts into the rifle. If all goes well, that will complete the tuneup, and I’ll be able to begin testing the gun again. Tomorrow, we’ll finish the job.

I knew when you talked about buttoning this gun it was going to be fun.
At work we drill into a lot of round surfaces. Center drilling is one way and another is taking a end mill and making a small flat surface where your hole will be to give the drill a flat surface to start in. But a regular high speed drill will still probably try to walk.
But the best way to go is a all carbide drill that has the point split to get rid of what they call the chisel point on the drill. If you do that the drill will not try to walk.
We make parts at work that is a spring steel tube that has multiple holes located around it. No kind of way would we be able to drill the holes in our production machines without the carbide drills with the points split. The machine produces a part every 5 seconds so that means that drill has to be done in less than 5 seconds. And the machines don’t have enough machining stations to center drill.
And I do believe it would of been easier to put the piston in a lathe and make a groove in the diameter of the tube and then cut a piece of the right thickness plastic or nylon shim and place it in the groove.
That’s pretty much what the TX has from the factory.
Just conjecture here, but wouldn’t cutting a groove around steel that hard and putting the kind of pressure and shock that the firing cycle exerts on that part be asking for a stress crack?
Zack,
Apparently not. The piston may also be spot-hardened.
B.B.
I tend to adhere a ring of 5 mm PTFE strip around the piston with 2 pack adhesive and then remove material with a file until I get a similar effect as buttoning, I’ve had traditional buttons come adrift before now and this both settles my mind but also means I don’t have to drill the piston and has a very large glued surface.
Dom
Is the stuff you use gray in color?
That is probably the same thing I’m calling a shim.
I can buy it through work if I need it. Ours comes in strips that is from a 1/16″ wide, 1/8″ wide and 1/4″ wide.
And it also comes in different thicknesses. From .040″ thick to a 1/8″ thick.
And the stuff we have will hold a shape. In other words its flexible but will stay the way you form it.
Is that what your talking about with the PTFE strips.
We also can get different inside and outside diameter nylon or derlin split rings that are different widths. They come with a 45 degree cut in them.
You just separate them a little and slip it over a piston to the groove and you can sand or file inbetween the cut to size it for fit.
We don’t file or sand the outside diameter that way it will keep a true diameter. And that way you can leave a end gap clearance or fit to make a gapless seal.
Mine is white GF, and it’s used in hydraulic seal sets as a slip ring, pre formed with a 45 degree cut
I find you don’t need to machine the piston but I do reduce the ring leaving high points as I don’t want to increase piston to tube friction any more than buttons, and preferably less
Dom
Dom
That comes on our hydraulic repair kits also.
I’m not sure what this grey stuff is called. I’ll try to find out what its called.
But the gray stuff we use is for air cylinders kind of like the white ones your talking about for the hydraulics.
GF1,
I have thought of doing that exact same thing. Cut a groove around the piston and make a delrin ring to fit and press it on and machine it down to fit. Great minds must think alike.
RR
Read my reply to BB.
RR
Use a delrin guide like you say or better yet you can get metal rings that have an L shape on the end that is opposite each other so that you expand it over the groove in the piston and the squeeze it together to latch the opposite L s so it stays tight on the piston skirt and will wear and fit much more uniform inside the compression chamber, they are used on the front pumps of auto trannies to deal the three or four different oil passage coming out of the pump into the valve body so the trans fluid goes to the correct valves to make it shift correctly and most any trans shops should have boxes of them in varying sizes to chose from.
I know when my B40 comes back apart I am going to take the delrin rings on the piston like a TX has to my local ammco shop to see if I can match them up to either the steel latching rimgs or a slightly thicker delrin ring.
BD
GF1,
We thought about the piston ring idea, but the slits in the spring tube would cut such a ring in no time. .
B.B.
BB
Not true if you do one important thing.
Radius or deburr any sharp edges on the slot.
The derlin style shim that is on the Tx piston rides free in the groove that is machined in the piston. The piston kind of floats on the inner diameter of the derlin shim ring and the outside diameter floats on the cylinder wall.
There is really no time that the shim ring is loaded. Maybe just a bit at cocking but the load will be placed opposite of the cocking arm slot.
To me its easier to machine a groove and fit the shim ring. All you need is different thickness shims and cut yo the correct width of the groove that is machined. A lot more simple than trying to get 3 buttons all the same size so the piston rides true.
Anyway just me. But can’t wait to see how it shoots when your done.
BB
The split delrin rings on a TX or B40 pistons do not get cut by the slot in the spring tube so as long as the burrs are removed from the side of the spring tube and as you stated that the 45 did not need any deburing as all the edge were smooth so why would it cut a delrin ring any faster than a TX or B40 does especially since the rear spring guide is a snug fit in the spring and it has the inner guide in the piston there should be very little to no side loading of the delrin rings any more than would be applied against the three buttons. So either method should work equally well and it most likely would have been easier to cut a groove in the piston skirt on a lathe with a carbide bit than it was to try to drill three holes into the skirt.
I do appreciate you showing us how to button a piston but if the design of the parts allow I would prefer a complete ring versus only three contact points that the buttons provide as one or two of the buttons may be loaded more than the others in operation and while the buttons are fixed in place a delrin ring is not and is free to rotate with the piston as the spring winds up when cocking and unwinds when firing.
BD
Looks like you are setting the rifle up to diesel violently?
I’d use a MUCH less grease in the compression area, and preferrably some less combustible grease on the piston washer.
Dag,
If this gun had a synthetic piston seal I would have held off on the grease, but leather needs lots of lubrication.
B.B.
BB,
I am afraid I do not understand. Why would it be necessary to remove the piston head in order to replace the seal. I would think it would be held on by a screw.
I believe my seal is riveted then cross pinned. The part that is swagged is the spring guide.
B.B., I enjoy your reports on shooting and tuning these old air rifles. The Diana 45 seems more complex than most others. I know of one for sale, but have hesitated buying it because of your reports about its vibration, and the expense and difficulty of rebuilding it.
RR, I would very much like to read about your BSA 1906. Its a historic rifle, and seems to be very high quality and a great shooter.
RB
RR,
Look at the picture. There is no screw.
B.B.
BB,
I am sorry, but I have looked at the pictures and I still do not see what is holding the leather piston seal on the end of the piston head.
RR,
What holds the leather seal are washers in front of the seal. Where you would expect a screw, Diana put a washer that cannot be removed from the front of the piston. The piston head is an assembly that has to be taken apart.
B.B.
BB, I know you have posted it before, but I CANNOT FIND IT! What is “black tar” made from?! I have moly, lithium grease, pellgunoil, silicone chamber lube and freaking 30W detergent free motor oil, along with ATF viscosity reducing lube on my bench along with about ten other forms of lubricant… including Whiscomb Honey! But what, pray tell, is in that evil, horrid, unreplaceable Maccari Black Tar.
Thank you kind sir. ~Qjay
The “black tar” referred to here looks like Jim Maccaris heavy tar which is available through the Air rifle headquarters website.
Qjay,
Open gear lube is the answer.
B.B.
B.B.,
Not a “tuner”, at least not yet. The video “clips”, while short, are very nice!
A little video can save a lot of printed words. Not sure if it’s harder or easier for you in the end. Just wanted to say,..videos add a “nice touch” to your reports.
Chris,
Videos are nice and you will see more of them, but for details the printed word cannot be beat.
B.B.
B.B.,
Thanks for another great report on this project. I am curious why you put lithium grease on the outside of the piston liner after you put moly grease inside the spring tube. I am also wondering why you would have to separate the piston head from the body to replace the leather seal. I am looking forward to the final assembly and testing results.
Tabbrown,
The grease on the outside of the liner will be obvious tomorrow. You can remove the piston seal without removing the piston head, but a new one cannot be put on.
B.B.
For the trigger unit. When shooting black powder revolvers, I used this to clean the internals without having to remove all of the trigger and action parts.
Try suspending the trigger unit in a mixture of. One pint each of Murphy’s oil soap, Hydrogen peroxide and alcohol. The dirt and crud will bubble out. Leave it in the mix for an hour or two. When it comes out, wipe it off. You can then hit it with some aerosol lube if you want.
Tom,
Thanks for that tip. This trigger is quite clean on the inside as it stands.
B.B.
A foaming cleaner – sounds interesting!
Never used Murphy’s Oil Soap before and will have to look for a local source for it. WIKI has a good description of this product and its uses.
For cleaning mechanical parts I have used naphtha and light machine oil (3in1 oil) in a ratio of about 20:1. Dunk the part, agitate and drain, the old grease and crud comes out, when the naphtha evaporates it leaves a thin film of oil behind for lubrication and protection. Great for small parts locks, mechanical watches and stuff that are not tolerant of dirt.
Naphtha is very volatile so the proper precautions (re:open flame, ventilation, storage) should be used. Varsol can be substituted but it is not as good.
Thanks for that recipe Tom!
This rifle is well worth the effort to optimize the fit and function of the power plant components. I had an old Beeman 250 (RWS 45). It was every bit the match for the much lauded FWB 124 or the Beeman R1.
This comment was sent to spam and lost, so I’m re-posting it.
You got me to pull my 45 out of the closet and find the reason I put it there 15 or so years ago. I didn’t have a chrony then but could tell it was getting weak.Tested it the other day with some light 7.2gr. super H points and got barely 610 fps.With help from your instructions I took it apart and all looked pretty good till I checked the leather seal. It had a big crack in it front to back. The spring is bent a little too. My seal looks like it’s riveted in then the rivet is cross pinned. Any idea where to get a replacement leather seal without having to make my own? I think Vortek has a conversion to synthetic I might try.
Richard
Richard,
If the leather seal is bad I would try the Vortek synthetic seal exchange.
B.B.
Thanks for the info!
I think I’m going to use macarri old school glue on buttons. I heard the piston steel on these is very hard.
Where did you source the spring guide?
No top hat?
Also I just received a tin of the new Chinese pellets you wrote about.
Superb accuracy out of my hw35 and clocking in over 12 ft lbs. Bested all my hn and rws wadcutters considerably.
Rob,
Johnny Hill made the new spring guide for me. I showed him how tight the fit had to be and he got it right.
The top hat is a weight at the front of the piston. This rifle has that weight already, The piston liner negates the need for a forward spring guide.
B.B.
B.B.,
Regarding that super-fight spring guide and having to twist on (nail on) the spring, might that prevent the spring from compressing as much as it otherwise might once the rifle is all back together?
Thanks,
Michael
Michael,
No. As the mainspring is compressed, the coils expand. So, even though the guide is tight with the spring at rest, it gets loose when the gun is cocked and the coils slide over the guide freely. When the gun is fired, the coils get tight on the guide again and kill any vibration.
B.B.
That happens with the spring going into the guide or piston since the outer diameter of the spring increases, like my hatsan that I need a spring for because the one I got (trying to go a little too beefy apparently) would “nail in to the piston but that just locks it up trying to compress.
BB,
So HOW do you remove a piston head that has been swagged?
Joe,
I have never done it, but I believe the swages (the places that are punched into the piston body and into that groove around the piston head) have to be removed. I would probably grind them out or better yet, machine them out. Then the head comes out and can be disassembled. When it goes back you have to use a screw or screws to hold the head in place.
That would be one way to do it.
B.B.
BB,
Looking at the picture above, if I machine the piston body where the indent grooves are, the piston head will come out, BUT I would destroyed the piston body and thus have to make a new one, or did I missed something?
Joe,
It will be careful work, but it can be done.
Are you trying to do it?
B.B.
BB,
Yes, but HOW exactly can I separate the piston head from the piston body with damage to the piston body?
I mean without damage to the piston body.
Joe,
Use an end mill to mill through the swage dents. There are 3 around the piston body. The cutter has to be small to not cut the channel in the piston head any wider. Set the depth of the plunge to stop at the depth of the bottom of the channel in the piston head.
Do that for all 3 swages and the piston head should slip out of the body. I did see a crosspin, so you might have to drift that out, or drill it, if it doesn’t go all the way7 through.
B.B.
BB,
Thanks, but your advise means I have to make a new piston body, correct? Because I don’t see how I can still use the body after I mill those 3 swags out of it.
Joe,
Well, you could weld the mill holes and grind them smooth. Or you could use the piston with 3 notches in it and use the unnotched parts between the milled slots for the screws to hold the head.
That’s 2 ways to do it.
B.B.
BB
Your reply to Joe wasn’t there yet when I was asking about re-installing the piston head.
Welding sounds like the best way to me.
BB,
Again thank you for your expertise. I think welding is a way to go, but since I am not a welder, I think it is best if I machine a new piston body on my lathe. This also offer the advantage of making a piston body custom fit to the gun with tight tolerance. Since I am not familiar with the swagging process, could you please educate me on how to swag my new piston body to the old piston head?
Joe,
Swaging without machinery is a job for a blacksmith. I am not qualified to teach it, because other than lead, I don’t swage things.
I’m sorry.
B.B.
Joe
I read your comment below to see your new comment to BB.
We use to have a machine at work that was called a Denason press if I’m remembering the name right. It had multiple pods that the tube would set in on a rotating table. The machine was setup to run production so it had six pods to put parts on. The machine ran on hydraulics and could produce tons of force as the ram came down.
The pods had a rod sticking up from the center that the tube was put on to keep the head from getting pushed down in the tube.
The ram had a pod that housed three fingers that had the shape of the crimp that would be the swaged area as BB calls it. Those fingers and pod that housed the fingers had a cone shaped taper in them.
As the rm came down the fingers would push up inside the taper of the pod then that would make the fingers (press) the dimples into the metal tube.
And if you had one of those automotive hydraulic single rams I guess somebody could think up a way crimp the dimples in.
But you for sure ain’t going to do with a bench vise by tightening the jaws. And a hammer and punch would take some heavy hitting to dimple the tube enough to hold the head in place.
So swaging or pressing those dimples or crimps in the tube takes a lot of pressure to bend the metal.
But on the other hand the head doesn’t need to fit the tube securely. The piston seal is what makes compression. So the head would try to push into towards the piston when the gun is fired.
Where the problem would arise is when you try to cock the gun the spring will try to push the head out of the piston tube.
So the crimp holding the head in would have to hold up to the multiple times of cocking and whatever pressure the spring creates.
I think mig or spot welding the head in place would be the best way for the one time with the gun your doing.
If you were going to work on more guns then maybe you could figure out a crimping device.
Joe
And I should say that as that pod comes down with the 3 tapered fingers in it.
As it comes down over the part and the fingers start moving up in the pod they also start moving I towards the part your crimping. How much you crimp is controlled by how far the pod comes down.
Suppose to say in towards the part your crimping.
BB
After you mill out the dents and get the cross pin out if there is one.
How are you going to secure the piston head after you re-install it?
GF1,
Are you planning on doing this???
I don’t mind describing how something is done, but the person I am talking to has to try to envision the work that I am describing. If you want to know how the piston head will be reattached, draw it out on a piece of paper. This isn’t something you can just talk about. You have to envision it in 3 dimensions.
B.B.
BB
Just for your info. I have done it.
And you will find out even after you mill out the dents and get the cross pin out if there is one you will need to use a punch and hammer and knock the head out of the piston.
If you do a good job of milling out the dents it will be easier to get the head out.
I’m sure you don’t know but a lot of the cylinders I work on at work a very similar to air guns. Almost even the same concept but used in a different way.
GF1,
Of course you will have to use a punch. The swage dents leave ridges around where the metal is displaced, and even when they are milled away, the ridges will still hold the piston head. But that is just a part of the job. You expect it.
B.B.
BB
You got it.
Gunfun1,
Thank you for your comments. I asked BB another related question (see above).
Gunfun
I left you a reply that you beat me to the punch but I guess it got caught in spam.
BD
BB
If I was to try and replace the piston head on that style with the swaged head held to the piston tube like it is. The easiest way would to be to use a mill and mill the swaged area out of the piston tube until the head can be removed . Then replace the head with new seal back into the piston tube and swage it in three areas that were not previously swaged to hold the piston or use a TIG welder and just weld the milled out area of the piston tube back in with the welder to effectively reswage the head in place.
It would be more work that just replacing with the Maccari screw on synthetic seal, but as much trouble as Johnny had drilling for the buttons it would be likely no different having to drill the piston head to thread it for the synthetic seal as well.
BD
Buldawg
If the right drill is used. Solid carbide to be exact with the point split it won’t be hard yo drill out the head.
I have to drill out hardened tool steel dowl pins that get broke off. And the only way is with solid carbide.
So I do believe the head could be drilled without taking the whole head apart like BB was talking about above.
Now tapping the hole for the threads could be a little touchy if the head is hardened material. It can be done you just have to go slower and easy and keep backing the tap out and blowing the chips out. Add a little more cutting oil and do a few more threads. And back out and do the same till the threads are complete.
I think that would be better than taking the head and separating it from the piston.
Who knows always several ways to do something.
Gunfun
Yea I knew it could be done “with” the correct tools and I agree it would be easier to replace the seal than remove the piston head as well. I was actually typing basically the same thing about milling out the swages on the piston tube and then either reswaging at three points that had not been swaged or as you said as well the best would be to Tig weld the piston head back into the piston tube.
I have left you a couple other posts that are caught in the world of spam. so hopefully they make it to you soon.
I got my parts for the firepower today and the new piston looks ugly compared to the one you reworked for me that will find its way into one of my NP 22 cal guns along with a couple more plain plates as crosman calls them that sit behind the NP spring to add some more preload and make my own Titan XL model,
I got about 300 shots thru the 40 today before the rain started and even got two squirrels by just using the mil dots to make the pellet hit the POI with my POA as it was shooting 1 inch high and 2 inches right with the scope still optically centered. it has also all but quit smoking and has just a hint of burning smell with a little puff of smoke out of the breech end of the barrel when loading another pellet just every 5 to 10 pellets.
BD
Buldawg
Don’t you hate when you use to much lube when you assemble a gun.
But it sounds like the 40 is getting closer to running clean.
Ready for another barrel cleaning yet? Or are you going to shoot it some more?
Gunfun
I am going to finish the tin of pellets as there are maybe 100 or so left in it so by then it should be clean from my over indulgence of lithium grease and be ready to clean the barrel and start sighting.
I am going to wait and get some more chrony numbers first though as its supposed to be raining off and on for the next three or four days so I am not sure I can do any sighting in plus I was going to use the boxed CP lites I have on their way to sight with as they were shooting at 884 fps with the over lubed piston and they were grouping good today actually well enough to get to squirrels so I am going to sight with the CP lites and see how it likes them.
BD
Buldawg
Already started raining here.
Hope its dry by the weekend.
Gunfun
Started here late afternoon and is supposed to off and on thru the week till the weekend.
BD
Buldawg
I need to check the weather for the weekend.
Its already a sloppy mess with the snow all melted now.
Before you know it. It will be summertime and as hot and dry as can be.
Gunmfun
Yea its supposed to stop the weekend I hope.
BD
Just wondering why you used lithium grease on a synthetic seal? By accident or do you not have any moly? If not I’ll send you some with the basketcase 3120, I’ve got everything here now except the stock and a box now and I’ll be gathering that on my next trip.
Reb
Reb
I used lithium instead of moly because GF1 uses it in all his guns and he has had great success with it and I have also read that moly can act as a sandpaper of sorts with the fine particles of metal it has in it .
It is also much thicker than lithium so it will create more friction than lithium as well and I do have plenty of moly as thats what Nissan applies to the back of the brake pads to stop brake squeal so I have a big tub of it but it is three time the viscosity of lithium so it will slow the piston and seal down as well as create more wear on the parts .
in the automotive world there are many more places that lithium grease is used versus moly so each has it own purpose and I just believe that that lithium is a better lubricant in am air guns piston than moly is, I do use it on the trigger parts and barrel pivots that have more loads and less movement applied to the parts.
It took a while to burn out of the 40 because I went a little overboard as I always tend to do as its better to have to much than not enough in my experience.
BD
Reb
Everything Buldawg just said is exactly why I use lithium.
I don’t care what anybody says. If you got to put a ton of grease on spring gun to keep it from vibrating and having a double bump shot cycle then you got the wrong pieces and fit in the gun.
I don’t want puddles of goop oozing from the gun everytime I pick it up to shoot it.
The warmer temps here in Tx. During the summers would have most lithium based greased at or near their melting point and have them dripping any excess
Reb
We got the hot weather here to from May to the end of August.
90 and 100 degree weather.
So yea excess tube here is no good for me too. And then think about what happens when we get down in the 20’s or colder.
Most lubes get thicker. So that plays heck on a spring gun.
So again to much lube and the wrong lube can be not good depending on the area you live in. So that is a good point also.
Suppose to say excess lube.
Not tube.
BD,
That makes sense.
B.B.
Sorry to get off topic but does anyone know the size of the little screws for the windage adjustment for a 3 by 9 by 32 Centerpoint Mil Dot scope. You can change the adjustment by hand and there’s two screws that hold the knob for the adjustment.I’ve already called Crosman and they don’t stock anything like that. Thanks
“Swage” means to bend into place, right? This blog brings up a longstanding question of mine. There is obviously a great body of knowledge about tuning airguns to make them function properly, but why is there no information about how to make them more accurate. That probably makes up the bulk of firearms literature, and even I know most of the basic elements of bedding, rebarreling, headspacing, tuning barrels, blue-printing actions and what not. The absence of this in airgun literature is a major asymmetry that I’ve never understood since ultimately airguns and firearms do essentially the same things and are more similar than they are different. My guess at an answer is that airguns, being generally cheaper, are not worth the effort to accurize them when you can just buy a more accurate gun. But that doesn’t quite hold up given how willing people are to tinker with airguns for the fun of it.
Vana2, thanks for your comments. If a called flier is one where you know you have screwed up, what is an uncalled flier? One that spatially diverges from your group despite good technique. I suppose you could attribute this to an equipment problem IF you could be sure that your technique was perfect. But that state seems like an ideal to strive for rather than a standard. I suppose it is more possible if you are shooting rested (although my experience is that there is a lot of room for variability even there). But I shoot almost all standing, so fliers are invariably my fault.
Matt61
Matt61,
On “flyers”, I am working on weighing and head sorting my current 4 pellet types. I will post the results in the future. ( Hint: Weight varied at 5 levels when measured to .1 grains)
Once sorted, I will test fire the ones that have the same weight and head in order to see if my groups tighten up.
I have all data, of all groups, with each pellet type. Pushing 800 shots since new.
It seems NO ONE does this, so it will be interesting.
ON LEAD SOFTNESS or hardness,…I came up with a way to to test the hardness of a pellet,… independent of a gun.
I call it the “Splat-O-Matic”,…..results to follow… 🙂
Just tried the “Splat-O-Matic”…..works great!
It consist of 3 parts, all separate, but when used together, work perfect.
(Height reduction) of the pellets is from 42.60% to 17.07%,….so as you can see…there is some different lead alloys used between the 4 different pellets.
(17% reduction = harder,…42% reduction = softer)
Height of pellet was measured before test, and after. Dial calipers.
Chris,USA
Ok just what is your splat-o-matic device and how is it used or are you shooting at a hard surface at a given distance.
I am just curious as to just how scientific it is as compared to your pellet weighing, measuring and sorting as that’s just way to much work to just have fun shooting unless you have hopes of becoming the next USA Olympic champion shooter.
Please tell me your splat-o-matic device as there may be a patented invention in the makings LOL
BD
Buldawg,
The inspiration came when cleaning up pellets around my target. The target “guts” are pretty well blown out, so most hit a large .090″ steel plate. Some where flat as pancakes and others were just more “squished”, with head and skirt still visible.
But, which pellets where the flat ones and which remained in tact more?
Maybe the softer ones were picking up the rifling better, and were more accurate?
Antimony makes a pellet harder and can lead to lead fouling faster, but which one might have more of it?
What if I want a good “splatter” for hunting, or do I want a harder one for penetration?
No data exist on pellet lead make up that I have seen yet and have not seen any hardness data as well.
As for weighing and head sorting, yeah, it takes a little time, but I just do it while watching TV. No big deal. Only 2 of 4 done so far. 30 sample size.
We all know the benefit of “Premium” pellets vs Wally World’s offerings. Appearance and better grouping are the most obvious.
But just how tight of tolerances are the premium ones? (.001 or .01?)
What if one brand varies in weight by as much as a grain (15.0~16.0, with .1 variations in between?)
Whats that doing to my accuracy?
What am I paying for? Accuracy aside, I want the least spread on weight and dimensions as possible. But which brands are they?
Since you are into FT, I figured some of this might be of interest to you.
At the very least, by measuring and weighing, you have {eliminated} 1 variable.
You KNOW that your “off shot” was not caused by weight or dimensional variations.
That to me, would be a big confidence booster.
As for the “Splat-O-Matic”,….a plate, a pipe, and a weight. It works great and is a very good test for expansion potential. Very controlled and easily measurable.
It does not matter what the pellet height starts out at or what it finishes at,..just the % of reduction in height.
My first test showed 17, 32, 38 and 42% reductions. Each # is a specific/different brand pellet.
Chris,USA
Ok that all make sense now as I use old washing machine panels as a backing on top of plywood for my targets and you can see the difference between different pellets in the amount of distortion/flattening that occurs but of course by now my washing machine panels are riddled with holes where repeated hits have occurred or if shooting with my hatsan it just puts holes right thru the metal in one shot.
I don’t have the patience or dexterity in my hands to repeatedly sit and measure dozens of pellets with my arthritis so it is not that big of a deal for me to find the very best of a tin of pellets as my guns are far more accurate than I ever will be so some slight differences in pellets is not going to make any difference in whether I hit my target or not.
It is all very interesting to me but with 45 plus years experience as a technician there are some things that it is critical that they be very precise and many many more that it is not that critical for it to be as precise for it to work just as well as the same item that was meticulously assembled. So there is a time for excellence and then there is a time for govt good will do.
I have examined some of my pellets after hitting the back stop at first and some did flatten more than others but they were also shot from several different guns so being able to determine which pellet came from which gun or what actual pellet it was to start with was next to impossible. I have had my grandsons here shooting with me and we will shoot up to ten or more guns at one session so it is virtually impossible to know which pellet came from which gun.
As far as my FT matches go I of course want to do as good as possible but as I said my guns are way more accurate than I am with my heart disease, COPD and arthritis so sorting pellets will make little to no difference as to how well I do. I have quite a bit of trouble just getting my breathing and heart rate under control after walking up and down the hills on the FT course so when I sit down to shoot I am short of breath and my heart is beating twice as fast as normal so for me it is a rhythm I try to use to squeeze the trigger as the crosshairs pass over the kill zone due to my swaying from my breathing and heart rate.
It is a world of difference shooting FT than it is sitting in my back yard where I can just relax in one position and shoot for hours as my breathing and heart rate are much more stable and have a far less affect on my aiming of the gun and keeping the crosshairs on the kill zone plus the gun is bench rested and not on a bipod.
So enjoy and learn all you can now while you are young so that when you get old you will be that much farther along than us old geezers that are just now just starting back into this wonderful sport as when I was a kid I hunted all the time but never knew or even thought about all the variables there are in shooting accurately because I was having to much fun just out in the woods shooting and hunting with my friends as pre teens and teenagers. I was duck hunting with my friends at 8 years old with no parents anywhere near us as they were all at home and new we were out duck hunting with their permission.
I sure do miss the good old days when this country was still truly free.
BD
Buldawg,
You are correct on many points. The most obvious one being that a good pellet rifle will be more accurate than I will ever shoot.
Not sure how old you are, but I am 53+,…so I am probably “in the same neighbor hood as you”.
And again I will say it,…You getting into FT is quite a noble under taking. Given your affore mentioned challenges, that even adds to that.
I sincerely wish you the very best of luck in your pursuit of FT.
While I’m sure you have mentioned it,…what is your gun of choice when doing FT? Also,..no rested events?
Chris
Chris,USA
You are just 6 years my younger as I turned 59 in January. I was going 100 miles an hour everyday like I was still 18 as I was riding mountain bikes 16 miles on the weekends in 4 mile stints with about 30 minutes rests in between on an 85 mile trail system we have 10 miles from the house with some very steep downhill’s and then of course what gos down must come up so there were two and three mile uphill pedals that would work every muscle in your body and these were the easy courses, rode motorcycles and was an out door person until around June of 2013 when it felt like someone just threw out the boat anchor and I was tired always and just could not go like I had been for 57 years so went to my family doc and he did some X-rays of my chest and listened to my heart and scheduled me some more test with one being a stress test. Well the stress test showed issues with my heart so my wife has had a heart doc for years and he did a heart cath and found that my LAD artery had a 75% and 85 % blockage in it and this is the one they call the Widowmaker and when he came out of surgery from placing stents in the LAD he told my wife that in three days to a week I would have dropped over from a heart attack and would not have survived it. Then two months later he had to go back in and stent the right coronary artery as it was at 50% blocked when he stented the LAD but our great insurance companies will not allow a doc to stent an artery unless it is 60 % or more blocked, so they just spent 80 grand instead of 40 for the first time and been done with it. Then I had smoked for 45 years and laid them down at ten oclock August 28 2013 the night before my first heart cath and have not touched them since and want nothing to do with them.
My COPD and emphysema and arthritis just seemed to jump on the band wagon at the same time my heart issues started and its been a downhill ride ever since. I grew up riding dirt bikes as my main form of transportation from junior high thru high school and still have my last Yamaha SC 500 dirt bike that with factory gearing and sprockets will do 105 mph and do 80 mph wheelies with just a twist of the throttle. I cannot ride it anymore as I cannot hang on to the handle bars but I have eaten it at speed of 50 to 90 mph on it and the only bone I ever broke from my dirt bike was my tailbone from falling off doing a wheelie at 60 mph and bounced down the road on my butt and had to ride around standing up for 6 months.
I am shooting the FT for as much the friendships I have made and the camaraderie as it is for the fun of shooting at field targets in competition as I have always been a competitive person as its in my blood. So it is a challenge moving thru the course and it takes me a little longer than some others but I am still learning a lot as I go.
Right now my FT gun is a 177 first gen marauder that I have continued to improve each match with so as long as I score even one point higher each match I am pleased with my effort. I am currently building/tuning a B40 and a RWS 48 to be used in the near future as well, plus have some disco tubes on there way to put together a couple 2240 HPA FT guns, one with a 20 Daisy Avanti Lothar Walther barrel in 20 inches and the other with a 24 inch disco barrel.
I am, also working on a trade for a 2240 regulated bottled gun that will get 100 shot per fill so needless to say I have a lot of irons in the fire and they are all slowly coming to fruition.
So we are close in age and I am sorry as I assumed you were younger then you are so don’t hold it against me but right now I am just trying to have as much fun as my body allows for me to do on any given day. It is difficult having an 18 year old mind that still remembers how to do all the crazy stuff I did growing up that is trapped in a 59 year old body that always disagrees with my 18 year old mind.
I honestly did not expect to make it this long with some of the stuff I did on motorcycles before they had 14 inches of travel up front and 20 in the back as my 73 SC 500 has 4 inches rear travel and 6 inches of front and I would do jumps like the motor crosser do now on a bike that did not soak up the landings like they do now so it was your body that became the shock absorber. I am paying for it now I can assure you but I refuse to give up and its just what I used to do all day now takes me all day just to do.
BD
Buldawg,
Hang in there. I could use some “lifestyle” changes myelf. And yes, I know,…the sooner, the better.
I always remember you as the one with the “tusker” hunts with dogs and all. Now aside, you have done a lot and had a lot of “adventures”.
Catcha’ in future blogs!
Chris,USA
I have made some lifestyle changes myself as I quit my heavy drinking 10 years ago when I came home two nights on my bikes and when I woke up the next morning and I had to go check my garage to see if the bikes were in it as I did not remember riding home I knew it was time to quit before my angels could not keep up with me. So with all my health issues now I may have a crown and dew two or three times a year and its when I am at home and never more than two drinks in any one night. I quit smoking 6 or 7 times in the 45 years I smoked as I started at age 12 but it never stuck until I knew my heart was getting ready to call it quits so it gave me the needed incentive to stop for good as I still have to much on my bucket list to get done.
Yes in my younger days I was ten feet tall and invincible so I thought and those years of hunting wild boar that are as big as bulls and will hunt you if you make them mad at you is a very good adrenalin high for sure, I am just glad they never got the best of me.
I am not by any means down and out its just now I work smarter not harder and it take more time to do the same tasks but then all I have now is time so its all good.
BD
Buldawg,
Food for thought for sure.
Your best story was someone, you?, getting tree’ed by a “tusker”, and said person spent the night in the tree as the angry “tuskers” were furiously working below, trying to up-root the tree, in an effort to “exact their revenge” on the afore mentioned, and maybe soon-to-be, unlucky hunter.
Classic!,… (and maybe a lesson on how NOT to do it)
Chris,USA
Yea that was one of the longest nights I think I have ever had and in the middle of the night you find yourself starting to doze off and then the tree moving brings the clarity instantly back as to why you are in the tree in first place. It was the most beautiful sunrise I have ever seen because with daylight it was obvious the boar had given up and was nowhere to be seen so it was freedom at last.
Yes I did learn from that experience that do not hunt something that will hunt you back without a whole lot of back up in the form of pit bull dogs and a very large knife.
I also forgot to mention in the Hunter class I shoot in at the FT club you can use seats that are 15 inches or less from the ground and monopods or bipods to rest the gun on but cannot be attached to the gun in any way and power limit is 20 fpe. There is one station that is standing prone shooting only and one station that is kneeling shooting only but all other are from seated position be it a stool or cushion sitting on the ground. So I do get to rest some but still not long enough to get my breathing and heart rate under control.
BD
Buldawg,
So it WAS you! I will never forget it. (in a good way) 😉 Glad you lived to tell about it.
I remembered it being told in the second or third person as you told it, but not the first person, (you). What an adventure!
And thanks for the FT insight. Very interesting. I did not know how they were conducted.
Catch ya’ on a future blog,…Chris
Chris,USA
It was actually first person ( me) and third person ( old man explaining why not to hunt with gun after fact that I experienced ) I was trapped in a tree by a huge boar overnight two days before my friend that owned the hog claim and I met the old man that hunted those monster boar with dogs and a bowie knife.
He told the same story of him being trapped as well by a big male boar hog in a tree overnight and was the reason he no longer hunted them with a gun, but instead used 10 to 12 pit bulls and two Airedales to howl so he knew where in the swamp the pits had the boar pinned down. He said he could kill them faster by cutting their throat so they suffocated in their own blood with much less chance of them attacking him as they tried to do to me and him several times.
so it took him a few time of being treed by one to figure out that shooting them would most of the time just piss them off unless you were lucky enough to hit them in an eye socket or ear since their skulls and shoulder bones would deflect bullets like armor proof vest. I would not have beloved him had I not been treed myself by one and my friend could not help me as he tried to shoot the boar and it would turn to chase him and then come back to me in the tree and by that time it was dark and I told him to just go back to camp and come back in the morning as he likely would have been gored to death as the boar can see much better in the dark than we can. So it was a very interesting week of hunting and seeing what to do and what not to do when you hunt 7 to 800 pound boars.
In FT matches you have three classes which are open class which is limited to 12 fpe but can use form fitting suits that help you hold the gun more steady as well as knee rests attached to the gun stock but not adjustable and not over 6 inches below center of barrel bore and a single or two point sling attached to the gun but must be shot sitting on a pad of no more than 6 inches thickness from the ground, then the hunter class you know already . Then you have WTFT which is the same as open class but you are allowed to click or adjust your elevation and wind age turrets and can have custom stock but plate with hooks and adjustable knee rests as well as straps but still shoot from a pad in the sitting position except for the two stations where one is standing and one is kneeling.
BD
I can’t wait until this is shooting, however, I’ve got to say, with that quantity of various jollops in there, and that tight spring guide I seriously can’t imagine it shooting past 10ft/lbs once the truly epic dieselling is over.Maccari’s theory as regards spring expansion under compression is, in my experience, slightly off, it does expand, but internally as much as externally….measure one in a vice (vise) and you’ll see what I mean….in both instances it’s much slighter than imagined, I like a slip fit guide with Molykote providing a bit of damping.
Never been a fan of metal piston shims when ptfe surrounds us and is so easy to cut and when I’m using one, a good layer of dampening grease between it and the piston internal wall is the order of the day, or smear a thin layer of silicon sealant on the piston inner before fitting (no, not the side by the spring fellow posters)
I guess we all do things our own way….I absolutely never, ever, lube the internal tube, linish it a bit with Dri Slide but anything else is incidental fling off the spring and off the piston seal when fitting.
Half of this tune is the polar opposite of what I do, by design, so I’m fascinated how it’s going to turn out.
Dom
I use a minimal amount of litium grease on the spring and then assemble the derlin or plastic guide on to the spring then slip it in the piston. After that I put a minimal of lithium grease on the seal on the piston head. And the same on the derlin guide on the back of the piston. And slip the piston in the cylinder and I’m done.
And I think that the spring and guide will be to tight also. But we will see.
I’m willing to trust B.B on the spring/guide fitment and I don’t think I’d be too concerned about epic duration deiseling either As he stated the leather seal should sponge up much if any excess and anything significant available should also prove too rich for combustion in such an enclosed environment..
When I overoiled my QB-36immediately after replacing a broken mainspring another one was already needed after the first dozen shots or fewer bit I trusted him then and all has been well since.the seal will put the oil to use .
Reb
The only way your going to know if the fitment of the spring and guide is right is if you chrony the gun and write down the fps.
Then take the gun apart and put a looser fitting guide in. Then chrony the gun with the same pellets as used with the first guide.
The thing I see is that’s going to be a unanswered question. Unless BB does what I just talked about.
And I do believe that the gun would be a faster shooting gun with the groove and shim guide than the buttons. But that will never probably happen either.
So as far as the spring and guide goes. I think that all we will see is what the gun produces when assembled. I don’t think BB will take it apart to try other things to see what will actually improve the gun or make it just marginal.
And I do agree that with the leather seal it will absorb the oil or grease or whatever you want to call it.
Gunfun
I am with you all the way and as we both know by BB doing all those repairs at one time there is no way to know what helps or hurts the power or accuracy of this gun and I don’t know much if anything about a Diana 45 but if it has a leather seal then it cannot shoot that fast or should I say fast enough to detonate easily as most of the compressed air will blow right past the leather before it compresses enough to ignite any petroleum oils and cause any form of ignition to occur.
BD
Buldawg
And it don’t matter if you don’t know the particular model.
The principal is the same. A spring gun is a spring gun. They just may use a little different technique in design.
You took enough apart also you know what I mean.
And yes testing needs yo be a step at a time to see what way it affects the gun. I think we encountered that also.
We’ll see soon enough what happens.
Gunfun
Yep we will soon enough and if he thinks this Diana 45 is like a ship in a bottle them putting the three timing chains on Cadillac northstar engine would be working on the ship in the bottle with six different timing marks to get aligned and then having to rotate the engine 27 revolutions just make sure it is timed righ and its basically the same on Harley Vrod Motor.
Heck Air guns are a walk in the park compared to the new dual overhead cam engines with variable valve timing as you not only have to get the chains on correctly but you also have to correctly install the timing magnets correctly so they advance the cams and not retard them .
BD
Buldawg
Done went through that stuff too on that turbo charged SRT4 Neon I had.
Then see what happens when you start playing with different intake and exhaust camshafts. And adjustable timing gears to advance and retard the camshafts.
As you say I put some ships in a bottle more times than what I care to think about.
Gunfun
You and me both and I still have two of them and its getting that time to blow the cobwebs off of them and get them back rolling some more.
BD
Buldawg
Don’t get me started on that.
I want to get me another race car. My buddy’s got a real clean big block 74 Nova right now that’s a grandmas car. A sleeper as can be. Steel wheels and baby moon hub caps with the bow tie emblem on the hub cap. Runs 11.0’s on pump gas.
But I think I better not get it and put the money down on that house we been looking at out in the country.
I think that would suite me better with my air gun addiction that I seem to have.
🙂
Gunfun
You need to stick to air gun as they are safer at or age as we don’t heal as quick as we used to,
BD
Reb
Your QB36 does not shoot fast enough to detonate so over oiling will only cause a hydraulic lock situation which could easily break a spring. The spring I sent you came out of my B3-2 and both my 3-1 and 3-2 only shoot in the high 500s to low 600fps which id not fast enough to cause any detonating issues.
BD
Brainfart,I meant to say I envisioned another spring being needed.
Dom,
You must have missed this report:
/blog/2012/03/resizing-a-mainspring/
I understand how mainsprings act when compressed.
I don’t use Dri-Slide because it rusts metal badly.
B.B.
Ahh its getting closer to the finish.thanks bb