Today reader RidgeRunner continues his blog series on his experiences with the Diana 34 I tuned for him. If you’d like to write a guest post for this blog, please email me at blogger@pyramydair.com.
Take it away, RidgeRunner
RidgeRunner’s Diana 34 Project: Part Eight
by RidgeRunner
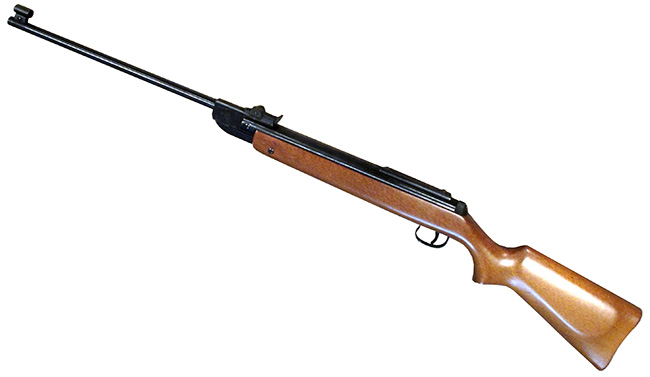
Ridgerunner’s Diana 34.
Part 1
Part 2
Part 3
Part 4
Part 5
Part 6
Part 7
This report covers:
- The weather
- The sights
- The targets
- Mother’s Day range shooting
- Thursday range day
- JSB Exact 8.44 grain
- Benjamin Bullseyes
- Summary
The weather
The weather last week was not cooperating with my shooting at my new bench setup. If it was not been drizzling or raining, I was mowing the grass which has been enjoying the drizzling and raining. However a good shooting day did come and I will now describe it for you
I do not think it is drizzling or raining this morning and I hope to get a little range time in before it is dry enough to mow.
The sights
I know I had promised you folks I would mount a scope and see how this Diana 34 does at longer ranges and I still am planning on doing that, but Fawlty Manuel had sent me a TruGlo front sight globe and Roamin Greco had traded me a Williams peep for my old FWB aperture, so I just had to try them out. Now, don’t you folks get your undies in a wad. I have my round tuit for the scope handy.
For those of you who have not had the pleasure of looking at a TruGlo front sight globe, here is what it looks like.
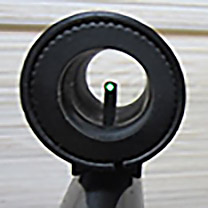
Yes, it is true that I normally do not care for glowy thingy sights, but the glowing dot of this sight helps to draw the eye to the square topped post. I personally would prefer a perlkorn, but we take what we can get.
Here is a look-see at a Williams peep sight.
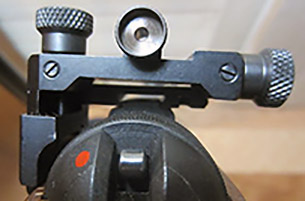
Williams peep sight.
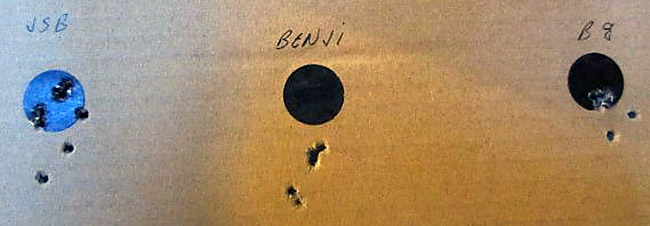
The targets
Since I am not using optically enhanced targeting methods (you liked that, huh) I am only shooting at ten yards. The dots are 3/4 inches in diameter price stickers colored black with a Sharpie.
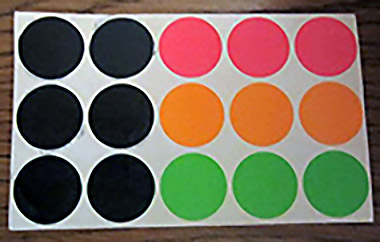
I like using these with open sights. They show up well and give me a fairly decent gauge of how well I am doing. Another thing is if I can hit that dot, I can humanely dispatch just about any vermin I may desire.
I would also like to take this opportunity to mention the financial aspects of using these price stickers as targets. They are cheap!
Mother’s Day range shooting
As I had stated before, I managed to get a little trigger time in on Mother’s Day (Sunday, May 12) after my grandson and I rebuilt my range a bit and filled our faces. Here is what I managed to do with the Diana 34 that day. Note what the H&N Baracuda 8s did.
As you can see by this photo, the H&N Baracuda 8’s seemed to be grouping the best. Not too shabby for a humongous rear sight aperture.

Thursday range day
OK, now for some serious shooting, or so I thought. I did so badly that I did not even measure these groups. Sometimes the dragon wins.
JSB Exact 8.44 grain
JSB Exact 8.44-grain pellets are usually my go-to pellet. As you can see, they did OK, but not that great today.
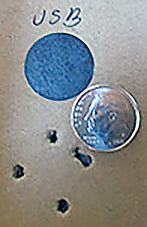
JSB 8.44 grain domes didn’t do that great on this day.
Benjamin Bullseyes
I personally have never had much luck with Crosman/Benjamin pellets before, so I am not disappointed with the Benjamin Single Die group.
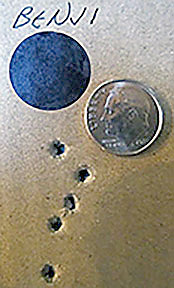
The Benjamin Bullseye group was about what I expected.
H&N Baracuda 8
H&N Baracuda 8 pellets are supposedly 8.44 grain, as is the JSB. If you look closely in the photo, you will notice there is a tight, little three shot group in the bottom of the dot.
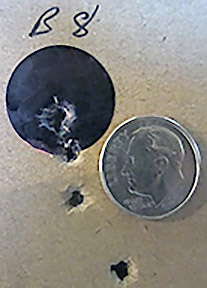
Barracuda 8s also did pretty good on Mother’s Day. Hmmm. I think I have a new favorite pellet.
Summary
Well, the large aperture of the Williams sight will most definitely need to be replaced. But fear not, I will not bore you folks with the further exploits of the peep sight setup. The next time I write/talk about this Diana 34, it will have a decent scope on it and we will see what this old, fat, balding geezer can do with it. Hopefully, the dragon will not win again.
BB comments
RidgeRunner does not mention how he sights with his dot front sight. If he is holding on the center of the dot, that would explain the larger groups. It also explains the verticality of all the groups. For this kind of shooting I think a 6 o’clock hold is necessary.

RidgeRunner,
Yeah, what BB said, how are you sighting with that front sight? You said:
“the glowing dot of this sight helps to draw the eye to the square topped post. I personally would prefer a perlkorn, but we take what we can get.”
That makes me think you are using the top of the square post, and centering the center of that on target.
Is that why you said you wished for a perlkorn? (which would be easier to center as it’s thinner?)
Nice report, but I’m looking forward to your scoped groups. 😉
Blessings to you,
dave
Yeah, what he said. I could not help myself. I kept trying to center the top of the square post. The very large aperture of the Williams sight did not help either. I intend to get a smaller aperture. I may go back to the original Diana 34 sight also as it is pointed.
I am too used to nice open sights and scopes.
Yep, I hear you, man; it’s the same thing I’d have done; I wouldn’t of been able to help myself either. 😉
RR
I also believe that you have more potential with that Truglo/Williams combination. Using the six o’clock method for sure. As you may remember it’s my preferred set up but with an FWB rear diopter. It makes me proud of my shooting achievements even with a 350 magnum in 5.5mm. With the plain black LGV I managed a 0.20″ group the other day. Lucky day maybe but still…
Bill I agree. Williams makes several size aperatures for its sight. If the lighting is strong enough at the target, Ridgerunner may do better with a smaller aperture. Or, perhaps an extension tube to bring the aperture closer to his eye.
RG,
The .05 Williams aperture will be better. The big, fat front sight does not help me either. Like BB said, I kept trying to center it, rather than six o’clock it.
Like RG mentioned somewhere below try to use it with the fiber optics covered. Then you may find it easier to use the six o’clock hold. Dimmer sight will allow your eye focus on the thin bar above the fiber optic.
Bill,
I myself am not used to sighting and shooting that way. This is why I prefer to use the perlkorn or pointed front sights to the squared off ones and the six o’clock hold. With the pointed or perlkorn front sight, I put the tip where I want the pellet to go.
Excellent report.
Without having SHOT one of those front sights, I don’t know.
But I’m tending to go along with everybody else. I think I would have a hard time using that front sight to make a 6 o’clock hold.
But it would make you FOCUS On the front sight. Not just see it.
Ian.
Ian,
I cannot do that six o’clock hold thing. I guess that is why I do not like those big, wide, squared off front sights. As I told Hank, I am a hunter, not a target shooter. I am wanting to shoot at the center, not the bottom.
RG
I wonder what would be the outcome of putting an aperture/peep sight further from the eye of the shooter. Wouldn’t that be like using a smaller peep hole?
Sound like a good experiment. I have two sizes of Williams apertures, too.
RR and RG: I have an addiction to Williams Peeps on my break barrels since they overcome the sight fixation problems encountered with double recoils and lots of mass on scope rails and rings.
The answer to the rear aperture problem is found in the Merit Disc. The Merit Disc is an adjustable aperture that is on the level of a watchmaker’s tiny precision. It solves the variable light and sight “window” problem common to a fixed aperture. I have one on my venerable Diana 36 that has thwarted many a sight option over the years (since 1989) until I FINALLY stumbled on the Williams peep with an additional fixing apparatus for the base AND the Merit Disc.
When I last bought a Merit Disc from the maker, there is a website, it was about $90. If I hade it all to do over again on my long guns, they would ALL have the Merit Disc. Well, except for the nasty Diana 350 Freurkraft (I think I mispelled the German word!) that has an huge muzzle weight with no provision for a front sight (if on is NOT a journeyman tool and die maker).
With the double recoil of the break barrel, most scopes either can’t stop moving or their internals finally just give up service. Additionally, given the weight of the springer, NOT having even more mass on a scope rail really is a blessing – but I’m getting on in years in the latter seventies – so….maybe I’m just becoming a whimp?
Getting a Merit Disc or the Gehman equivalent is high on my wish list.
Can you post a picture of the “fixing apparatus”, please? I am envisioning a scope stop that screws onto the rails. Doesn’t the push the Williams too far forward on the rail? Are you able to get it over the funny screw that sticks up over the back end of the Diana rail?
I just recently procured a Diana 36. It needs some TLC. Recently saw a 38 for auction and missed it.
As for getting old, it’s not for wimps. Therefore you are not a wimp.
Roamin:
Here’s how I made a “fixer” for the scope rail to Williams Peep chassis. It seems to be working and isn’t glaringly a DIY fix – which, of course, it is….
I took a piece of black steel strapping that came on a large carton containing a recliner to my house. It is the usual shipping stuff, about an half to 5/8″ wide, painted black, not hardened, of course, so it can be wrapped around big cartons.
I noticed that it is just a bit wider than the RWS/Diana scope rail (just a smidge), and being soft steel can be drilled and cut and bent without snapping. I measured the distance from the rear of the Williams CHASSIS – NOT THE PEEP CARRIER – to the stop screw at the tail end of the Diana scope rail. That distance was settled by trial by shooting the Model 36 with the peep and finding the sweet spot for it on the rail. Once that spot was established, that set the distance for the piece I made.
I measured the distance from the near center of the Diana stop screw HOLE, having removed the screw temporarily and setting it aside, to the rearmost of the chassis of the Williams sight. I then added about an half inch for the chassis end and a quarter for the screw stop end and cut off a good, unmarred piece of the steel strapping material at 90 degrees to length.
At the end that would become the stop on the chassis, I measured and marked about 1/8″ from each side leaving about an half inch center section with two side sections. I then took out my snips and cut parallel to length, two cuts parallel to the length in 1/8″ on each side and about 3/8″ in length. I had marked this depth with a pencil line and a square.
I think bent UP the two outside pieces so they were perpendicular to the piece of strapping and would catch the peep chassis, The wider center section fit UNDER the chassis, thus preventing the shot jolt from misaligning the two outside stops. This wider center piece was important to prevent the “springy” strapping metal from just bending upwards with shock.
Having the sight end of the piece in place to trap the chassis, I moved to the rear end of the scope rail and fixed the place to drill the strapping with a hole that would center over the threaded hole for the scope stop screw. Obviously, the hole was big enough for the standard Diana stop screw to fit through the strapping to its “home” on the scope rail.
Now, with the strapping material bent with hits two legs (or horns?) catching the chassis and the screw hole awaiting the stop screw, I had a fixture that would prevent the Williams peep from creeping down the rail to the stop screw — which is what it would otherwise do (it would not go toward the muzzle).
I then, having this all measured where I wanted it, carefully used my find grinder wheel and my Ken Onion sanding belt knife sharpener to gently round the scope screw end of the strapping into rounded corners and to preclude having any razor sharp cutting edges where it would be accessible to my person. The chassis end was less of a concern, but I took off any aggressive edges there as well.
I took out my Birchwood Casey Cold Blue and gave it a couple of repeated coatings (after cleaning off any oils from me or the original manufacture to tidy up the otherwise pretty mundane piece of steel that no one really cares about for looks or rust-resistance. When it was all nicely blued, I gave it a wipe down with the Sheath/Barrier oil, installed it with the wide tongue under the chassis and the two vertical horns catching it and screwed the other end down carefully with the Diana stop screw.
The very little bit of resistance that the piece of thin strapping material offers is quite enough to end the malevolent travel of the Williams chassis. Being approximately the width of the Diana scope ramp/rail, it disappears and tidies up that piece on the rifle. Being blued, there’s no ugly shiny stuff there for distraction.
The piece was “free” from a shipping carton and had the advantage of being a completely custom installation fit for me. It only required one drilled hole and some careful measuring with a pencil, and a square to determine where I used the tin snips. Oh, and I used a good and snug pair of pliers to bend upwards the two outside “horns” that capture and limit the rearward movement of the chassis.
Roamin, it took more time to measure than to make. One does want to use a small square and a good pencil to establish the two cuts for the outside horns on the chassis end and to find the exact center for the scope stop screw hole. One wants that piece of strapping to be exactly parallel to the scope rail to both cover it and prevent unwanted sideways movement.
In closing, that fix for my 1989 Model 36 has been a real blessing. It is invisible on the scope rail and covers over 34 years of different sighting fixtures on the thing that have banged it up ever so slightly. In particular, the rounded stop screw end means there’s no catching my flesh or clothing on the strapping.
Finally, the cost of this fixture was NOTHING other than time to measure, drill ONE hole and make three careful tin snip cuts. Well, and a careful deburring and rounding of the edges of that strapping material followed by bluing.
I can send you a picture if I can get your email address, I think.
Thank you for the great description!
You can email a photo to me at my handle here at this blog, no spaces, then the number one at Gmail dot com. If I can, I will format it and post it here for you for all to admire your handiwork!
Roamin Greco,
I can imagine how it looks like but would really appreciate it if you can post the picture that LFranke will send you.
Siraniko
Siraniko: You perfectly, and I mean “perfectly” captured the piece. The only further modification is that the hole end of the stock was rounded at the two corners. The only other thing that would be absolutely perfect is a dash line across the width of the piece at the end of the two black cut lines, thereby indicating where the two end “horns” are bent at a 90 degree angle upwards to be the catch for the Williams base.
Thank you for being able to translate my verbosity into a very, very accurate rendition of what I made of the steel banding material! Thanks for being an astute reader!
I think I need to find out how to send photos to the blog. I do it to some of my Email recipients, so it must be possible to do it here.
Thanks, again, Siraniko! You’re good at it!
Oh my! You have destroyed my image of this slim mountain man, turkey hunting guy along the Blue Ridge. Tell me it ain’t so, please! You see, I thought that I was the only old, not so slim, balding geezer on these forums. Twins? Orv.
Triplets if you count me in. But I’m not balding. That phase is over. ;o)
RG,
I still have some on the back and sides, but the front hairline is now in the back.
I have the rest covered,,, old and fat,, but I’m not quite balding. I have, tho, an issue many of us share and that is that my forehead has become a fivehead. I’ve been considering bangs.
I, too, am looking forward to your next blog, RR. Whether it is scoped or with a smaller aperture (and a little different sight picture), I believe you will justify yourself and BB’s tune.
Ed
edlee,
If I were to grow bangs, they would hang off the back of my head.
Orv,
I am sorry, but I am indeed an old, fat, balding geezer. I have been losing weight, but I have a long way to go before I reach slim again. My hair used to get in my eyes, but the only way that is going to happen these days is if I quit trimming my eyebrows.
Speaking of weather, B.B. have you been efffected by the power outages?
-Yogi
Yogi,
No, that was down in Houston. I’m several hundred miles north of there.
BB
Ridgerunner,
I believe that set up is more aligned for use with feral soda cans than paper targets. Maybe a perlkorn sight might be better to show the accuracy on paper. Mounting a scope would be a better way to show the accuracy potential at longer ranges though (which we will hopefully see soon). Then it will be back to the Tru-Glo and Williams peep sight combination for regular shooting of the feral soda cans at unknown ranges.
Siraniko
Siraniko,
I have sent BB a part nine where I took off the sights and put on a scope to try and show the potential of this air rifle to you folks.
The TruGlo/Williams setup is superb for feral soda cans and any other quick shooting at various ranges, but is not so good for decent target work as you point out.
Thanks for the interesting report RR. That’s some nice shooting. I agree that a smaller aperture on the rear sight should help with the consistency of the eye positioning. I like the looks of the TruGlo front sight. One is definitely on my wish list. Looking forward to the next report.
That front sight is cool. Ridgerunner didn’t show you the adjustable shade that you can turn to make the dot brighter or dimmer. It adjusts how much sun hits the fiber optic element and that makes the dot glow brighter or dimmer.
Elmer,
I should have done better. A smaller aperture and getting used to that front sight would most definitely help. It is not easy to not center that glowy thingy dot. Like I was saying, that dot draws your eye. The TruGlo front globe is fantastic for quick shots, do not so hot for target work.
So, do you think that you were trying to use the flat top of the blade to sight with but your eye instinctively was drawn to the dot (which is a little bit lower)?
Elmer,
That is very likely. It also does not help that I have to spend some time with this Diana 34 to learn how she likes to be held while we dance.
Nice shooting my friend. You certainly have a can-killer there.
I think I’m inspired to set up my new (to me) Diana 36 the dame way.
RG,
For quick shots, this setup is fantastic. You just bring the rifle to your shoulder, peer through the hole and put the dot on your target. Feral soda cans do not stand a chance.
A smaller aperture closer to the eye would most certainly help. I am even thinking about a Creedmor.
Ridge, you might want to look for an adjustable iris aperture for your sight. I think Merit (?) made one that is a direct fit.
Lets you instantly adjust the aperture size.
Derrick,
One of those things is on my wish list. A smaller aperture would help improve the accuracy, though for killing feral soda cans this is great.
RR,
Thanks for the Guest Blogs!
I’ve been using these 3/4″ self adhesive dots from Amazon…
https://www.amazon.com/Pieces-Stickers-Colored-Classroom-Student/dp/B0BHYWHRQY/ref=mp_s_a_1_3?crid=13MRQ18IEI1KM&dib=eyJ2IjoiMSJ9.tPkzDlu5-JycfYQ_wq0r3BjDaiQVnIoLswrPpCEAJHEalsKW6jViDD0sJlZ-oMSHKVxRWfignE84-cayZDGOlZP0Qea86u9FzltnSu06bM7aWJtLJWJVdP-0OuKKPtuxo8afvc8ghLdmY4IlUIgk7eDpT0-mr1Zz24q2FMxvkp2n-InZjl0hBd5dzFytlG9HcI9oJJ66llQnC2JZ3BgAFA.-p4eswXbBSHetfHpZVEpzDcl_sEwlJcL4gmTlg2i_d0&dib_tag=se&keywords=3%2F4+sticker+dots&qid=1716289093&sprefix=3%2F4%22+sti%2Caps%2C141&sr=8-3
Hank,
For a dollar more you can get them all in black, which I find to be better for my eye. Those are pretty cheap though and look to be a lifetime supply.
I get mine at Wally World and color them with a fat Sharpie.
RR,
Yeah, all black is available, I like them at longer ranges out to 50 yards. Beyond that I’ll use those “shoot and see” type of targets.
For close range (sub 25 yards) I use a 1/4″ black dot on a light colored 3/4″ dot. That gives me an “aim small” target on the 3/4″ reference.
Being pesting/hunting oriented, any hit outside of the 3/4″ dot is considered a miss and only used as a reference to show incorrect compensation or which way I pulled the shot… theoretically because I never miss 😉
Cheers!
Vana2,
I get the: “…any hit outside of the 3/4″ dot is considered a miss and only used as a reference to show incorrect compensation or which way I pulled the shot… theoretically because I never miss ”
But Hank, i have check all of the pests i track and even bigger prey and none of them have 3/4” black dots anywhere…even Leopards if they lived near me don’t have 3/4″ dots to aim at!
That is why i have found the Skippy® Peanut butter silvery seals inside the lids such great targets. Hanging them from branches and twigs suspended on wire bag ties allows them to dance a bit in the breezes. They have no specific point of aim on them so i am forced to mentally pick dead center which is fun at 30 meters with the SIG ASP20’s with the WHISKEY3 scope or the Benjamin Marauder.
This is one of my best 30 shots taken lid… I don’t think i missed…either!
I’m actually thrilled to be able to keep all thirty anywhere on the lids with most centered.
shootski
Cool, franc.
And nice shooting, shootski!
Roamin Greco,
Swiss Frank.
Thank you for the compliment RG but i owe most of it to my Trainer keeping this 75 year old in shape with HIIT (High-Intensity Interval Training) workouts and a bit of luck in the family genetics. Also, the folks who taught me how to shoot better over the past seven decades deserve a great deal of credit.
Me…i just try to listen, learn, and execute.
shootski
Shootski,
None of your critters have dots??? Mine do but then it could just be my imagination
A large, plain, unmarked surface is tough for me to aim at and the first hole becomes the aim-point. The Skippy-disk is small enough to center on.
For archery practice I like to suspend a 2″ diameter disk of 2″ ethafoam on a string in front of the target butt, give it a push then pin the moving disk with an arrow. That really helps with focusing on the target. With airguns I use Honeycomb cereal.
Hank
Vana2,
I know you are a modest man but i was really hoping to hear more about how you do this: “…theoretically because I never miss.”
Do you think it is the Honeycomb cereal rounds with that hole dead center that does the trick?
When i shoot the Teddy Grahams i go for their bellybutton.
;^)
shootski
My goa is to keep them all in the 3/4″ dot also. This is one reason I cannot do this 6 o’clock hold thing. I am aiming at the center of the dot, not at the bottom. I am a hunter, not a target shooter.
When I use a scope, I draw an X and aim for the cross point.
Yup, there’s a big difference between hunting and target shooting.
Hunting is mobile targets at random ranges in less than ideal conditions.
Target shooting is at stationary targets at known distances in optimal conditions.
RR, Do you focus on the front sight or the target?
Hank
To tell the truth, I am not sure what I focus on when hunting. The target, I believe. I think I try to focus on the target when I am target shooting also.
RR,
Guess that I should expand on my comments on targets and mention that where you are primarily shooting iron-sighted springers I’m shooting scoped PCPs.
For irons and springers I also like an easy to see target.
Hank
RR
Need a smaller aperture?
Try moving the rear sight forward. You know, away from the eye.
Breeze,
That might just work. I will give it a try.
Folks
You can use a permanent black sharpie, washers and or adhesive tape rolls, to stencil perfect round targets of many sizes on the inside walls of cereal boxes. The cereal boxes get double use before being recycled. Since you likely already have these items on hand, the cost is zero. Also when using a scope I use an inexpensive plastic school ruler to stencil one inch +’s for immediate group size feedback. Oh, as mentioned before cereal boxes make cleaner, easier to measure, pellet holes than cardboard or even most official target paper.
Deck
Me too, thanks to the genes from our mothers’ side of our families…. My uncles on my Mom’s side were the same way.
I disagree with the 6 o’clock hold advice (unless you are trying to show the best precision of the gun and minimize your contribution, but the scope would be much better at showing that). The TruGlo sight lends itself to quick shooting. Try practicing with it off hand, as you would hunting or plinking or mini-sniping and see if you can keep the groups under an inch at 10 yards, then 15, etc. Use your stickers and draw a 1″ circle around it. Cover the black dot with the green glowy thingy and center it in the 1″ circle. That’s like a head shot on a varmint. Let us know.
Edit: sounds like from other responses this ground was covered. Sorry for being repetitive. Best of luck with the “new” Diana. But a reminder to give the 50 a turn or two on the dance floor once in a while.
RR: Still believe you will do much better with that glowy-thingy TruGlo than your buddy here ever could have; his problem too was he was treating that as a target sight – agree the TruGlo works better as a quick-target-acquisition sight for feral cans and similar non-regulation-type targets.
RidgeRunner,
Enjoyed reading your Guest Blog very much.
The Readership’s comments were/are almost as much fun.
All i can say is there are Practical Sighting systems and there are Target Sighting systems they come both as optical and non optical; we shooters need to know when to use which.
Some select the correct type almost instinctively others need to learn how to pick wisely.
Your Guest Blog helps folks see the difference:
Merits a BZ (Bravo Zulu) just for that.
shootski
Off topic,
Thanks all for all the encouraging words for doing a guest blog. I am probably being overdramatic about the whole thing. But I have moved it into a “One day soon category”, up from a never.
I do have a lot of airguns that will never be a blog topic for one reason or another. Not great performers but different and perhaps entertaining like the one pictured below. At least BB may get a break. Or something like that. May be more work for him in the end? Who knows how he makes magic happen.
So now I have not made a commitment and that makes me happy. More time to get involved with it.
Right now, I’m dealing with the VA, DAV and memory care homes for my old shipmate and clearing over 3 acres of brush just dying for another wildfire to re-seed. Had 3 here in San Diego County already.
Just a bunch of enablers around here, including you, RR. Nice work. Get some hats guys, or some spray on hair. 😉