Today reader Dean Speidel, whose blog handle is Motorman, continues to share his experiences with an Anschutz 335 breakbarrel air rifle. This day we look at disassembly and inspection.
If you’d like to write a guest post for this blog, please email me at blogger@pyramydair.com.
Take it away, Motorman
Anschutz 335 Rebuild: Part Two
Motorman / Dean Speidel
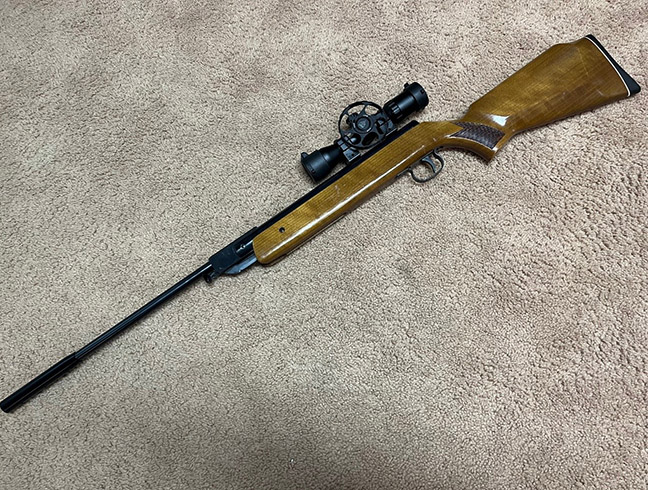
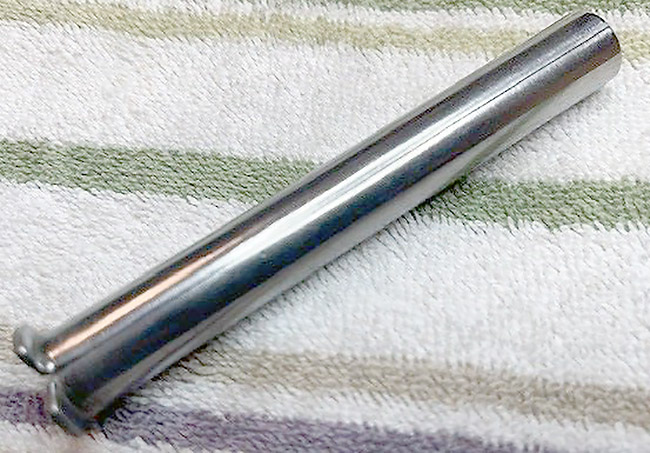
Anschutz 335.
This report covers:
- Inside the compression tube
- Honing
- Touch up the bluing
- Burnishing the compression tube
- Polishing the piston and spring guide
- Spring guide washer?
- Too much?
- Where is this going?
Inside the compression tube
I was somewhat surprised when I inspected the inside of the Anschutz 335 compression tube. It had what I can only describe as “stretch marks” from the process that turned a flat piece of steel into the tube. It was not a nice, smooth surface. Frankly, I would have expected better from a company with the Anschutz reputation, but then most customers would never see the inside of the compression tube. It occurred to me that this rough surface would create friction against the piston seal and make the task of sealing the air behind the piston seal more difficult. Both of these factors would inhibit power output. Not good. I decided I would try honing the inside of the compression tube.
Honing
I have an automotive brake hone I used on drum-and-shoe brake systems back in the 1960’s and 1970’s. The three spring-loaded abrasive shoes adjust for diameter and/or pressure against the inside of the tube (see photo below).
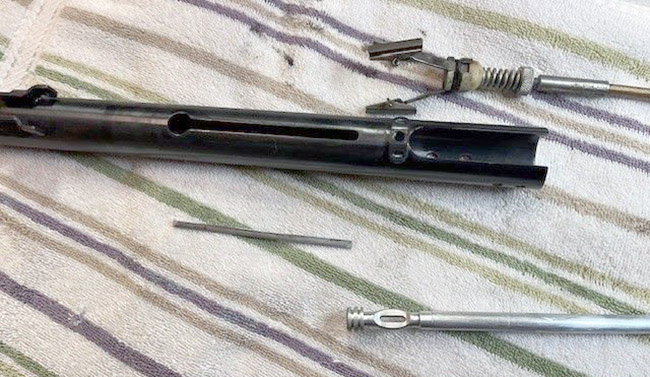
My brake hone will smooth the 335’s compression tube.
Now, how am I going to prevent the brake hone’s shoes from catching on the cocking slot? I found a piece of donor steel that was the same thickness as the compression tube. I cut it as closely as I could to the same width and length as the cocking slot and beveled all the corners with a hand file (shown just below the compression tube in photo above). I held it in place with some Gorilla brand duct tape. As a confirmed Ozark redneck, I’ve become a connoisseur of duct tape and, to my experience, this is the prime rib of available tape.
I was elated when the hone worked perfectly for the length of the cocking slot and all the way to the bottom. I lubricated the hone with a generous quantity of Ballistol, chucked it up in my drill and went slowly. While the surface was much improved, I was worried about honing the cylinder enough to remove ALL the stretch marks. I didn’t want to increase the ID of the tube so much that the new seal would be too small. So, I settled for a much improved, but not perfect inside surface.
Notice the shotgun cleaning rod at the bottom of the picture. We’ll come back to that.
Once I finished honing I blew the whole thing out with brake cleaner. There are several brands of this stuff and it’s available at any automotive parts store. It leaves the steel absolutely clean and dry. I’ve wondered if it isn’t the same thing as “Gun Scrub” or some similar product. I’m not sure I’d spray it on any plastic bits that might melt when exposed to the solvent, but it works great on metallic stuff.
I put pieces that I’m going to spray with brake cleaner in a 6” X 12” cake pan to help control the mess. No, don’t steal your wife’s cake pan and then put it back in the dishwasher. I bought this cake pan to be on permanent duty in my garage.
Touch up the bluing
I mentioned that there were a dozen or so spots in the bluing on the top of the compression tube. Oddly, there is no accompanying rust. I’ve experimented with several different brands of cold blue; Birchwood Casey’s Super Blue, Van’s Instant Gun Blue, and Brownell’s Oxpho-Blue. The latter has worked the best for me.
After cleaning the surface with brake cleaner I set the tube on one of our house’s heating vents. As I write this it’s about 5 degrees outside, so the furnace is running a good bit. It warmed it up just right! In the summer I would have left the compression tube out in the summer sun for an hour or so. Any of these bluing solutions creates a chemical reaction with the metal. My high school chemistry class taught me that chemical reactions happen faster and more completely the warmer they are.
I get some bluing paste on a small paper towel or fabric pad and rubbed it into the surface for three to five minutes or so, re-wetting the pad as needed. Then, I let it sit for a while until the bluing solution is just starting to dry, then I buff it off with a clean cloth. Repeat the process two or three times and follow up with some Ballistol. You might not get quite the same result as genuine hot blue, but with some care and effort you can get a reasonably acceptable result.
Burnishing the compression tube
Next, I dug out that old shotgun cleaning rod. I folded a long, narrow strip of paper towel and fed it into the slot on the end of the cleaning rod. I wrapped it around several times and secured the end of it with a small rubber band. I mounted the cleaning rod in my hand drill and, making sure the rotation direction of the drill matched the direction that I wrapped the paper towel around the tip of the rod, I was ready to go.
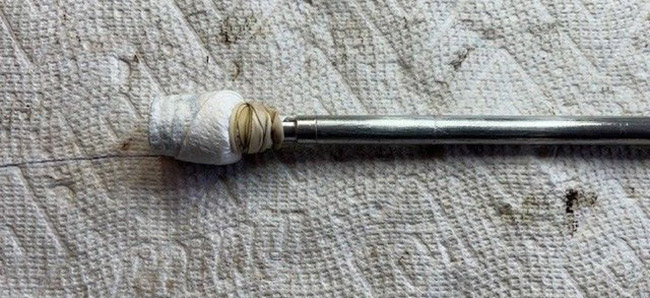
There’s the shotgun rod I said we’d come back to.
After dipping it into some genuine Air Venturi Moly Metal-to-Metal paste, I started burnishing it into the inside of my newly-honed compression tube. Make sure you do this thoroughly. Coat the whole inside surface of the compression tube. Leave a thin coat of moly on the surface, but not too much! When you get it back together again the excess lube will diesel when you pull the trigger the first few times. In extreme cases the dieseling can damage the gun so we want to keep the grease to the bare minimum.
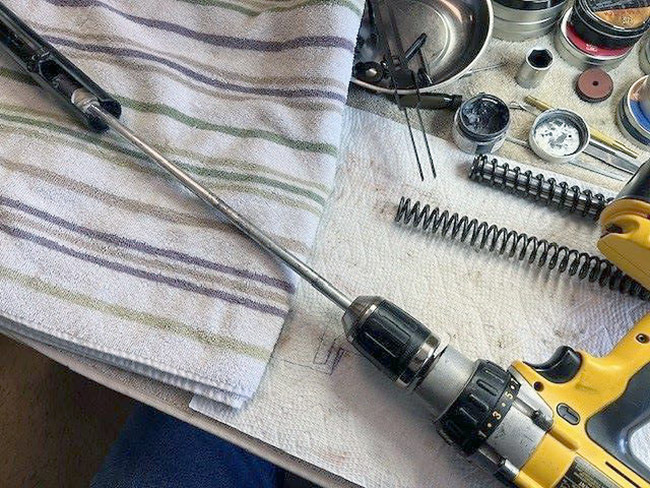
My electric drill is a perfect burnisher.

Polishing the piston and spring guide
Next, I turned to the piston and spring guide. Curiously, the top of the piston had buffed itself off against the inside top of the compression tube. Maybe the spring was cocked to the side and pushed the piston against the tube? Maybe the piston is just too small for the compression tube? Difficult to tell. I have a buffing wheel on my grinder. I buffed the piston and spring guide to a nice shine and rubbed moly into them both.
Here’s the spring guide after I ran it over the buffing wheel:
Rear spring guide.
Spring guide washer?
The end of the spring guide was formed by cutting it longitudinally in four places and then bending those four tabs at a 90 degree angle to hold the end of the spring. No, it’s not a nice, smooth surface for the spring to rest against.
As the spring is compressed and suddenly released it rotates. A washer between the end of the spring and the spring guide would provide a smoother, lower friction surface for the spring to rotate against. Moreover, the washer may rotate some to help ease rotational friction.
I debated about doing this. I’d already gotten the impression that the Maccari spring would be a little more powerful than the OEM spring. The synthetic seal should have less friction and seal better than the original leather seal further increasing power especially after the honing. If I added a washer it would preload the spring some more. Plus, the polishing and combination of lubricants will hopefully have a positive effect on output.
Too much?
All of this is going to theoretically increase the power of the gun and that was NOT one of my goals. Getting it up from 500 FPS to the OEM spec of 700 FPS was one thing, but I’m not trying not build a hot rod here! In the end I decided to fabricate a washer with the right ID and OD and slip it over the spring guide before installing it inside the spring. What is going to be the cumulative effect of all this? Who knows?
Where is this going?
Coming up next in PART THREE: re-assembly fun.

Motorman,
Thank you for an informative Part 2 to your rebuild of the Anschutz 335. I question whether it is better to burnish the compression tube then insert the piston (which I feel is less messy) or smear the piston with moly while inserting into the compression tube (very messy)? In the second method I think the moly will be spread by the repeated passage of the piston allowing it to fill miniature defects in the compression tube. Then again all this might be moot and it makes no difference either way.
Siraniko
Siraniko,
I do both, but I think the second way is the one I prefer these days.
BB
I like the idea of burnishing (rubbing) the moly into the inside of the compression tube. That way I am assured that it is evenly applied (you can actually see where the moly is and isn’t as you do this).
While the piston seal doesn’t ride as far back as the cocking slot, the back of the piston rides against the inside of the compression tube way back there, so I burnish the moly in for the length of the tube.
Motorman
Eastern MO
Dean,
Wonderful report! Well documented and explained. I knew a guy once who said that just about anything could be fixed or improved with spit and baling wire. So no issue with the duct tape, Okkie.
Now you need to offer your honing skills to B.B. so he can fix the compression tube of the FWB 127!!
-Yogi
Yogi,
A brake hone is a good tool to remove deep scratches from the compression tube (not too smooth or your lubes won’t have anything to adhere to). A brake hone WILL NOT make an out of round compression tube round. The brake hone is too flexible and because of this will only make an out of round compression tube more out of round.
To fix an out of round compression tube you need a honing machine with very tight tolerances that can work the entire length of the tube at once in this blind hole starting with coarse grit and working to finer. Something like a Sunnen Hone machine.
Well Kevin,
Thanks for the clarification. Anyway that is what B.B. needs to fix yesterdays FWB 127.
David Slade also mentioned that often the FWB’s barrel forks are not properly aligned.
Perhaps B.B. could do a report on the Air Arms Pro Elite, which also had a problem-big problem-with out of round compression tubes.
-Y
Yogi,
Maybe…
Do we know for a fact that it needs to be NEAR perfectly round? HOW ROUND does it need to be?
To the Tenth, hundredth, thousandth, or maybe ten thousandth? Millimeters, inches, Angstroms, or Furlongs?
Hard to know unless you know the required tolerance of the Piston and seal as well as their build specification.
Bummer!
shootski
I would say, “round enough to shoot to specifications” whatever that/they are!
-Y
Round, square, star, whatever shape… as long as the piston seal fits the compression tube like cookie dough in it’s cutter, eh?
Of course, perfectly round has the least circumference thus least friction area. 🙂
I would love to see an oval pistoned airrifle.
Yes, that Honda engine never won anything.
To me the real bonkers engines were Mike Hailwood’s 6 clylinder 250cc bike. They reved to the heavens…
-Y
Ingenuity always fascinates me, and this post has some. Thanks, looking forward to the next episode. As a side note, I am used to finding links to the earlier parts of the series near the top of the post. But this one appears to be missing a link to part one.
I think we can “blame” our host the lack of the link. This I am sure will be remedied before the day is out.
RR,
Ooops! 😉
BB
😉
I have always used a closely sized dowel pin with a slot cut in the end to hold a length of cloth in bedded with Moly grease to do sort of the same thing by hand . I need to try your method with a drill motor. Good stuff , thanks Motor head.
Motorman,
This is an awesome report! It is indeed very surprising the Anschutz compression tube was in such sad shape. I had to do similar honing to my 1906 BSA as it had been shot repeatedly without any lubrication. The back edge of the piston had gouged long grooves into the top, back of the compression tube. Fortunately, it was not in the compression section. I used a bit that had sandpaper flaps on it.
Thanks for your bluing and metal cleaning tips. I have a few cooking pans in my garage also. 😉
RidgeRunner,
Maybe this ONE went past the bin for honing because it was a Monday during Oktoberfest!
Of course maybe it doesn’t make any significant difference to the expected performance is also a possibility.
Just a thought or two…
shootski
shootski,
Sorry, I am really slow today. Whatever you just said went over my head before I had the opportunity to reach up and grab it.
RidgeRunner,
You have a sever case of Retired Syndrome!
Shoot two pellets immediately with plenty of moonshine and call me in the morning ONLY if you don’t feel Retired!
Do not consume Water Beads with this remedy!!!!
…from the Nannies at the CPSC
I was trying to say that this particular tube was in that condition a manufacturing step was skipped.
Mightn’t it…
shootski
shootski,
OK. I am with you now.
That is a very real possibility. Another is that this was to be exported to the USA and did not receive the care it should have. I have a Webley/Hatsan Tomahawk that really should not have been exported. The machining that was done on it would qualify it for the junk pile.
As near as I can figure, Webley must have beat on Hatsan for a super low price and when Webley charged an outrageous price, people would not tolerate such slovenliness and insisted on refunds. I picked this thing up for almost nothing from that airgun company out in Arizona.
If I had received such at full retail, I would have sent mine back. It was pretty bad.
“Frankly, I would have expected better from a company with the Anschutz reputation, but then most customers would never see the inside of the compression tube.”
Motorman,
Yes, I agree; I would have expected better of them.
Many years ago, I had a S&W K38 Target pistol, beautifully blued, with a 6″ barrel.
It was built just after WWII, with lots of what I’d call “pride of craftsmanship.”
When I took it apart, the metal surfaces on the inside, the parts most people would never see, were nicely polished!
Years later, I bought a S&W 686 L-frame and took it apart…beautiful on the outside, but full of machine marks on the inside. I guess economically they can’t afford to do the level of finish work on the inside that they used to do, but I find it sad.
I’ve got one German .22LR that’s over 100 years old, and two German air rifles that are over 80 years old.
All have one thing in common: even though they were “economy” guns at the time they were made, they still display a very high level of pride of craftsmanship.
The good thing is, you yourself are displaying an excellent level of craftsmanship and pride in your work on this rebuild. Great report! I can’t wait to read the rest. 🙂
Blessings to you,
dave
Reminds FM how much fun he had rebuilding MGB clutch master and slave cylinders over the years, using a two-stone hone; very similar process otherwise except no moly in there, of course, just good quality brake fluid. Well written and illustrated, Motorman; look forward to your report on the results.
I cursed myself twice in my youth; once with a Triumph TR3 and the second time with a Triumph Spitfire. I’m a slow learner. After the Spitfire I promised myself that I’d never own another English car (or motorcycle). I’m happy to report that I’ve kept that promise!!
Motorman
Eastern MO
Motorman,
I once helped lift a Triumph Spitfire out of a ditch because it’s right front wire wheel came off in a turn. But that was a common problem for some wire wheels, I guess.
BB
BB,
Knock OFF Hub? Lol!
shootski
That wheel must have been a victim of “Undo” syndrome; it’ll get you undone. 😉
How about a nice, reliable Miata??
Motorman
Eastern MO
How MGBs should have been from Day 1; reliable airguns will do now.
shootski,
Or fall off.
BB
B.B.,
Just ordered 600 .30 caliber (7.62) 50.5 JSB KNOCK OUT SLUGS to see how they compare to the JSB .30 caliber (7.62) 50.15gr Pellets when shot out of the DAQ 308 1:10 out a bit from the muzzle.
Could be interesting ;^)
shootski
Was “owned” by two MGs over a 51-year period; miss them, yet not so much.
FawltyManuel,
Lucifer’s Electrics…
shootski
Ahhh — Lucas — The prince of darkness! 🙂
BB
B.B.,
But those BIG LUCAS RALLY Lamps looked SO KOOL!
FZZzzzt… SCREECH!
Sound of WEEPING over the crumpled mess.
shootski
It is said the reason our British friends prefer their beer warm is because Lucas makes their refrigerators. Having said that, the Lucas original/factory headlights on FM’s ’74 MGB were still working perfectly when the car was sold November 2019.
I saw a t-shirt at a British vehicle rally:
“Three positions of a Lucas light switch:
1. Off
2. Flicker
3. Blow main fuse”
British electrics can be okay, if you are scrupulous about cleanliness and maintenance and your expectations aren’t too high. The people that rode those bikes used them for daily transport & had to maintain them, as necessary.
They were not the turn-key appliances that the Japanese manufacturers produced (to come to own the market).
Just sayin.
Bill
It seems to me that even when fully cocked, the piston seal would not reach al the way back to the cocking slot, so it doesn’t seem necessary to hone the cocking slot part of the cylinder.
If the cylinder was slightly out of round, would your tool make it rounder or simply smooth the sides leaving a smooth, but still out of round cylinder?
No, the seal doesn’t go back into the cocking slot, but the back of the piston does, so I honed and moly’d the whole tube.
The hone only smooths the surface, but it doesn’t reshape it, so it won’t make it more round.
Motorman
Eastern MO
Motorman,
Totally enjoyed Part 2, also!
Got me thinking.
“In Too Much?” These sentences especially: “What is going to be the cumulative effect of all this? Who knows?”
That is what made doing DT&E on various systems and aircraft (Development Test & Evaluation) so much fun.
Later it helped me to keep an open mind on things like: Cross Hatched Snow Skis were faster than polished skis in certain conditions (more than even the Wax Tech thought) but tests were available to prove or disprove the techniques value.
When we tinker we run the risk of not having at our disposal a good test or even a valid comparison.
All of that testing and evaluation would also drive up the cost to the maker. The bean counters are are all over that! The BOX retail store buyers are only interested in: Will it sell to my customers?
SO, we few who seek perfection, or close to it, are stuck with guessing what works, using what worked before, hoping for the best, or spending the money that the manufacturers Don’t.
Bless you on your pursuit of better with your 335! Hopefully it will please you for years to come.
Looking forward to the future Part(s)!
shootski
If the inside of the cylinder is out of round, is a synthetic seal still better than a leather seal?
Roamin,
Negative. Leather conforms to odd shapes more readily. PTFE can be squashed into shape, but leather naturally fills the odd shapes.
BB
BB,
Would one of the seals that ‘balloons’ out be able to fill a slightly oval compression tube? (As long as it’s not too oval, I suppose.)
I know that we like to consider that our airguns are truly precision pieces of machinery but some of them (many?) don’t have to be highly precision to function at a very high level.
It goes back to design, tolerances and material used.
Testing does tell whether all of the elements come together for a good product.
We are the lucky recipients if the design/production do come together effectively.
Happy plinking.
Bill
Hello,
My favorite springers are the youth size to medium size( Dianas 23. 25. 27. Beeman R7). I have had aporturnities to acquire the same size Haenel , BSF and Anschutz airguns but I pass on them. Eventhough, parts are available. I don’t have the skills or equipment to hone or fabricate parts. I’m thinking that these older guns need more attention and I do not have the skills and let them slip away. Any thoughts?
A bargain purchase tuns into an expensive acquisition if one needs to send it away to get serviced.
Recently, I purchased an FWB 65 for $200. Due to poor packaging the rear sight and right side windage knob are damaged. Have started an UPS claim. See how that goes? Have found replacement parts but they are around $125.00 US . Defeats the purpose of a bargain. Still a bargain and thinking of getting the FWB 65 serviced (the gun is shooting an average of 425 fps) so i am a bit hesitant. Have tried to attach photos but get an error message.
Ps.
Have always wanted an FWB 127. After the latest report, I appreciate more my two FWB 124s. One scoped , one open sights.
Motorman,
Found this while looking around for a part:
https://www.waffencenter-gotha.de/shop/ERSATZTEILE-Spare-Parts/LUFTDRUCKWAFFEN/HERSTELLER-MODELL/ANSCHUeTZ/Anschuetz-335:::11_12_614_13_3395.html
Might be of use to you.
shootski