
I’m still at the Pyramyd AIR Cup. Today reader Vana2 whose name is Hank, shows us how he made a pellet pouch.
If you’d like to write a guest post for this blog, please email me at blogger@pyramydair.com.
DYI Pellet Pouch
by Hank Vana2
This report covers:
- The design
- Preparation for sewing
- Stitching the pouch
- Fitting the flap
- Gluing the flap
- Summary
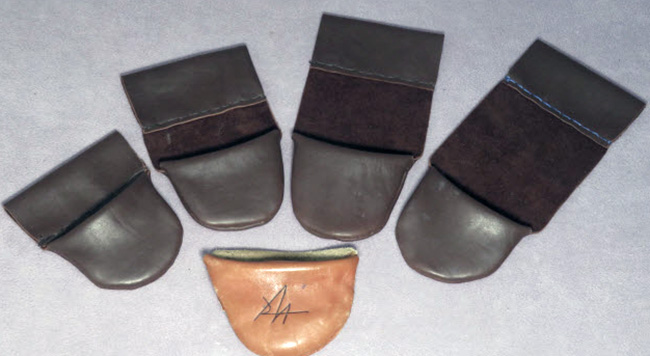
Pellet pouches for different occasions. A time proven design, the initialed pouch is 56 years old.
My wife left a little pile of pellets sitting on my dresser. Yup, I’d forgotten to take them out of my pocket AGAIN. Déjà vu – my mother used to do that as well. To ward off any complaints of pellets in the washing machine I needed to make a couple of pellet pouches.
Recent comments posted by readers FawltyManuel, pacoinohio and Roamin Greco about containers for pellets prompted me to write this guest blog on how I’ve been making pellet pouches since I was a teenager.
Designed as a “special pocket”, the pellet pouch is made to allow plucking out one pellet quickly without having to fumble with containers and lids. The rounded bottom (no corners to hide in) causes the pellets to roll to the middle for easy access and a flap serves as a “one-way valve” to stop the pellets from falling out if the pouch is accidentally inverted.
I make the pouches in different lengths to suit clothing I’ll be wearing. The short ones are like an extra pocket; the longer ones are easier to access when you are wearing a coat.
The design

The pouch is made from a suitable width of leather, mine are 4 ½ to 5 inches wide.
The top piece is cut with a full radius, with the depth (from the dotted line to the bottom edge being the length of your first finger. The flap is about 1 ¼ inches wide.
The bottom piece (not detailed) is the same as the top except that the “flap” will be longer so it can be formed into the belt loop. It needs to be long enough to suit your belt width plus ¾ inch for stitching.
Preparation for sewing

Setup and ready to go
I find it difficult to keep the top and bottom pieces from shifting out of alignment so I staple them together positioning the staples in far enough to a good margin to allow for the stitches.
The pouch is sewn together inside out. In the picture above the top and bottom pieces are stapled face to face in preparation for trimming the bottom piece to match the top one.
Stitching the pouch

The sewing setup.
Stitching the pouch is pretty straight forward. Sewing is not one of my strong points so I’ll just make a few comments.
For sewing leather you may need to check Amazon for some “leather waxed thread” and get a good sturdy needle. Watch the prices (they vary widely) and there are some inexpensive kits available.
I use a block of wood (with a wide crack in it) as a working table and a pair of needle-nose pliers for pushing the needle through the leather (into the crack). To prevent puckering, the stitches should be pulled tight (with consistent and moderate force) while holding the pouch flat.
Once the pouch is stitched it is turned right side out and the belt loop can be stitched to the size and length desired.
Fitting the flap
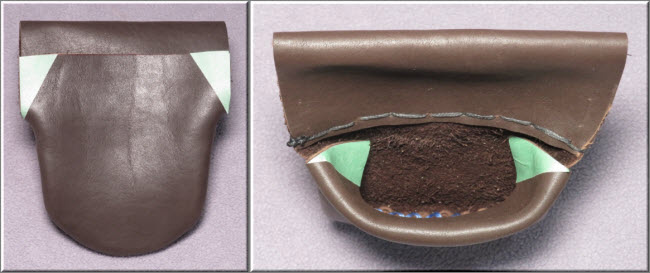
The green tape shows the corners that need to be removed
The next thing is to trim the flap to fit. The picture above shows how it should look. Don’t just cut off a hunk of leather (you can’t put it back on LOL!), trim off a small part of the corner and test fit it, repeat until the flap is tight to the pouch but not distorting the shape.

Gluing the flap

This shows the beads of silicone calking applied and the flap folded into position.
All that is left is to finish the flap. Silicone calking is used to make the flap stiff enough to become a one-way valve to keep the pellets in the pouch but flexible enough to allow the flap to move out of the way when retrieving a pellet.
Here I’ve applied several ¼ inch beads of calking then folded the flap into position, molding it to the shape I want before setting it aside. That amount of calking takes at least a day or two to fully set so leave it undisturbed for that long.
Summary
That’s all there is to it. It takes about an hour to make a pellet pouch and they last forever.
These pouches are great for carrying 50-100 pellets while on a walk-about sniping targets of opportunity. I find them to be ideal for feeding single-shot airguns.
Hope you will try one out.
Cheers,
Hank

B.B.
I’ll take three! Where do I send the money?
You diminish your wood working skills yet you make beautiful pellet pouches.
So you have DIY skills…
-Y
Yogi,
Sorry, you’d have to get that project passed my wife’s “honey do” list and there’s not much chance of that happening LOL!
Hank
Thank you for a very informative project.
Very well done Hank.
I think I could possibly make one even with my pathetic sewing skills.
If not I would at least look like a monkey doing a math problem…..
Again, nicely done!
Ian
Ian,
I predict that you could make one of these with no sewing skills what-so-ever. I CAN sew, but for decades I have chosen to repair holes in the pockets of my work pants, reattach web straps to various duffles and packs, and mend liner rips in jackets and coats, among other tasks, by using a staple plier. (I’ll add a photo of a Bosticn Model P6) They have a deep throat and use more robust staples than a desk stapler. The staples are also available in stainless steel. I assume that the leather that Hank is using is more like glove leather than saddle leather, so the staples should pierce it easily. Another trick that I use to hem my pants is “seam tape”. It is basically a narrow strip of flattened hot melt glue. Lay it between two pieces of fabric (or thin leather) and iron it. The glue melts and sticks the two together. Along the same line, conventional hot glue sticks in a glue gun or super glue will probably work as well. If you decide to use stitches, a small fork with sharpened tines can be driven into the overlapped leather and hit with a hammer to pre-punch the holes, making the stitching easier and more uniform. Just put the first tine of the fork into the last hole in the series that you previously punched. I intend to make a couple of these from a bag of scrap leather that I bought from a company called American Science and Surplus. The sort of leather in the bag will be perfect, I think.
Half
Hank,
Look at my comment to Ian right below. Do you think these methods would work in place of sewing? Try to think outside your obvious craftsman’s box, otherwise we’ll already know your answer.LOL
Half.
Half,
Stitches ensure a tight seam so no escapees 😉
Hot melt glue would work but I’d want a couple of staples or rivets for the primary strength.
Superglue will glue leather but I wouldn’t trust it alone. Think that leather is too oily and porous for a good joint.
Myself, I’m going to get one of those sewing things that shootski mentioned.
Hank
Hank,
Thank you!
I can actually sew pretty well (thanks Mom!), and I’ve got some heavy needles I bought for stitching a cover for our boat. Hence, all I needed to make a pellet pouch was someone to show me how it’s done. 😉
Thanks again,
Cheers,
dave
Dave,
Post a picture when you’re done! 🙂
Hank
Will do! I just need to scrounge up a good piece of leather. 🙂
Hank,
Thank you. Do you think I can use a rubber tire interior instead of leather for this project?
Siraniko
Siraniko,
It MAY work, but you may have issues with it tearing at the edges where it is sewn. You will have to be careful.
You might be able to use some old boot tongues. These may have a useable shape also. Heavy canvas might work, most especially some that is meltable. Keep using your imagination.
Siraniko,
I think that RR summed it up well. You might be able to glue the rubber seam together and add stitching for reinforcement.
A friend used to glue two layers of heavy cloth (from old demin jeans) together with a thin coating of silicone calking to make a leather substitute for his pouches.
I’ve seen fake leather (that vinyl stuff used on car seats) used as well but the seams needed to be glued and stitched.
Hank
Vana2,
Really good looking and of course very functional for hunters since they are quiet.
I saw your pouches in a Reply and wondered about how you formed the lip/flap as well as what sewing method you used.
Since Yogi is demanding a production run… https://www.sailrite.com/Speedy-Stitcher-Sewing-Awl-Kit?gclid=Cj0KCQjw_5unBhCMARIsACZyzS0M17N80PyE6ae_SjVtcKx-AdapeNJx7IRL_EVvr5lqNhw8282ECQYaAkwsEALw_wcB
One of these awls might help increase your productivity. I have used one for leather, cordura, webbing, sails, and even on the Bitter Ends of sheets.
shootski
I have had my Speedy Stitcher Shootski referred to above for about 50 years. It is easy to use for sewing puncture resisting material like thick leather, even shoe soles. It is just as serviceable now as it was when new. Nothing to wear out. Should be perfect for Hank’s pellet pouches.
Deck
I have something similar. Works great.
Thanks for the link shootski,
I’ll need toget one of those. I have some heavy leather put aside for a holster I want to make for my HW44 this winter.
Hank
Vana2,
Glad to be of help Hank.
Always thought only sailing types and Sea Kayakers that use sails knew about the Speedy Stitcher awls. Now i find out that EVEN airgunners ;^) know about and use them!
shootski
Hank,
That is superb! As Yogi has stated in so many words, you are a “DIY” wizard!
🙂
May have bought my Speedy Stitcher from LL Been to repair my dad’s much used mountain trout willow creel. I used it for years until I retired from challenging slick rocks. Now it is mounted on a wall in my closet so I can see it everyday. Brings back special memories from mountain streams in Carolinas, Wyoming, Colorado and Montana. That creel dates from the 1920’s and is still ready to go for some trout.
Deck
Deck,
I used to have one of those willow creels way back when I fly fished for trout. Got away from fly fishing and gave the creel and a bunch of tackle to a friend who was just starting out.
Recently I’ve picked up on fly-fishing for panfish, bass, walleyes from the comfort of my boat. Really enjoying it. Yeah, let’s avoid slippery rocks!
Cheers!
Hank
I think that wabbit hide would work well. Hang a wabbit foot on it for good luck….
Elmer,
I always wondered if wabbit feet were actually lucky… after all, the wabbit had four of them a see what happened to him!
Hank
Good point Hank!
While people still carry rabbit’s feet (often as a keychain), many nowadays are made from synthetic fur, which is certainly good luck for rabbits.
https://people.howstuffworks.com/rabbit-foot-lucky.htm
Nice design and work – you could parlay this into a home-based business and FM would be a customer. On the other hand, FM will stitch his fingers together to create unintended webbed hands if he tried making one of these useful accessories. As for leaving pellets in the pockets, so far have avoided that though once in a while Mrs. FM – rightly so – gets on her Worser Half’s case about forgetting to take tissues out of them before the clothes go in the wash…
FM,
No time for a home-based business, it’s an easy DIY project though.
Hank
Doesn’t Mrs. FM get compensated by the money that gets laundered along with the tissues? :o)
Or don’t you believe in tips? ;o)
FM never has pocket money…
Ha! Me neither! We are like George Jetson in the opening credits.
That’s a great idea, I will have to try it. It is a LOT more convenient than the discarded Tic Tac containers I usually use. I always drop about 25% of my pellets fumbling with the lid while holding the rifle.
jimaok,
The pouches work very well, better than a pocket and much better than any sort of a lidded container.
Hank
B.B. and Ian,
Hope you two have your arm floaties and rubber Wellies!
Parts of Ohio got some serious deluges last night hopefully you are on high ground.
shootski
shootski,
We caught it, all right. But today is dry and muggy.
Ian is meeting people he only knew through the web.
BB
Yes Shootski, the area was hit hard last night, several people I talked to today either had family members without power, or they didn’t have power this morning.
And yet they still showed up to put on this event, and I would like to personally thank them for their dedication.
Ian
45Bravo,
Ian get a bunch of Xs!
But most of all enjoy the people.
shootski
Thank you,!
I have met many wonderful people over the last 2 days, and hopefully a few future friends..
Ian..
That’s really what it is about.
shootski,
Ian did really well in the Gunslynger. Stay tuned for news — next week.
BB
BB,
I am really looking forward to what you and Ian will have to say about it.
Hank,
I understand all the way until you get to the silicone. Is the silicone used to add some spring action to keep the flap closed or to form it into an always open position like in the last picture.
I have a bunch of different pellet pouches. I prefer my pouches on a neck lanyard. My favorite are molded leather made by the same people who make the Wilkins pouches but shaped in what they call a kidney shape. You can find them and pouches identical to the Wilkins pouches on EBay listed as coin pouches and for cheaper prices. They are all made in Hungry if I remember right. I used to import them by the dozen and sell them at the Airgun shows. I prefer the medium size best. The reason I prefer the kidney shape is that they lay flat against your chest and don’t flip over as much as the round ones. The kidney shape keeps the pellets lower in the pouch and helps keep the pouch bottom side down.
David,
The bead of silicone acts as a flexible wedge that holds the flap closed against the back of the pouch.
Being flexible, the flap moves out of the way when you reach in for a pellet and springs back when you pull your fingers back out.
The color and shadow makes the pouch look open, it’s not.
Hank
David,
I really like the Wilkins’ pouch and have three of them, one for each of the old gals that hang in the great room. I reckon I will have to explore EBay some. Buying anything through them is hard for me though. They left a real bad taste in my mouth many years ago.
I didn’t see any this morning on EBay but found them on Etsy.
When I was a teenager I used a Crossman 147 multi-pump in .177 caliber to shoot sparrows. The thing that worked really well for me to hold my pellets was a tobacco pouch. My dad smoked a pipe and he gave me one. This pouch was the type that tapers down and is squeezed to fill the pipe with tobacco. It had flat metal springs that would close the opening when you stopped squeezing. I hung it around my neck with a string for quick access. It worked great to get a single pellet out quickly.
geo791,
Thanks for that idea! Maybe I can use strips of metal from an old tape measure to recreate that opening.
Siraniko
Siraniko,
Check out the steel banding used to secure product to the shipping skids. It comes in various widths and thicknesses and makes a pretty good spring.
Construction lumber is usually banded with the stuff so a building site or lumber store could be a good source.
Hank