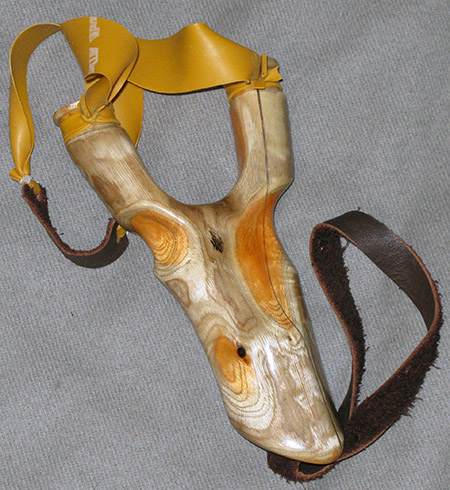
Slingshot reader Vana2 made for me of buckthorn wood.
Today reader Vana2 whose name is Hank, shows us how he makes slingshots. And I have something to say after that.
If you’d like to write a guest post for this blog, please email me at blogger@pyramydair.com.
Take it away, Hank.
Shooting a Hank slingshot: Part 3
by Hank
This report covers:
- Preamble
- Types of slingshots
- Our first slingshots
- Natural forks
- Tools to use
- Carving an OTT slingshot
- Summary
- BB’s turn
Preamble
Why are we talking about slingshots on an airgun blog? Well, it’s probably because I keep on bringing up that shooting (rifles, pistols, bows and slingshots) accurately all share a common requirement: CONSISTENCY. Everything that you do that relates to the shot benefits from consistency.
Many people shoot poorly because they never learned the basics of shooting – proper stance, hold, break and follow through. Slingshots make an excellent learning tool – in addition to all the basics, the shooter must be the stock, sights, trigger and power plant. I’ve found that people who learn to shoot slingshots develop the skills required to become an excellent shot with an airgun.
In this report, I’ll give an overview of slingshots and some ideas on how to make a custom one for yourself.
Types of slingshots
There are many different styles of slingshots but they are mostly variants of four basic types; Through The Forks (TTF); Over The Top (OTT); Pickle Fork (PF) and the Wrist Rocket type with an arm brace. In this report I’ll be focusing on the more traditional TTF and OTT slingshots made from wood that use flat bands (elastics) for power.
With traditional TTF slingshots the pouch, ball and bands pass between the forks. There’s approximately two inches between the forks to have enough space to avoid contact with the pouch and forks. An experienced catapultist can shoot with narrower forks where a beginner would be better off with a wider spacing until they develop a proper hold.
Both the vertical (straight up) hammer hold or the more common horizontal (tipped sideways and parallel to the ground) forks with a “pinch” or “braced” hold can be used when shooting TTF slingshots.
With OTT slingshots the pouch, ball and bands pass (mostly) over the top of the forks so narrower and shorter forks can be used. Typically, the horizontal forks and a pinch or braced hold is used. To avoid hand-slap the strength of the bands should be matched to the weight of the projectile. Too strong a band or too light a ball will result in the pouch coming back to hit the fingers.
PF slingshots have short, narrow forks and require a special shooting technique to avoid hitting the frame or your hand with the pouch/ball. PF slingshots remind me of ultra-compact bull-pup airguns and have no experience with either of them.
The commercial Wrist Rocket slingshot with surgical tube bands are usually very heavy to draw and challenging to be accurate with. One of those Super-Magnum break-barrels would be the airgun equivalent of a Wrist Rocket.
Our first slingshots

Here are a couple of natural fork slingshots. The left is a basic TTF configuration; the right an OTT that has been custom fitted using twine. Both are quick to make.
Back in the 60’s and 70’s finding a nicely forked branch was a strong invitation to make a slingshot. Commercially made slingshots were not common and having a slingshot was something that most kids could not resist.
The fork would be whittled to size, notches carved, a bit of leather from a boot became the pouch and whatever stretchy material available, usually large elastics or strips of inner tube, were used for bands. Add a pocket full of pebbles and we were ready to slay dragons.
Once all the local dragons were vanquished, we might take the time to remove the bark, sand the frame and maybe even apply a bit of linseed oil. Mostly they were just used as they were.
When we transitioned from shooting rocks and pebbles to ball bearings and marbles we realized the potential of our weapons and recognized that a consistent hold was critical to being accurate. This is the point where we started custom fitting the slingshot to our grip – forks were rasped or padded to suit and our effective range increased dramatically.
For padding and adding grip supports to a natural fork we used multiple wraps of thin jute twine set with the occasional smear of wood glue. The jute was built up to the required size then pounded into the desired shape with a hammer. Once the glue was dry the fuzzies are burned off (outside!) and the wrapped areas were sealed with a couple of light coats of varnish.
I think of making slingshots in three ways. You can use a natural fork with some minor modifications (as shown above) like filing down knots or padding the grip to make it comfortable to hold. You can carve a frame INTO a natural fork leaving most of the original wood undisturbed. Or, you can cut the frame OUT OF a large fork (or piece of plywood). All three approaches will yield a good slingshot.

Here are a couple of examples for cutting frames OUT OF wood.
Cutting a frame out of a large fork allows for more freedom in shaping the frame while still having the strength of the natural grain. Plywood gets its strength from the laminations and is very convenient to work with when you need to make a bunch of identical frames. As you can see by the stack of frames, I’m working on the slingshots I promised to make for the local kids.
I prefer to carve a frame into a natural fork and leave as much of the character – knots, cracks and even bark as I can, so that is what I’ll show you in this report.
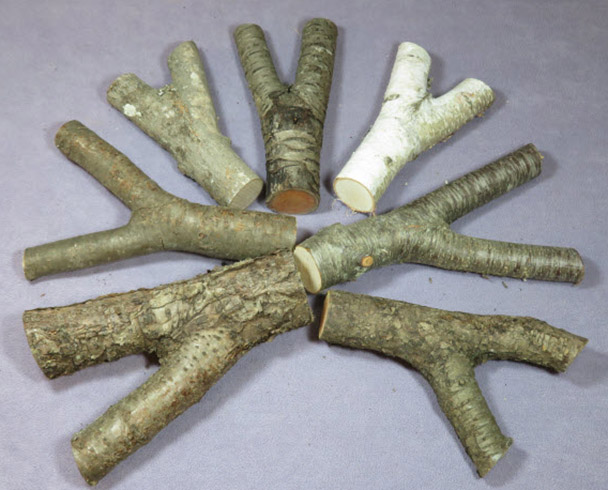
Natural forks

Each natural fork is unique; here are a few from my stash.
Most any suitably sized wood fork can be made into a good slingshot if it is sound and strong enough for the bands mounted on it.
Softwoods work, hardwoods are preferred. Dead wood is okay but rotten wood should be avoided as you can never be sure when it will fail.
Elm and birch grow nice symmetrical forks, maple and nut woods (oak, hickory, etc.) and fruit trees generally have less balanced forks. Buckthorn, my favorite, grows in a random fashion and produces many forks that have a lot of character.
When collecting, cut the forks 4 to 6 inches longer than necessary. The extra length is a safeguard against checking and provides a convenient handle to clamp in the vice while carving. Don’t forget that bark makes a fork look larger than it is. As cut, an average sized fork will have a 1.5 to 2 inch diameter handle with the tines being an inch or so in diameter. You can always remove extra wood from an overly large fork and smaller forks make good for slingshots for youngsters.
If you are going to use a polyurethane finish, the fork should be properly dried. Seal the exposed grain (ends and large knots) on the green forks with wood glue or paint to control the rate of drying and stored in a dry area away from direct heat. Wood dries at a rate of about 1 inch per year and the ideal moisture content would be 10 to 12 percent but it’s not critical.
Alternatively, you can use the fork as it is or remove the bark and force-dry it in an oven or microwave. There are lots of YouTube videos on how to dry wood. If a check (crack) develops add some low viscosity cyanoacrylate (super glue) to strengthen the split, fill the rest with epoxy and you should be good to go. If desired, linseed oil (or any furniture oil) can be used on the frame.

Tools to use

This my V-block for holding the fork and the tools I use to shape the frames.
Our first slingshot frames were made with a pen knife. A good fork needed little more than to be cut to size and have grooves for the bands whittled into the tips.
Carving a frame into a hardwood fork can be done with a pen knife but a rasp will make things much easier. Most of the carving is done with hand tools – a knife for scraping, rasps and files for shaping, and some sandpaper for smoothing. Power tools can be helpful as well; I like a cordless drill and carving burr for the concave areas and a belt sander for general shaping.
I use a plumb-bob taped to the upper fork (horizontal hold) as a reference to get the forks square relative to how the slingshot is held.
For safety and convenience you will need a way to hold the fork securely while you are working on it – a bench vice or Work-Mate works well if it is at a comfortable height. I prefer to use a V-block and a Quick-clamp as that combination is quick to use, solid without needing crushing force and allows access all around the fork.
My V-block is made from a rubberized piece of metal (part of a repurposed snowmobile dolly) and a block of wood. A couple of pieces of wood cut at 45 degrees and mounted on a 2×4, padded with leather or inner-tube rubber would do the same job.
Carving an OTT slingshot

Here is where we start, the fork as it was cut and with the bark removed.
The first steps are to remove the bark, and then dress down any knots so that the fork can be inspected and tested to see which way it wants to be held.
Forks can be ambidextrous, right- or left-handed. They can be carved to whatever hand you want if there’s enough wood present but if it’s seriously twisted it’s usually better to go with what the fork wants to be.
I’ve chosen to show you the carving of a more involved frame to be able to explain the options. A simple frame works just as well… the twine-wrapped one shown at the beginning of the report is one of my favorites.

This shows the initial shaping to fit the hand, the BELLY (left) faces the shooter and the BACK (right) faces away.
This will be an OTT slingshot used with a (thumb) braced grip. On the BELLY view you can see the thumb rest, the two concave areas in the handle that have been relieved to create the palm swell and, just visible on the left fork, the notch that sets the width of the grip and positions the web of the hand on the frame. The BACK view shows where the four fingers will be while gripping the frame and aligning it with the palm swell.
All this looks complicated but most of the shaping is done by feel – hold the frame correctly and remove wood that interferes with that grip.
Carving each finger location isn’t necessary; I did that on this frame as a graphical demonstration so you could see what I’m doing and where. The grip needs to be the correct thickness to be comfortable to hold – too small causes tension, too large will feel awkward.
Ergonomics is the key here, the better the fit to your hand the more consistently and accurately you will shoot. The proper fit will relieve the pressure on the wrist by focusing the stress from the bands through the web of your hand (the area between the thumb and first finger) to the wrist bones instead of the muscles and tendons.
The slingshot needs to be square to an eye-level target when viewed from the side, perpendicular to the ground when shooting horizontally to have both bands stretched an equal amount. Your hand, as held at full draw, will determine how the grip on the frame needs to be carved to make it square to the target. The position of your thumb on the lower tine controls the angle of the frame.
The shape/depth of the palm swell and fingers affect the angle of the slingshot to both bands when viewed from above. Letting the tines pull towards you or angling them away while shooting will affect the draw length (and power) but the slingshot will shoot to the same place if you are consistent.
All the carving is interdependent but there is an order of precedence I follow: lower tine (thumb), upper tine, palm swell and fingers. Remove wood to establish the vertical plane of the forks, shape the palm swell to settle/stabilize the frame in the hand and then adjust the finger area to make the slingshot more comfortable to hold. Remove small amounts of wood from all areas and test the grip before continuing. Once the frame is properly shaped it’s a matter of removing any high spots that are pressing into your hand. You will know when you are done when you no longer notice/feel the frame while it’s held at the full draw position and is properly orientated (square) to the target.
I recommend putting a dot on the wall – at eye height – as a sighting reference and having someone (or a video camera) available to check that the tines are vertical, one above the other from the side view for this part.
I need to put a note in here as I see this happening all the time. I keep on mentioning an “eye level target” because that is how you should learn to shoot – parallel to the ground – before adding complexity. To shoot at a target higher or lower than your eye level requires that you bend at the waist. If you raise or lower your arms to shoot the new geometry changes everything – your hold, anchor, and draw length – so your point of aim and point of impact changes as the distance and angle to the target changes. This applies to shooting slingshots, bows, pistols and rifles as well – when hand-holding a weapon, bend and pivot at the waist.

Final shaping – here the tines and handle have been cut to length and shaped
Once the frame is shaped (functionally) the final bit of work is done. I cut and shape the handle to suit. Using the plumb-bob for reference I cut the tines to length and round off any square edges. Finally, the grooves used to retain the bands are added and a hole drilled for the wrist strap if desired. The frame now is ready for sanding.

The finished slingshots.
The frame can be finished as desired, left natural or stained and varnished. I like the natural color of the wood so I’ll apply four of coats of polyurethane. If I’m stippling the grip (as shown above) I’ll do that in-between the second and third coats. That way there is enough polyurethane to seal the stippling but not so much to flood the texture. It’s best to leave the frame dry thoroughly before adding the bands.
Summary
So a tree fork is shaped into the frame and adding the band set makes it a slingshot.
Slingshots are backyard friendly and great fun. You might want to join in.
Hank
BB’s turn
I am so grateful to Hank for this guest blog because it was time for me to try again and to write part 3. I was afraid to do it because I was so humbled last time.
In case you didn’t catch it, and if you never tried to shoot a slingshot Hank’s way there’s no reason why you should have, he gave some wonderful advice in the paragraph that’s bolded and three paragraphs above the Summary. It starts out, “I need to put a note in here as I see this happening all the time.”
He told me much the same thing in a private email. Apparently there is a LOT to learn about shooting slingshots!

Ian,
This is turning out to be a great series.
Thank you for a very detailed report. 🙂
Blessings to you,
dave
P.S. I’m glad there were no cell phones (to take pics) back when I was a kid.
The “slingshots” I made back then were super-crude compared to your handiwork. 😉
Dave,
I goofed up. This guest blog was written by Hank from Canada — Vana2.
BB
LOL! OK, B.B., that makes sense! 🙂
Sorry, Hank,
I’ve been offline a few days; the battery in our wireless router died, and the new one just got here. It’s kind of scary how dependent we become on the internet. 😉
Ian,
Thanks for helping us understand how you make your slingshots. Does stippling actually help in consistent hand placement?
Tom,
PS: Section BB’s turn 1st sentence: “I am so grateful to Hank (Ian) for this guest blog because it was time for me to try again and to write part 3.” So this is Ian (45Bravo) creating a guest blog expounding on his method of making and shooting slingshots like Hank’s (Vana2).
Siraniko
Siraniko,
Nope! This is Tommy messing up in public.
This guest blog was written by Canadian reader Vana2 — Hank!
My apologies Hank!
BB
An old boy I worked with 50 yrs ago told me , “If you don’t make a mistake every now and then, you’re not working fast enough.”
OK, I am confused. Did Ian write this or did Hank?
Whomever wrote this I wish to thank that person.
RR,
Oh, my gosh! I completely spaced this out and swapped the two men in my mind. The first part of all guest blogs is something I cut and paste from a recent guest blog, and I copied it from one of Ian’s. That’s how it happened.
Hank, I am so sorry!
BB
B.B., to error is human. Waking up before 5 am is questionable. ;o)
The “Dennis the Menace” in all of us thank you!
-Yogi
Ha ha. Good one!
Hank,
How much does stippling help in making the hold consistent for accuracy? Do you glue two sheets of plywood to make those slingshots?
Siraniko
Siraniko,
The stippling is optional though it does contribute to having a positive grip. The smooth carved areas (like the palm swell) allow the slingshot to settle itself into your hand, the stippled areas help keep it there.
Some frames, by their shape, benefit from stippling but most are fine without any. Sometimes, like on a frame that doesn’t have much character, I’ll apply a bit of stippling to add something interesting.
I like 3/4″ for my frames and prefer Baltic Birch plywood because it has more laminations than standard plywood and the it doesn’t splinter as much on the router. The frames in the picture will have a jute wrapping on the handle to pad it a bit and bring it up to “teenager size”. For an adult slingshot I’ll glue on an extra 1/4″ piece in the handle area before putting it on the CNC and that extra thickness will be shaped into the palm swell.
Hank
Thank you for a great report, that is some beautiful work you do.
I have shot slingshots since I was a kid, and knew there were some very talented slingshot shooters out there, but had never really thought of what really went into designing and making the actual item they used other than it being a stick.
The ones I had seen looked rather “crudely”made, but now I realize it was that shape for several reasons, ergonomics being the main one.
And that’s a lot of technology you manage to squeeze into and out of a forked stick….
Thamnk you again..
Ian..
Thanks Ian,
I’ve had a slingshot or two close to hand ever since I was a kid as well.
…Probably because I never grew up 😉
Hank
No problem BB, (Ian does excellent guest blogs!)
…It’s the sharing of information that’s important!
Hank
Vana2,
Well said and well done!
Now i hope this bunch sells like Hotcakes (Pancakes, also made with a rising agent(s) fat Palatschinke/Crepes) to keep the PANTHERA in ammo and accessories!
Thank you again,
shootski
I apologize for this being off-topic, but where can if find a set of front sight inserts for a Diana 5 / 6 and for Weihrauch front rifle sights? I’ve looked on Chambers, Pyramyd AIR, and several other places in the U.S. Can I possibly be the only one that’s interested in replacement front sight inserts???
Motorman
Eastern MO
Either look at airgun sites that are targeted to 10M target shooting.
Otherwise, Rolling Thunder(google search) can make anything you want.
-Yogi
Motorman, For the Diana, I looked at getting some too for my Winchester 435 (Diana Model 35), but I haven’t (ahem) pulled the trigger. I found them sold individually at J.G. Airguns.
https://www.jgairguns.biz/35-c-78_247_251/
You may want to look at the exploded diagrams to make sure they are the same part numbers.
Weihrauch front sight insert sets I have seen in more places including on P.A.
/product/front-sight-inserts-fits-weihrauch-beeman-hw-air-rifles-575-od?a=3542
RG:
Thanks for the suggestions!
The Diana insert that they show is the pointed post version. I’m looking for a couple width options of square post inserts. It’s .67″ diameter (about 16.75 mm). I know they exist because I have another Diana 5 that came with a square post insert. Sigh.
Motorman
Eastern MO
Motorman,
Since PA doesn’t carry what you need I think I can do this Link: https://www.champchoice.com/mc-optics-sights/sights-accessories/
shootski
That was great Hank! Feeling responsible for requesting this blog, I want to personally thank you for the very detailed and clear explanation. Kudus for very good looking final product are included too.
I think that I will start with plywood to get a feeling on the carving process. I have done several knives grips so rasps and the other tools are familiar to me. Although, I have to finish some home projects first.
Any last words about pouches and bands? I am also looking forward to BBs next instalment on this series.
Cheers!
Henry
Henry,
Glad that you liked the report!
Plywood is good, just watch for voids – fill them with epoxy. Baltic Birch in 3/4″ is the best.
Googling “slingshot pattern” will connect you to all kinds of frame patterns that you can download and customize to fit your hand.
Bands and pouches would be a whole report in itself. Best to buy commercially made bandsets to start. I buy the band material in bulk and make my own.
Hank
Thanks Hank, I will follow your advice related to bands – at first at least. On your comment on plywood, I do some woodwork as a hobby and I definitely would try Baltic birch or marine type if I find a small piece. The home improvement variety is not for this type of work.
Best!
Henry
Henry,
At a local lumber mill, Baltic Birch is available in 5×5 foot sheets as a full sheet cut to various sizes – which is convenient for me as the 15×30 inch size fits the bed of the CNC perfectly.
Dad used to buy small (12×18 and 12×24 inch) single pieces from the hobby supply stores for his scrollsaw work. Price per square foot was be higher but you didn’t have to buy a whole sheets worth.
Hank
Has anyone else noticed that almost perfect snowflake in the fourth picture? It appears to be one Y (slingshot frame) short of being complete. 🙂
hihihi,
“…almost perfect snowflake…”
Well maybe if one isn’t really picky about your snowflakes!
Alta, Utah has the Greatest Snow on Earth.
Alright there are a few other places that do good from time to time….
shootski
B.B. and Readership,
Hank (Vana2) covered wood drying briefly to include using a microwave and an oven.
I would like to caution all you non woodworkers about the hidden dangers.
“…force-dry it in an oven or microwave. There are lots of YouTube videos on how to dry wood.” Like all YouTube information it may be wrong.
Don’t use anything but low power setting on the microwave and in the oven low heat.
Don’t use your spouse’s/family’s oven or microwave for obvious reasons as well as not so obvious: fumes can be deadly at worst and stink up your home at best. The wood core can be burned with the outside looking normal resulting in very weak wood.
The wood will be weaker than if air dried, check more easily, and may also lose significant color.
Just a few of the things to watch out for when drying wood.
shootski
What shootski said!
I didn’t go into details about force drying wood because the report was too long as was.
Yeah, don’t use the kitchen microwave, I got my shop one for 5 bucks at a garage sale.
Basic drying involves heating the wood to hot but not too hot to hold and letting it stabilize inside the humid microwave. When the wood is back to room temperature, wipe the condensation out of the microwave and repeated the heating/cooling cycle until the microwave is not showing much moisture inside. Monitoring the weight of the fork helps – it’s dry when the weight loss between cycles is low.
To avoid scorching the wood watch the temperature and use a lower power/shorter cycle as the wood dries.
Hank
OK, now that I’ve finally got my computer back online, let me re-post my corrected comment:
Hank,
This is turning out to be a great series.
Thank you for a very detailed report.
Blessings to you,
dave
P.S. I’m glad there were no cell phones (to take pics) back when I was a kid.
The “slingshots” I made back then were super-crude compared to your handiwork.
My “Hank Special” is proudly displayed on the shelf with my airgun pistols.