
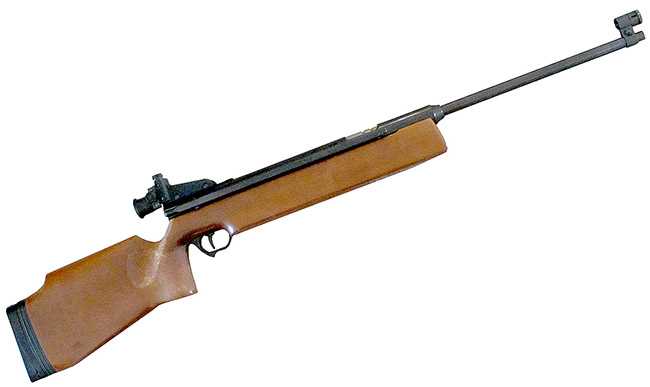
Haenel 312.
This report covers:
- Common sense
- Cleaning
- Mainspring
- Assembly and lubrication
- Install the end cap
- Install the trigger assembly
- Install the sidelever pivot block
- The million-dollar picture
- The trigger
- Summary
Drum roll, please. Today we are assembling the Haenel 312 target rifle and lubricating it for success! You are going to learn a LOT in this report!
Common sense
My aunt once said to me, “Common sense isn’t that common.” What wisdom! Here’s how that applies.
At this point most writers will tell you to assemble the gun in the reverse of the way it was taken apart. Well, you will do that, but the 312 offers some special challenges. Remember I said that I took a lot of photos as I disassembled the rifle? They paid off in spades today!
Cleaning
Step one was to clean all the parts. You may remember from Part 4 that I showed you they were caked on the outside with the varnish left by old oil. Let me remind you what that looked like with what I will call the million-dollar picture.

The brown stuff that makes the steel end cap look like brass is just old oil that has dried to a varnish. That was cleaned off with a rag soaked with rubbing alcohol. And this is the million-dollar picture. Why? Because I was so careful to take it out of the spring tube with this part exactly as it came out of the rifle at disassembly. See that ratchet pawl sticking out. It’s all loose and floppy, yet this is the way it has to go back into the rifle. You will read about that later.
I cleaned the outside of the sliding compression chamber and piston. Then I cleaned the insides of both parts. I also got inside the spring tube and cleaned out all the old grease. There wasn’t a lot and this cleaning went quickly. I also soaked the leather piston seal (now that we know for certain that it is leather) with household oil (3-in One) and let it soak in. If that seal is kept lubricated it could last for a century or more because this rifle doesn’t stress it that much.

The sliding compression chamber and piston both had old dried-up oil on them that was cleaned off. They were also both cleaned on the inside, as well as the inside of the spring tube that the compression chamber moves in. The chamber doesn’t move fast like the piston, so it needs a light lubrication for smoothness.
I removed the sidelever to clean the end that connects with the piston and slides in the notch of the sliding compression chamber.
Mainspring
I folded a paper towel once over and stuck it into the coil as close as I could get it to the end of the spring. Then I wound the spring around and screwed the the towel to the other end of the spring, scraping off all the old grease. The 312 spring didn’t have a lot of grease on it. I had to use cotton swabs to clean both ends of the spring.
Assembly and lubrication
With all the parts clean I started the assembly by coating the outside of the compression chamber with a very light coat of Tune in a Tube grease. Remember that small grease gun I showed you a week ago? Well, it works EXACTLY as advertised and made the job of applying grease far cleaner and more precise than ever before! I just picked it up and squeezed the handle whenever I needed a little grease. I can control the handle to get just what I need and no more.
You already know that I oiled the piston seal. I now inserted the seal end of the piston into the sliding compressing chamber by turning the piston as I pressed in. I call this “buttoning” the parts together. It keeps the leather seal from expanding back on itself as it goes into the chamber.
Once the two parts were together as far as they would go and their cocking slots were aligned I put the sliding chamber into the spring tube and aligned the sidelever linkage end with the large hole in the spring tube. That allows the end of the linkage to pass through the spring tube and the compression chamber to connect with the piston. Before putting the end of the cocking link into the piston I lubricated it with moly grease. Now I pushed the piston and compression chamber as far forward as they would go. Once these parts are together they shouldn’t need to come out of the spring tube again.
Now the the mainspring is ready to go in. Using the little grease gun I lubed the mainspring with TIAT lightly. Past use of TIAT has shown us that you don’t need that much. More will slow the gun down, and, while the 312 can stand to lose a little velocity, I want to keep as much as possible. To keep your workspace and hands clean, lube half the spring, then insert it into the spring tube to hold it while you lube the other half.

I lubed the mainspring lightly, inside and out.

Install the end cap
The mainspring will be under some preload, but not that much. It’s about two inches. Now I have a confession to make. When I disassembled the rifle I didn’t use the mainspring compressor like I told you to do. BB was a bad boy and pulled what he calls the base block up out of its slot, allowing the mainspring to quickly push the end cap backwards. He learned what not to do. Don’t do as I did; do as I said.
But now, when putting the end cap back in the spring tube, I did use a compressor. It was the only way to get the end cap in. And before I pushed it into the spring tube I lubed the outside of the short spring guide with moly grease. And I set the ratchet pawl to be under spring tension. This is an oh, oh moment, but BB didn’t learn that for a long time.
When the ridge on what I call the base block (I’ll show you below) lines up with the slot in the end cap, insert it and the end cap will be held in the spring tube. But I’m getting ahead of myself. The anti-beartrap slide has to go on under the base block first because there is a pin on one side of the base block that both guides the slide and also keeps it from popping off the rifle. And wait — there is more. Let me show you a photo and then discuss what I mean.

A lot is shown in this picture. First, you see that the anti-beartrap slide is under the base block pin (yellow arrow). So the slide goes on first, followed by the base block. Next you see the anti-beartrap spring that lives inside the trigger mechanism and presses down on the anti-beartrap slide (blue arrow). And finally you see the pin that connects the anti-beartrap slide to the trigger that prevents the rifle from firing when the cocking lever is all the way out to the side (red arrow).
What you see in this picture is a lot of things that have to happen in the right sequence for the rifle to go together. The caption to the photo above spells them out, but one of them is tricky. So let me give you a tip. I haven’t installed the trigger just yet, but when I do in the next step, that little wire spring has to be pulled out of the trigger box to go on top of the anti-beartrap slide. How is that done? I took a long twist tie and threaded it through the end of the spring. That allowed me to pull the spring out as I installed the trigger assembly. Once that spring rests on top of the anti-beartrap slide, you can pull the twist tie out and the spring will hold the slide in place. All that remains is aligning the open ends of the slide with the long slot in the trigger box so the pin can be pressed in. It was possible to press this pin in by hand, though I did have to tap it in farther with a pin punch.
Install the trigger assembly
Once the bolt is holding the base block down, take the barreled action out of the spring compressor. Now the trigger assembly can go back into the spring tube. The outside of the trigger box is notched in the rear to fit into the slot in the spring tube and the anti-beartrap slide has to be aligned with the slot through the trigger box so the pin can go through. All of that is shown in the picture above. However — that pesky spring that holds the beartrap slide down and pushes it back when the rifle is cocked is a slight problem. Once the trigger assembly is in place there is no clearance for that spring to come up out of the trigger box to clear the beartrap slide. This is where that twist tie comes in. As you insert the trigger mechanism you pull that spring forward and out of the trigger box and then insert the trigger assembly so the little spring can rest on the bear trap slide. It’s confusing to read about but not so bad when you have to do it.
Install the sidelever pivot block
The sidelever pivot block goes in next. That’s the block at the back of the spring tube. It has to fit around the rear of the trigger box and also goes in far enough that the hole for the pin that holds it is lined up with the holes at the top and bottom of the spring tube. If it goes in ALMOST far enough, but not quite, it’s in upside-down. It takes no effort to get it to align with the pin hole. Slide it almost all the way back out and rotate it 180 degrees and it should fit just fine.

The block that holds the sidelever pin can now go in. Remember, the long slot in that block goes to the rear.
Now the pin that the sidelever pivots on can be drifted into the pin hole and I found that it only wants to go in from the bottom. It fits really tight on my rifle, so I guess there isn’t much clearance.
The barreled action is together and you can test it. I did and — NOTHING! The sidelever pulled back a few inches and stopped. I knew immediately that the ratchet pawl was in wrong,. And since I hadn’t removed it from the base block it should be a simple fix. Twenty minutes later I was back at this point and again — NOTHING.
The ratchet pawl was in a different position, but since it never came out of the end cap, it couldn’t be that much different.
The million-dollar picture
I ruminated on this situation for a day and thought of this. Remember that million-dollar picture? What if that was the way the ratchet pawl was supposed to be oriented when the end cap went into the spring tube? It didn’t seem right and the pawl flopped around but I tried it and it worked. The rifle was together and working.
I have to admit that the ratchet isn’t working, but that’s okay because the anti-beartrap prevents the trigger from releasing the piston as long as the sidelever is back. Maybe someday I will fiddle with the action once more and get the ratchet working again, I don’t know. Or perhaps someone who has done this can guide me through the right steps to correct it.
The trigger
Once the gun was working I noted again how bad the trigger was. On the advice of a reader I adjusted the front trigger adjustment screw. A full turn out did nothing. A full turn in gave me a super-light single-stage trigger. A half turn in gave me a first and second stage. Stage two isn’t crisp, but it is positive and light. By positive I mean it doesn’t move until the rifle fires, once stage two is reached. That’s all I will do to the trigger for now.

I adjusted the long screw in front of the trigger blade 1/2 turn in and got a first and second stage.
Summary
That’s all for today. This was the culmination of several hours of work that stretched out over several days. Next I will test the velocity of the rifle and report on the smoothness.

BB,
For a lower version of the FWB 300s this rifle seems to have a surprising engineering inside. What is that pawl’s function?
Siraniko
Siraniko,
The pawl catches the notches in the piston rod, so if the lever is let go before the rifle is cocked it doesn’t slam forward. When it’s cocked the ratchet is out of the way and the anti-beartrap holds the lever back until purposely closed after loading.
BB
It engages with the teeth on the piston rod so that once the gun has been partly cocked, the sidelever/compression cylinder cannot slam forward if your grip slips, I would imagine.
BB – if that is the tip of the pawl in your million dollar picture, should it perhaps be facing inside the spring guide?
Iain
I found this cross-section, also showing looking down through the action – does this help?
(One part is highlighted because it comes via Versandhaus Schneider, their spare parts listings.)
Iain
lain,
I’ll have to print and enlarge that image to see if it helps.
BB
lain,
Nope. That’s what I thought — twice. The rifle wouldn’t cock with the pawl that way.
BB
Curious.
If anyone else wants to play ‘guess how the parts go back in’, this is what they look like individually. I’m guessing the spring and pawl share the same pivot?
Iain
Just to clarify with respect to the cross-section – the pawl is part number 44, its spring 47.
Iain
BB,
When you are saying “Stage two isn’t crisp, but it is positive and light. By positive I mean it doesn’t move until the rifle fires, once stage two is reached.”, do you mean that the trigger has overtravel once it releases? I define crisp as there is not trigger movement within stage two. It breaks cleanly after stage one is taken up and an additional force is applied. It is nice to have an overtravel adjustment, but most triggers lack such.
I have a few single stage triggers that I define as crisp. Some of them are not light, but when the proper amount of force is applied, it fires. I do not have any two stage triggers that I do not consider crisp. They are not allowed to live here at RRHFWA.
RR,
Yes, the trigger has overtravel when it releases.
BB
B.B., my humble advice is to try to get the rifle back together properly while this is still all fresh in your mind. In my experience, if you try to revisit this later, it will be more difficult.
BB-
Errata-
Section- ‘Install the end cap’, last paragraph, last sentence-
‘…… I did have to tap in (it) in farther…’
Regarding the million dollar picture- what with the runaway inflation and all, a ‘million’ just doesn’t convey the priceless nature of a picture’s value as it once did. But still, what a wonderful tool digital photography is today. And most everyone has that tool in their pocket. I rate it (my phone) right up there with my knife and multi-tool as essential. Almost makes up for having people calling and pestering me.
Paco,
Fixed it. Thanks,
BB
Paco
“ALMOST”!!!!!!!
ED
B.B.
One time that “good enough” is not good enough. Hopefully somebody who understands the East German mindset will help you out.
You have to get the ratchet working properly or it is not fixed. Bummer.
-Y