
Today we have a guest blog from Canadian reader Hank who we all know as Vana2. He talked about a more permanent rubber mulch pellet trap that will last longer than my cardboard box trap and I asked him to write this guest blog about it.
If you’d like to write a guest post for this blog, please email me at blogger@pyramydair.com.
Take it away, Hank.
A new pellet trap
by Hank (Vana2)
This report covers:
- A new pellet trap
- The design and construction
- Summary
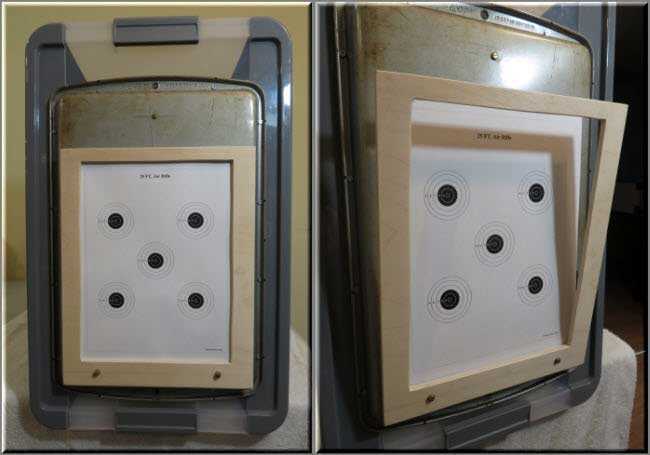
Rubber mulch pellet trap. The wooden bezel mounts on two pins and has magnets to secure the target.
A new pellet trap
Winter in Canada is the indoor 10 meter shooting season for me and I needed to replace my old duct seal trap. Duct seal works well, but it’s next to impossible to reclaim the lead so I started looking for an alternative.
After reading BB’s praise for a rubber mulch trap and some discussion with Benji-Don and Roamin Greco, I decided that I would make one that would meet my needs.
I wanted something more durable than a cardboard box and because I print all my targets on regular copy paper I need a good way to support and hold the target.
I thought that I would design in some convenience (’cause I’m lazy LOL!) while I was at it. The picture (above, right) shows how the magnetic bezel tilts forward on its mounting pins to allow a fresh target to be dropped in place – no tape, clips or pins required.
My rubber mulch pellet trap consists of a plastic tote (12×18 inches, 11 inches deep – with a locking lid), an old cookie sheet, some scrapes of wood, miscellaneous hardware (screws, spacers cut from a piece of pipe, fender washers, nuts and magnets) and about 30 pounds of rubber mulch. As it was, the only out of pocket expanse was $20 for the rubber mulch.
The design and construction

Pellet Trap Design – the layout and the finished lid.
For my trap the three main design considerations were:
1-to reinforce the lid,
2-provide a metal surface so I could use magnets to hold the target in place and
3-have some way to align and hold all the loose bits (target and backing board) together.
I also wanted the cardboard backing sheet to support the target. A metal cookie sheet meets all the requirements.
The picture (above, left) shows the layout of the lid. I located the cookie sheet (and the target) low on the lid to have as much mulch above the area where the pellets hit as possible. I’m hoping that the weight of the mulch will help fill in any cavities created by the pellets. The green circles show the location of the magnets mounted in the bezel that secures the target.
In doing the layout, I positioned the cookie sheet as low as practical on the lid (you need to allow for the wood framing inside and the tote itself), located the two pins (those two black & red targets on the layout) that will be used to support the target and backing boards, traced where the 8 ½ x 11 inch printer paper target will sit and marked the (one inch smaller, the 7 ½ x 10 inch cross hatched area) for the cut out in the cookie sheet.
The picture (above, right) shows the black outline of the printer paper target and the cutout in the cookie sheet that leaves ½ inch all around for the magnetic bezel to hold the target in place.
The picture (below) shows the back of the lid cutout, framing, the clip and the pins that hold the backing board(s) in place.
The whole area behind the cookie sheet has been cut out of the plastic lid to accommodate the backing board. The cookie sheet is screwed to the wood frame (sandwiching the tote lid between them) to reinforce the lid.
The clip is a piece of metal (could be wood or plastic) mounted on a screw with a spacer and a spring. It’s there to hold the backing board in place while the lid is being put on the tote – it saves some fumbling around as gravity doesn’t want to cooperate. A piece of tape or a strong magnet would work as well.
The pins do a couple of things. On the outside of the lid, they are the mounting points for the front bezel and they position the target (relative to the cutout in the cookie sheet). On the inside of the lid, they position and retain the backing board – again, to save fumbling around.
The pin is assembled as follows: Starting from the outside of the cookie sheet there is a screw with a spacer (to mount the bezel) that passes through the cookie sheet, then another spacer, a fender washer and a nut. I used a #6 screw, two ¼ inch long .250 diameter (cut from pipe) spacers, a ¾ inch fender washer and a 6-32 nut.

Support frame and backing board hardware.
1
A fresh backing board in place ready to be mounted on the tote.
Summary
So that’s the pellet trap that I have come up with. A cardboard box filled with rubber mulch will work fine but I think the couple of hours I put into modifying a tote will be more convenient in the long run.
I’m all set – lots of pellets, targets and a box of backing boards that I cut on the table saw – let it snow!
Take care and shoot safe!
Hank

Hank,
That’s an awesome target! Just right for your winter season. Unfortunately rubber mulch is something I have not been able to source locally.
Thanks for sharing this design.
Siraniko
Siraniko,
The rubber mulch is made from tires cut up into 3/4 to 1 inch chunks.
It was cheap to buy so I didn’t think about it, guess that a good jigsaw or better a sawzall (reciprocating saw) could be used to tear up a couple of tires. Soapy water to lubricate to blade might help. And avoid the steel reinforcing in the sidewalls.
Would be doable, would take some effort but the mulch looks like it will last a long time.
Hank
Hank,
It looks like I’ll be making my own mulch. As Roamin Greco suggested below I’ll be following the trail of used tires. The car owners here though have this tendency to use them until they are bald though. Have to invest in power tools too to make it something worth my time instead of attacking each and every tire with a hacksaw. I can always tell my wife that it will be the last mess I will make.
Siraniko
Siraniko,
It’s always nice to have an excuse to buy a new tool 🙂
…You can blame me for suggesting it if you like (I’m far enough away to be safe LOL!)
Cheers!
Hank
Siraniko,
Where do used tires go where you live? They may just get dumped somewhere, but they also may get shredded and sent somewhere to be used as fuel or as a raw material for other products. Look for tire or rubber recycling in your area. Or ask at a local tire dealer or an auto mechanic and follow the trail. You may be able to find a source that way. I get mine at a home improvement center (hardware store / garden supplies). It is hidden between the pine bark mulch and the bags of different sizes of gravel and stones.
Also, I am thinking that any sort of heavy rubber product, like rubber-backed commercial carpets that are placed at the entrances of stores (sometimes these are provided by a service that cleans and replaces them; where do the worn out ones go?), or the rubber mats that you put on the floor of a car, or truck mud flaps (again, when they wear out, where do they go?), could be chopped up and put in a box. Just some ideas, you might come up with others.
Roamin Greco,
I’m taking a hard look at what is available here and considering making my own mulch. Motorcycle tires are available for the asking although they are thinner than automobile tires though.
Siraniko
Take a look at a handful of mulch that I pulled out of my trap. I put the cm side of a ruler for reference. I don’t think the size of the tire matters, it’s the rubber material and how a pile of it all interlocking in the box absorbs the impact of the pellets without bouncing them back at you.
A dirt bike tire has big knobs on it if you want big pieces.
Remind me where you are in the world…Phillipines?
Roamin Greco,
Yup that’s my country! Not many use dirt bike tires on the road. I’m living in a very urban area. Thinner tires just mean a lot more tires have to be processed to make up the necessary volume. Somehow, somewhen or other I’m definitely going to do this. As I told Hank I’m going to promise my wife that I’ll minimize the mess I make in the long run by making this trap.
Siraniko
There must be companies that recycle or shred old tire (tyres?) In the Phillipines. I found some interesting hits just by searching for “where can I buy shredded tire or rubber in phillipines.” Keep trying. You will find it. They must do something with all the used up tires there.
Photo
Vana2,
How do you cut out the hole in the cookie sheet?
When you change targets, do you have to lay the trap on it’s back, so mulch does not fall out?
-Y
Yogi,
I used a variable speed jigsaw with a fine-toothed blade running at a slow speed to cut the openings in the bezel, cookie sheet.
To support the thin sheet metal, I (temporarily) attached the wood bezel to the cookie sheet with a couple of small screws and cut the opening in both at the same time. The screw-holes in the bezel were inlarged to fit over the “pin” afterwards.
To change the target you tilt the bezel forward, pull out the old, drop in the new target and close the bezel. No need the put the trap on its back.
The cardboard backing boards that stop the mulch from falling out will have to be replaced after a while and the trap will need to be put on its back for that.
Hank
Hank,
I am thinking of using my Dremel for cutting the cookie sheet. Your thoughts? (I’ve cut metal before with a Dremel, but nothing this large.)
Congratulations on an excellent guest blog.
Michael
Michael,
I considered using the dremel, the abrasive cutting wheel would work but would take some time. I have carbide bits that cut metal like butter but they are difficult to control, it would have taken too much time to setup “fences” to guide the cut.
The jigsaw let me cut the cookie sheet and the bezel at the same time. It was a bit noisy but went fairly well and a minute with a fine file cleaned up the edge.
Hank
Vana2, that’s impressive! The backer boards that get clipped into the frame on the back of the lid are wood–thin plywood? I think you might end up using stiff cardboard sheets cut to size after a while. I use two layers to hold back the rubber mulch better. One is sized to cover the entire length and width of the tote and then a smaller one is sized to be a bit bigger than the cutout in the lid. The smaller one gets changed more often and I simply tape the targets to the face of the smaller piece.
Hopefully you don’t use those copper-plated pellets or BBs, I would be worried that an errant shot might ricochet off the cookie sheet. I had one of those copper plated baracudas ricochet off of my 3/4″ backstop and land in my lap. Thankfully, it hit my thick leather belt and caused no damage, but I never used them again!
And I know you folks up north spell some words differently, but did you mean to write “scrapes” of wood or “scraps”?
Have a great day. And let us know once in a while how the trap is holding up.
Roamin,
The backing boards (I use two) are cardboard from boxes I cut up on the tablesaw.
Good point, I think bb’s (because of the low velocity) would ricochet off the wood bezel as well so I wouldn’t recommend using this target box for them.
Good catch! Yes, that was a typo, “scrapes” should read “scraps”, BB please correct that if you get a moment.
Now I get it, when you said you cut the backing boards on your table saw, I assumed you were using wood of some kind. You probably use the table saw just to make the cardboard a more uniform size and to cut many pieces at one time. I just use a box cutter razor knife and eyeball it because I basically rely on the tension between the lid and the mulch to hold everything in place.
I try not to let any cardboard leave the house without at least one hole in it. ;o)
Yup, 15 minutes with the table saw and I have a winter’s worth of cardboard rectangles that are all the perfect size 🙂
Hank,
Totally unsurprisingly, this is an excellent and well-thought-out design. Perhaps you could follow up with a status report at the end of the winter to let us know how well she works out, as well as any other thoughts you have on the design, after some long-term use. 🙂
Cheers,
dave
I second that motion.
*thumbs up* 🙂
Thanks Dave,
Testing the new pellet trap will start soon. At the moment, there’s not enough snow in the bush to keep me and my chainsaw out so we are having fun while we still can. I just cut down a poplar and a white pine that I’m going to resaw into lumber.
I’m curious about how long the cardboard backing boards will last. I figure that there could be three scenarios… there could be a single .177 diameter hole in the exact middle of the bullseyes that all the pellets pass through ( NOT likely 😉 ) ; the pellet holes could be evenly distributed over the whole target face (quite likely) or there could be a large ragged hole in the general vicinity of the bullseye (which is what I’m hoping for LOL!). We’ll see.
Will let you know how well the trap (and my shooting) goes!
Hank
“…there’s not enough snow in the bush to keep me and my chainsaw out so we are having fun while we still can.”
Hank,
That’s cool; the one thing I miss down here is the lack of snow; we’re lucky if we see a half an inch every 3 or 4 years…which I’m sure is nothing compared to what you see up there! 🙂
Happy shooting,
dave
Vana2,
Enjoyed your Mulch Trap design and fabrication/build blog write-up!
I request you consider two accessories/modifications Hank.
The first is an LED lamp to evenly illuminate the target face.
The second is a mulch mixing paddle that can be turned from the outside to mix/settle the mulch to eliminate potential voids.
Once you design and test those accessories you wil be ready for volume production.
Thank you for yet another well done Guest Blog!
shootski
Shootski…Good luck turning the handle. Might be a good Festivus Feat of Strength.
Every so often, you will lay the tote on its back to take off the lid and change the backer boards. You can then run your fingers around and smooth out and fill in any voids. If you are worried about the metal bits of the steel belting in the mulch poking your fingers, I guess you could wear leather gloves or use one of those little hand held garden tools that look like a 3 pronged rake. The motion of laying the tote on its back and them back up again should be enough to resettle the mulch, too. Also moving the targets an inch or two left or right will cause the pellets to move mulch around in there.
The led light is a fantastic idea. What set up do you and others have currently? That’s one aspect of my basement range that could really use some improvement and refinement.
Roamin Greco,
I use a dual work light that is off the stand on the floor, angled upwards, a few feet in front of the target. When I’m outside i use the stand. I use the light even in the daytime if the target has back or sidelight issues.
As far as moving the mulch I guess up and down motion would be easier and get it done.
I’m not sure if I will go with a mulch trap because most of my steel traps have sound deadening and can contain even my .58 calibers.
shootski
Shootski,
My first experiment with the rubber mulch was simply a copy paper box into which I placed an entire bag of mulch, plastic bag and all, and I shot at it from the small end to maximize the depth of the mulch. I found that after the first couple of holes, if I was getting a good group, there was no sound echoing back. You could tell if you had a flyer without looking because you would hear the pellet striking the cardboard under the target. If you hit the prior hole, you would hear the sounds of silence.
What do you use to deaden the sound in the metal traps you use? How quiet is it compared to the sound of the gun?
Shootski,
Glad you liked the trap and guest blog!
As far as the requested modifications…
I’m using a led floor lamp for lighting (one of those multi- temperature, multi-intensity models) and that is working well. I’m adding led-strip lighting to my paint spray booth so there may be some left over for the pellet trap. I’ll post pictures if that happens.
I was thinking about a “mixing paddle” (a piece of pipe with a couple of bolts sticking out) for agitating the mulch. I’m hoping that there’s enough mulch above the target area that the weight and other pellet impacts would minimize the voids. That being said, the mulch is irregular in shape so it will probably resist settling. I’ll watch for voids and add a paddle if needed.
Sorry – No plans for volume production 🙂
Thinking about the design, with a couple of jigs you could fabricate 3 or 4 of these pellet traps in an hour. Sell the modified lid and box and let the purchaser get the mulch locally.
Hank
Hank,
Yup, use my work light: https://www.walmart.com/ip/HOMCOM-8-000-Lumen-LED-Work-Lights-Dual-Head-Weather-Resistant-with-Tripod-Stand/242889981?wmlspartner=wlpa&selectedSellerId=242&&adid=22222222227324971019&wl0=&wl1=g&wl2=t&wl3=406643283035&wl4=pla-848310869976&wl5=9061285&wl6=&wl7=&wl8=&wl9=pla&wl10=111839932&wl11=online&wl12=242889981&veh=sem&gclid=CjwKCAiA78aNBhAlEiwA7B76p4sFq9x3Me-DcM1FpQKZyQIH8CRCpSTe2XIKaOVqF2YkgcO6eyzfHRoCgPMQAvD_BwE&gclsrc=aw.ds
Much like the linked one one. I like the two lamps for the more even lighting and the Lumens to kill the backlight problem.
The power to light output is so much better than the Halogens i used in the past.
shootski
Nicely engineered ammo trap; FM’s “invention” involves layers of cardboard from soft drink cases available via his friend’s vending business. This contraption does well enough to catch pellets at the usual 25 yard shooting distance FM favors. To recover the spent pellets, the layers are separated and cleaned out. Eventually, of course, new sheets are required; recently found an old cookie sheet which fits perfectly around the boards so will place it in back of the target trap and that should stop anything from getting through – at least from the airguns in the home arsenal. As you can imagine, would not think of using this contraption to stop rimfire rounds or pellets/slugs from very powerful PCPs.
Do have a notion of bringing home a large potato chip box, filling it with the rubber mulch and then taping it up securely so the material stays in place. That should work well enough for our backyard. Your version of the target-and-trap is waaaaaay more elegant, Hank.
FM,
Nice trap! Follows the “KISS” principle 🙂
For years I used 3 or 4 old phone books held together with duct tape.
My favorite “natural” backstop is a 12 inch slice of white pine log. This morning I cut down a 75 foot one that will provide me with lots of backstops, lumber and kindling for the next couple of years.
Hank
Appreciate the compliment – yes, the KISS principle is one to live by as much as possible. FM should take his own and other’s advice in that department more often. Goes right there with approaching problems armed with Occam’s Razor.
Remember, the genesis of the idea of the rubber mulch pellet trap was to make an inexpensive trap. Elegance is a secondary consideration.
I love the background of your shooting range. Is that bamboo?
They’re areca palms; like bamboo, but it grows like…a weed.
Last night gave some thought to the “potato chip box-trap” idea, and that is to put the rubber mulch into a lawn bag then stuff the whole thing into the box and seal it. If FM implements this backyard solution will let you all know how it works out.
FM
Can you email me. Gunfun1’s phone went to the happy hunting grounds the other day. In other words it’s dead. Gunfun1’s fault. He dropped it in a machine at work the other day. Had to get a new phone. Haven’t been able to retrieve everything. Gunfun1 has been lost but trying to recover.
And also got a surprise today. Thanks much. We love them. 🙂
Done did it, GF1; appreciate the appreciation. 😉
FM
Emailing you now.
Thank you. 🙂
Vana2,
Thanks for sharing your excellent design, well thought out and utterly practical. I made a similar unit a few years back but using wood. In retrospect I probably spent too much time making it, which is why I like your approach.
I know that my trap can stop a high energy pellet – or slug – but my fear is that after a long string, like when adjusting a PCP or testing pellets, too many of them will be hitting in the same area creating a tunnel. To prevent that I like to shake the box when changing targets rearranging the mulch. I admit that it probably is overkill, but it requires little effort and it has worked well until now. My trap has a ¾” plywood bottom and so far no pellet has reached it.
Best,
Henry
A quick shake is not overkill, it’s preventative maintenance. I am going to cut a piece of plywood or steel for the bottom of my trap. That and another 3/4″ plywood backstop should handle anything that I can dish out. Also moving your targets around on the face of your trap helps too.
Yes Roaming Greco, a shake helps but how much depends what you are shooting with. When replacing the backing carboard after a long session the tunnel is visible, but as I use low power ‘garage’ airguns most of the time it is not deep. A little shake and is as good as new.
Henry
Henry,
I hear you about adjusting a PCP and making “tunnels” – I was tuning my Impact for a .22 caliber, 25 grain pellet and blew through 4 inches ductseal, umpteen spent pellets, two layers of plywood and a cupboard door in 5 shots. Don’t remember the velocity but was around 50 fpe. I usually shift the pellet trap after each shot but got distracted with the tuning – my bad!
Curious, how deep the mulch is in your trap? A plywood backing board sounds like good insurance – bonus that it serves as an indicator as well, no pellet marks shows that the mulch is up to the job.
A regular agitation is a good idea as well!
Hank
Vana2
My tote is also about 12 inches deep.
Recall I posted pictures in the comments of B.B.’s reports on his cardboard box pellet trap, and also “Think inside the box.”
/blog/2021/12/an-update-on-the-rubber-mulch-pellet-and-bb-trap/
/blog/2021/09/think-inside-the-box/#comments
I don’t have any big bores (yet), the most powerful gun I have is a .22 R9, but it blew through 4 or 5 inches of mulch in my test box. So it would be a good idea to proceed with caution until you know how much it can handle. So far, it has not penetrated 12″. I mostly use 5 bull targets, and I shift them around slightly, so only up to 10 pellets in any given spot. On the other hand, in my older comments, I noted that a small box of mulch absorbed 750 shots from a light powered .177 springer, the Umarex Embark…and I was intentionally trying to shoot a tunnel through it. Now I am experimenting with two 6″ deep boxes from fed ex back to back to see how far that .22 will penetrate. Maybe tonight I’ll have more info. I have to build a bunch of traps because I bought airguns for the whole family for Christmas this year. I’m going to have a shooting gallery in my basement soon!
Roamin,
Most of the time I’ll be shooting 10 meter rifles and pistols so we’re talking 6 fpe and less.
Maybe shoot the break barrels some but then again it’s low power stuff… sub 10 or 12 fpe.
Might be an idea to test the trap with the Impact (50ish fpe) to see how the trap handles higher power. Will have to do that outside, moderators and silencers are illegal so it’s kinda loud for indoor shooting.
Getting airguns for the family is a great idea! Our family BBQs feature (in addition to food) airguns, archery, slingshots and all manners of thrown weapons… perfectly normal stuff eh?
Hank
When I built my trap I intentionally made it sturdy and small to to keep the weight reasonable and be able to move it around. It is about 6″ deep inside plus the external wall. It helps that my most powerful air rifles deliver only around 25 fpe and as most of my practice is in the garage I don’t use them very often. Most of the time I shoot one of my 3 to 4 fpe pistols. All said, I never had any problems, according to my ply ‘indicator’. Still, a quick shake once in a while gets things back to new.
Henry
That is another professional looking pellet trap!
B.B. and Readership,
The second batch of Quackenbush Camp & Garden .410 Shot Pistols went up for sale and promptly SOLD OUT in short order.
I’m still waiting for delivery of my .410 reloading supplies. The folks at Ballistic Products have charged my credit card for all the stuff I need to reload but so far no shipping confirmation.
I spoke with Dennis today about getting another 25 of the Brass hulls so I can have more than the Six loaded for range testing.
I’m beginning to think that i need to fabricate a mulch trap with the biggest lid I can find to do the patterning work in my yard.
I will need to do some sound checks to make certain it isn’t totally objectionable to my thus far very tolerent neighbors. I haven’t exposed them to any of the Big Bore noise but the short range on this .410 shot pistol will keep the risk of pellets leaving the property, even in the worst case scenario, as a concern,
The few 6mm AirSoft loads and the Sugar Pearls went supersonic very briefly out of the muzzle. The steel bb pattern nicely but destroyed the handful of shot cup/wads that Dennis provided with the Brass hulls.
Maybe I need to get one of those under bed plastic storage bins to get a big enough surface for patterning…
shootski
How about a flat screen TV box with a few reinforcing braces to keep it from bulging out?
Roamin Greco,
The DAQ .410 isn’t a Blunderbuss! LOL!
I’m not looking for patterns larger than about 16″ (40.6cm) since i’m starting with #4 shot that has a 1/2 oz load of 60ish pellets going into 50 or so square inches. I doubt I will see one pellet in each square inch, that would be great, especially with the 10 extra pellets toward the center of the pattern.
One of the large monitor size shipping boxes might work, or a dishwasher box.
shootski
How about a few FedEx shipping boxes stacked up to the size and thickness you need, filled with mulch and backed up by plywood? The only drawback to the mulch is the weight. A dishwasher box would require a ton of mulch…almost literally. Even my plastic tote is no picnic to tote around, hence my experiments with layers of smaller boxes.
I will look up the DAQ so I can better appreciate your situation.
Roamin Greco,
This is all new territory to me.
I have no idea how much power each of the pellets will carry out the muzzle. I have run some numbers but the shot column makes it different than one single .13 inch pellet exiting the muzzle at XXX FPS.
Especially since there is a wad and I plan to experiment with Mylar wraps, mica wad/shot slick, as well as binary loads (two different shot sizes loaded in two layers) to get better shot trains.
I never thought much about small bore scatterguns since almost all my experience is with Mossberg M590A1.
I’m learning and will no doubt learn even more once I start working up loads and shooting!
shootski
Can’t reply to your last message below, but my understanding is that shot hits like a single slug at close range and then as the shot speads, the energy is divided by the number of pellets. If it were me, I would try a few experiments at a gun range to ensure your mulch box won’t have a failure in your backyard. Take things slow. The dishwasher sized box may not be a bad idea. And have a good backstop.
Shootski,
Sounds like you are into some interesting stuff. Any chance of you sharing your findings with a guest blog?
Hank
Vana2,
I have many irons in the fire; too many most of the time.
IF, the results I document are of real value to the small group of airguners interested in shooting shot I will certainly provide the data in some form perhaps in a guest blog.
My long range wish is to show that an air powered small bore sporting shotgun is a reality not just a novelty.
I suspect it will take a two stage regulated 4,500psi
or higher air source to get more than two shots at 950- 1,000fps.
We shall see since FedEx has been informed that a package of .410 loading supplies are ready for pickup.
Of course they also have a shipment of 21 round SIG P320 X Five magazines as well as some more smaller count magazines for my wife’s SIG P238 to save reloading time at the range. On top of that a few new boxes of .44Mag have the S&W M29 yelling Me too! And worst (BEST) of all: I will be working the https://utaholympiclegacy.org/event/2022-ibu-youth-junior-world-championships-biathlon/
With my son. That will be some cold irons however!
shootski
Hank,
I just remembered your guest blog today. Busy day. Most excellent!!!!,…. as usual. 🙂 Over and above,… like most things you do. 😉 Nice job on the pics and text. Some good/new ideas for someone looking to build themselves one.
Chris
Thanks Chris!
Glad you liked the blog! Good to see you posting again!
Take care!
Hank
Hank,
As usual a great job on your pellet trap. Been on the road all day so just getting to your report.
My trap is only about 4 inches deep but I tape my targets on so the bulls are in a different location every time and I have a heavy sheet metal layer behind my rubber mulch just in case. Your trap is 11 inches deep so I don’t think you will have any problems with tunneling. If your pellets all hit dead center of each bull your cardboard backer should last forever. LOL
I have not tried the real heavy pellets or slugs in my trap; I should give them a test.
Maybe you can do some testing with a cardboard divider to see how deep the tunneling goes.
Don
Thanks Don!
Good idea to test for tunneling as other people may be planning to use the trap with higher power airguns.
Yes, I intend to keep all my shots confined to a single hole in the middle of the bullseye to save the backing boards …but what I intend and what is more likely to happen are two different things LOL!
Cheers!
Hank