

Marksman model 70 breakbarrel rifle.
Part 1
Part 2
Part 3
Part 4
Part 5
This report covers:
- Erase, erase
- Shortify da spring
- Attach the barrel
- The piston seal
- Lubed the spring
- Off the track
- Holes out of alignment
- However
- End cap and trigger assembly installed
- The stock
- Oh, no!
- BB fixes it
- Discussion
- Summary
Oh, boy, have I got one for you today! Thank the Lord that BB is as flawed as he is, because he can tell you something the first time and then come back and tell it all over again — the right way! Brew up another pot of coffee, because this one is gonna be good!
Erase, erase
As you know from Part 5, the Marksman 70 was completely apart. Last Saturday I cut the mainspring like we discussed and assembled the rifle. And in doing so I learned a lot about how this strange breakbarrel goes together. And it goes together unlike any other air rifle I have assembled. If you ever have to take one of these apart, this report is worth what your entire year’s subscription to this blog cost you!
I will pull a quote from Part 5 and criticize it for you today. But I started with a rifle in pieces, so that’s where this report will start.
Shortify da spring
The first job was to remove the bent end of the mainspring. Remember that?

The Marksman mainspring was bent on the end that goes over the spring guide.
You guys talked A LOT about how I should do this, and I didn’t comment. But here is my view. I want to keep as much of the spring as possible, and I plan to heat and crush the last coil and grind it flat, so the last bit of bend can be preserved. Therefore I cut a little below where the bend begins.
I used a cordless Dremel tool with a cutoff wheel to cut the spring. We know it is hardened, plus it is made of good steel, but the cutoff wheel zips right through it. It took less than a minute to cut.
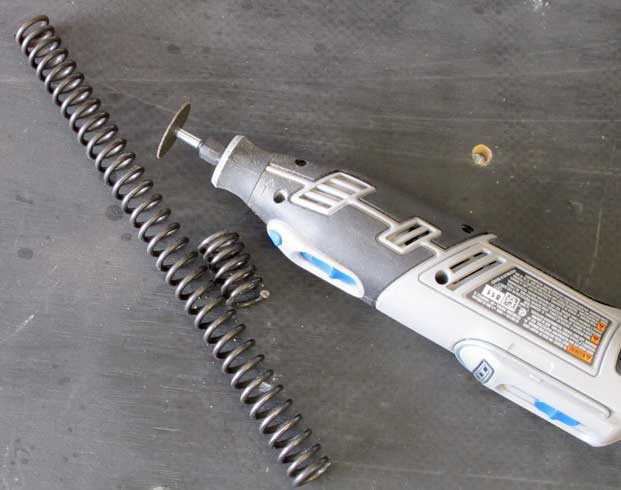
The cordless Dremel made short work of the mainspring. Gotta love that tool!
My neighbor, Denny, was over to see how a spring gun goes together (and he had to see this one — oh, the shame!), and he stayed and helped me.
My bench grinder isn’t mounted to my workbench yet, so we went over to Denny’s and he ground the end on his Shopsmith sander.

The end is ground, but the last coil needs to be collapsed.
Back to my shop we traipsed and put the spring in a vise. Just the last two coils were sticking out of the jaws and I heated one spot on the last coil to red hot then Denny whacked the end with a hammer. It’s now reasonably flat.
Denny told me to quench the last coil, so I dunked it in my coffee. It worked, plus it heated the coffee a bit!
Now I did that job exactly backward. I should have collapsed the coil first and then ground the end. Live and learn.

This spring is not ground as flat as I would like. But for the testing I have planned, it will do.
Attach the barrel
Now I attached the barrel to the spring tube so the piston could be installed. The cocking link on the barrel has to attach to the piston before the spring puts any pressure on the piston, or it will never go together.
Remember to lube the thrust washers on each side of the base block (the block that holds the barrel) and the pivot bolt with moly grease. And grease all sides of the cocking link shoe that connects the cocking link to the piston, before you connect the link to the piston.
The piston seal
Did some of you think the piston seal in this rifle was leather? It’s not. It’s synthetic, and it is still flexible enough to work.
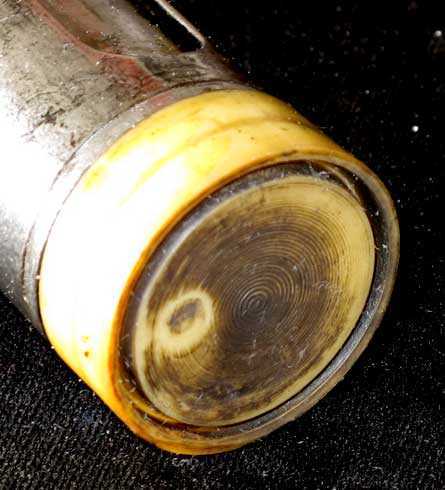
The Marksman 70 piston seal is synthetic and flexible enough to work okay.
The piston now slides easily into the spring tube. I lubed the seal with Vortek grease lightly. Before sliding the piston in I felt every surface of the cocking slot and all the other cuts in the spring tube and there were no burrs. This one is slick!

Lubed the spring
Okay everyone — how much Tune in a Tube grease did I put on the mainspring? Not very much! I took a couple pictures, so you could see.

That is how much TIAT grease I put on the entire mainspring. Just a whisper!
And, to show you what a whisper of TIAT looks like as it is applied, here it is going on the outside of the spring.
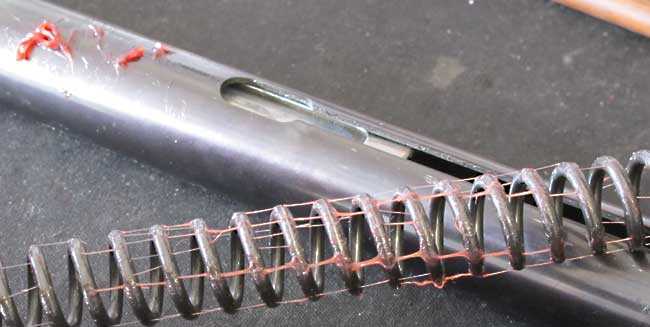
About half the grease is on the front half of the mainspring. Look at the threads that grease makes!
Okay — the piston is in and the mainspring is lubed and in. Now the rest of the powerplant gets assembled.
Off the track
And here is where the train left the tracks. Old BB is not as smart as some of you give him credit for. He’ll take the credit, but know that he sometimes makes mistakes. A LOT of mistakes.
I won’t bore you with the whole story. Rather, I will summarize. BB tried to push the bushing (remember that part?) that backs up the mainspring into the spring tube with the end cap. He did so because that’s the way other airguns go together. But NOT THIS ONE!
In fairness to BB, Denny who was standing right there watching, was a patternmaker for White Farm Equipment and Vought Aircraft, and he knows how things have to go together. He was standing right there with BB, looking and seeing that, when the bolt hole for the mainspring bushing lined up with the hole in the spring tube, the screw hole for the scope ramp on the other side of the spring tube was a third of its diameter off-center.
He listened as BB told him that, at Weihrauch, a 21-year-old girl named Heidi had put this rifle together at the factory in less time than it took BB to tell him about it. We laughed, we joked, we sat down. How can the end cap screw hole in the top of the spring tube be a third off-center when the large bolt hole in the bottom of the bushing is aligned?
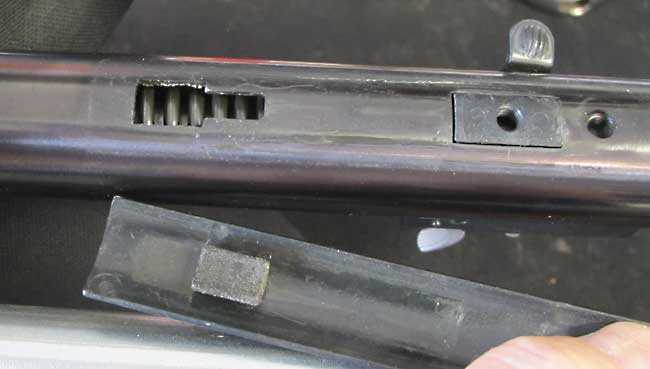
Holes out of alignment
Let me remind you that I had seen the problem when I took the rifle apart, but I didn’t know what I was seeing. Here is what I said in Part 5.
“Well, when the (bushing) bolt came out of the hole, the inner hole popped off-center a few millimeters and stopped (not enough tension on the end cap), so something else was holding the end cap in.”
Denny and I stood up again and tried reversing the bushing. Was the bolt hole drilled off-center? It sure didn’t look like it, but BB was out of ideas. How can that end cap hole not line up when the hole in the bushing is aligned?
We sat back down. Then, after just a minute Denny smiled and I knew he had figured it out. So it was something that was possible to figure out! Then BB figured it out a minute later. The bushing and the end cap are separate parts!
THE END CAP DOES NOT PUSH THE BUSHING INTO THE SPRING TUBE!!!!!!!!!
The bushing goes into the spring tube on its own and gets attached to the spring tube with the large bolt, before the end cap ever enters the tube! That bushing holds the mainspring under tension. And, now that I had cut off a hunk of the mainspring, it was very easy to push in, against the spring. I used a deep wall socket to push it into the spring tube and slightly compress the spring.
So, when you disassemble this model rifle, do what I just said in reverse. Take the end cap and trigger assembly out first, before you remove the bushing bolt. This is what the assembler, Heidi, at the Weihrauch factory knew. Old BB had to learn it the hard way.

I pushed the bushing back in and installed the bolt that holds it in place. The other end of the same bolt is the threaded hole where the front triggerguared screws into.
However
I was not yet out of the woods. Take a real close look at the picture above and see if you know what old BB did wrong — again. I tell you, with “expertise” like mine, there are probably three or four reports in this one simple job!
End cap and trigger assembly installed
With the bushing in place it was easy to slide in the end cap that also houses the trigger assembly. The plate that fits in the top of the spring tube popped in and the scope rail screw hole aligned perfectly — BECAUSE THE END CAP WAS UNDER MY CONTROL AND NOT UNDER PRESSURE FROM THE MAINSPRING!
When the end cap can be positioned wherever you want it, the screw hole lines up perfectly.
The stock
The stock now goes on and the job is done. Wow! This rifle cocks so easily! And it shoots dead calm. BB Pelletier has done it again! Ta-da!
Oh, no!
Have you found it yet? The thing BB did wrong? Did you cheat and read ahead to the answer? Shame on those who did that!
With the rifle assembled old BB saw one part still laying on his workbench that should probably be inside the rifle — the spring guide! Yes, in his haste to see if Denny was right about the bushing and end cap, old BB Pelletier forgot to put the spring guide into the rifle. The mainspring was resting directly against the bushing.
BB fixes it
Denny went home, probably laughing. BB stopped for lunch and dinner and to spend some time in the air conditioning. Then he came back out to the garage, disassembled the rifle and put in the spring guide (lightly lubed with TIAT) and had the rifle back together — all in about 20 minutes. Now the rifle cocks a little harder than it did a few hours earlier, but still much easier than before I took it apart. In Part 3 it cocked with 28 pounds of effort. Now, with the shorter mainspring and the spring guide in place it cocks with 22 lbs. of effort.
It shoots smooth, though the rifle still lunges forward when the piston comes to a stop. I have to say, I like it as it is. Gotta check the velocity next.
Discussion
Learn from my mistakes. If you have a Marksman rifle to disassemble, you may encounter the same things I have talked about today. Watch for that bushing! Never saw one quite like it, but no doubt there are more out there.
Why does the rifle shoot smoother? Well, first of all, the bent part of the mainspring is no longer there. That took care of a lot of the vibration. The TIAT grease probably helped, but maybe not as much as we have seen with other tunes. But, as little as I applied, it probably didn’t take anything off the velocity.
Summary
This isn’t the way I will leave this rifle unless, by a strange quirk of fate, it has gained 50 f.p.s. That would be RWS Hobbys going out the spout at 765 f.p.s. I did what I did today so we can assess the effects of mainspring spring length on velocity.

Dale Evans enjoys her sunbeam that arrives at 9 a.m. most mornings.


Never too old to learn….
Can the bushing block be installed backwards, so that the trigger guard screw does not go in?
-Y
Yogi,
Nope.
BB
“About half the grease is on the front half of the mainspring. Look at the threads that grease makes!”
B.B.,
That was my second most favorite pic in this report…those grease threads look pretty cool.
The best pic (for me) is Dale enjoying her sunbeam…yay, Dale! =>
Take care & God bless,
dave
BB
Will be waiting to see how the velocity is now after the spring cut.
How much pre load does the spring have now?
GF1,
There is still at least most of an inch.
BB
BB
So when the gun is not cocked the spring has about a inch of preload still.
That’s not bad. But I found that about a 1/4 inch to a 1/2 inch preload seems to work the best. The gun will be very easy to cock and the safety sets easy. You don’t need that little extra cocking pressure to set the safety. And that pretty much always still gives good velocity.
And you know that sales pitch about nitro piston guns. You can leave them cocked and not worry about velocity loss like a spring gun. Well the less preload the less chance for that spring to take a set with it always having the extra preload.
I want to see the velocity test. Then I would like to se you take more off the spring to get zero preload then shim back up to get the preload and velocity you want.
Oh and you might of weakened the spring by heating it up. Cutting the spring with the cut off wheel was the right idea. That keeps the heat out of the spring and that is absolutely what you want to happen. Next time take that cut off wheel and use it as a grinder to get your flat on the spring right. Do not heat the spring. Grind it. And quenching the spring in oil would of been better than water or “coffee”.
BB you are just something else sometimes. 😉
GF1,
I hadn’t thought of that! No preload. Let’s do it.
BB
BB
Good deal. I think it will show something interesting.
Like I have said before. Each gun has it’s own characteristics. Tuning that spring is so important is the best I can say.
Then start playing with pellet weight and fit and see what happens. Shot cycle and accuracy will change. It’s just all part of finding that best combination. Cool stuff. 🙂
BB,
I to am anxious to see what effect this has on velocity. I would like to remove a little of the preload on my 1906 BSA. I am thinking there is a wee bit too much there.
Also, I am wanting to experiment with my Webley/Hatsan Tomahawk. When I first got it, it would lunge forward when fired and had a horrid amount of vibration. I used too much TIAT in it and calmed the vibration down wonderfully, but it still has a powerful lunge forward.
First I am going to want to chrony it and find the most accurate pellet for it. Then I will disassemble it, check out the spring load, clean and inspect it. Hopefully the piston seal will survive all of this. I will be surprised if I do not find a bunch of burrs and sharp edges in this thing. The seal may already be damaged from the initial assembly.
It is my intention to cut the spring down a bit and see how it affects power. I also want to use less TIAT than I know that is in there to reduce vibration. If I can turn this into a calm, accurate sproinger, I will be tickled. 2 MOA out to 50 yards would be awesome!
Who knows, I might even convert this over to a gas sproing. 😉
Errata-
Opening pic caption- Marksman model 72 (70)……..
Paco,
Got it. Thanks,
BB
Benji-Don, this populated in the “Related Posts” section of the blog today, and I immediately thought of you.
/blog/2006/08/a-new-book-about-air-machine-guns/#comment-249371
You were right about the lead round balls as ammo for the shoot the star carnival game, but the intriguing thing is you may be able to get parts from those for your low pressure air project, and check out patent no. 2,312,244.
Roamin,
I did find a parts diagram for the shot the star out carnival gun. Boy are they complex. My low pressure gun will never be a repeater. Once I fit the .22 caliber L/W barrel on it, I will spend some time tuning the valve and finding the best pellet. Maybe out to 35 yards.
Eventually I will get a .177 barrel for it and tune the valve for that.
I was hoping to be able to easily go from .177, .22 and .25 barrels, no luck even though the barrels are listed at the same outside diameter. The are different enough that each one needs to be custom fit.
Don
Don,
I think I have mentioned it before,…. but a way past all that complexity (shooting star) would be a venturi,.. where air can pass through freely,.. creating a vacuum at the venturi,… and gravity funneling bb’s into it. Air flow would be constant/continuous.
That is the basic idea anyways.
Chris
I’m sure you will figure out a way to standardize the way they attach.
You probably know this, but if you take a golf-ball size chunk of duct seal and flatten it into a thin pancake and stick your target to it, even domes will cut neat little holes, just like wadcutters.
BB
Question for you and readers: Does an airgun’s (barrel) pellet preference ever change after tuning?
Deck
Deck,
I have not see that happen, but I have seen tuned guns shoot pellets they didn’t shoot well before improve with a tune. I always thought it was a vibration thing.
BB
Deck the only way to know that for sure would be try different barrels before and after the tune.
Definitely something to think about. Of course more work. But if your looking for optimum accuracy it is probably needed.
You know how that goes when somebody starts searching for the best something can be. And you know I wouldn’t know anything about that. 😉
Hey everybody!
I know a lot of you would like to have a plinking pistol that you can hit feral soda cans at 25 yards. The problem with most of those bb pistols is you would be lucky to hit the side of a barn while standing inside at that range. Now, there are a few that can do it, and a few that shoot pellets that can do it, but they usually cost more. Another problem is the cost of the CO2.
Well, I found one of those hidden jewels. At the last NC Airgun Show, I bought a Predom-Lucznik from Larry Hannish right at the end of the show for $75. It was in pretty good shape, worked, had all the sights. For those who do not know, this is a Polish copy of a Walther target pistol.
I had it out on my table with the plans of taking it apart and tinkering with it some. Today at lunch time I decided to take it outside and see what the firing cycle was like before I went into it. When I took a shot at a feral soda can I had hanging in a tree at 25 yards, I saw the pellet go right over it. Standing with no rest, I proceeded to hit that feral soda can five times in a row.
I am not going to tear into this thing at this time.
There are a bunch of these things around and most can be had for a little of nothing. I always see several of these things at airgun shows. Check around on line and you might find a few to be had. This pistol is staying here at RidgeRunner’s Home For Wayward Airguns.
RR
Five in a row standing is good shooting at 25 yards no matter how accurate the gun.
About your earlier comment converting to a gas spring. You know that some of us folks prefer a steel spring for easier tuning. But you may find that gas is less hold sensitive. BB was in a forum video a few years ago and this point was made by one of the participants. My Hatsun 95 came with a gas or air spring but is now converted to a steel spring. It still has the same accuracy potential, just harder to extract it. I’m still looking for a better pellet though. It’s one of the reasons I asked my question above about tuning and changing the innards affecting a gun’s favorite pellet for accuracy.
Deck
Did I happen to mention the 8th Annual North Carolina Airgun Show will be October 15th and 16th in Newton, NC?
BB, thought you would like to see the original spring that came out of my Marksman 70, and where it broke.
Rob,
Isn’t that interesting? It broke at almost the same place where mine bent. What happened to the other end?
BB