by Tom Gaylord
Writing as B.B. Pelletier
Today’s report is another guest blog from reader Ian McKee who writes as 45 Bravo. Today and tomorrow he will tell us of his experience in resealing a Daisy model 41 pellet pistol.
If you’d like to write a guest post for this blog, please email me at blogger@pyramydair.com.
Resealing the Daisy model 41 pellet pistol: Part 2
Now, take it away, Ian.
Ian McKee
Writing as 45Bravo
Part 1
This report covers:
- Disassembly
- Parts breakdown
- Trigger and hammer
- Valve body
- Valve parts
- The reseal
- Leak test
- Testing
- The service manual minimum specs are listed as:
- Some things Daisy got right with the 41
- What was Daisy thinking?
- A treasure trove of information
Disassembly
Today we start with the disassembly of the Daisy model 41. Removing the barrel and velocity adjuster is the similar to the Daisy 790 in part 4 of the 78G blog, except the crosspin that holds the end cap that contains both the front of the barrel and the power adjuster in the “slide” is splined on one end, so it goes in only 1 way.

The 41 barrel and velocity adjuster remove the same as the 790’s parts.

The pin that holds the barrel and power adjuster end cap is splined on one end, so it only fits in one way.
Parts breakdown
At this point it is useful to give you an illustration of all the parts. Ellarge the page to see it better.

The 790/41 parts breakdown provides a map to follow the rest of the disassembly.
Trigger and hammer
The trigger and 2 piece hammer system is the same as the 790 that was shown shown in Part 4 of the 78G blog.

This is the underside of the two-piece 41 hammer, similar to the 79G hammer shown in Part 4 of my blog on the 78G and 79G.
Valve body
The rear of the slide is held on by 1 screw on the right side of the pistol, just like all of the earlier pistols.
The valve body (part 790-312-A) is made from zinc or pot metal, the valve assembly is held in by 4 screws, not 3 screws like the earlier design.
The completely assembled valve assembly as a whole is part number 790-32.
If you wanted to order the individual parts, you have to add the letter designation, such as 790-32-F for the main seal, and 790-32-C for the main valve body seal.

This is the valve assembly, complete.

The model 41 valve, assembled.
The transfer port seal (part 790-31) is nylon, like the one on the 790 we looked at in part 4 of the 78G blog, it seals the barrel/valve very well, with no leaks or puffs of air when fired. Its slightly oversize design, allows for some misalignment with the barrel port, but still seal where they join.

The transfer port seal on top of the valve seals the valve to the barrel.
Valve parts
Now let’s look at a drawing of the valve parts.

This portion of the parts breakdown shows the valve parts with their letter designations.
There is a protrusion cast into the valve body that holds the trigger spring in place during assembly so you don’t need an eleventh finger, or zip ties during assembly. You see it in the drawing above.
Because the valve body and piercing assembly are together, there is no cartridge connector connecting the valve body to the frame. This is where the Daisy engineers simplified the S&W design and reduced the parts count.
There is a steel pin (part 790-32-G — refer to the previous drawing) that holds the valve body cap (which Daisy calls the valve plug) in place, when you drive that out, the cap/plug is under a few pounds of spring pressure and will come out the back like the earlier designs.
Definitely not the same
The steel valve stem and nylon main seal (parts 790-32-E, and 790-32-F respectively) are 2 pieces, unlike the older design, where the seal and stem were 1 piece.

Valve stem and seal.
This is a simpler design, and more cost efficient to produce.
The reseal
Only 1 o-ring from the Smith & Wesson seal kit will work on this gun, and that is the main valve body o-ring that fits on the valve plug.
The bolt probe o-ring is thinner in diameter than the normal .177 bolt probe o-ring, and the groove on the bolt probe is narrower than the other .177 bolts.

The model 41 bolt probe o-ring (right) is thinner and larger than the 79G bolt probe o-ring.
Whoever said the internals were the same, has never been into one of these!
The valve body plug o-ring is straightforward. It is a number 012 o-ring, and is captive, so it can be any type of o-ring you want to use. But personally I use urethane as they are impervious to CO2.
I have never seen a seal like the one used as the main seal, if anyone here knows a source for them, or if they were used in a different model Daisy made, please let me and Tom know, so he can update the blog with the info, and I can get a few for future repairs .

The main seal in the valve looks proprietary to me. If you know where they exist anywhere else, please let me know!
Daisy’s service manual tells you to dig the main seal out with a sharpened piece of music wire bent into a hook. If the main seal deteriorates, (part 790-32-F in the parts diagram) at this point in time, good luck finding a replacement.
The seal drops in the valve body, flat side facing the front of the valve, the valve stem (part 790-32-E) goes next, the valve spring, the valve body cap, and the steel pin holds it all together.

The main seal goes into the valve first, followed by the valve stem assembly.
The OEM CO2 face seal (part 790-43) is available online. The company that sells the OEM face seals, limit you to only 3, until the OEM parts came in, I used replacements I had on hand to test the gun, it is apparently the same size as used in several models of CO2 magazines of modern 1911 air pistols.

The face seal is installed.
If you unscrew the CO2 piercing piece, there is a small o-ring inside there, (part number 36 in the diagram). I do not know the size of it, but it was flat, kind of like a small rubber band used by kids with braces, but smaller, and made from black rubber.
After assembling the valve, it’s easy to assemble the rest of the pistol. Put the trigger spring on the protrusion on the front of the valve, line it up with the trigger, and insert the valve into the frame. Secure it with the 4 screws.
Daisy added 4 small pads cast into the frame around these screws to strengthen the frame at this point. Since the frame is thicker, it SHOULD not crack like the older frames if the screws are too tight.

The pads Daisy added to the frame can be seen around the screw holes for the valve.
Insert the plastic transfer port into the valve body, replace the bolt probe o-ring if needed, and assemble the “slide”. I suggest setting the power adjuster to a preset position, before assembly, as it is plastic, and easily damaged by a screwdriver while trying to adjust the power.

As you can see, the power adjuster of the 41 is all plastic and doesn’t hold up to being adjusted. It’s best to set it where you want it before you assemble it into the pistol.

The power adjuster parts are plastic. Set them where you want and just leave them alone after the pistol is assembled.
Secure the slide to the frame with the single screw on the right side.
Insert the muzzle plug that holds the barrel and power adjuster (part 790-4).
Then insert the power adjuster assembly into the bottom hole of the muzzle plug, making sure the groove for the retainer pin uses is towards the barrel, then reinsert the splined retaining pin.
On this gun, the pin goes in from the right side of the gun, but the diagram shows it going in from the left side. You want those splines going into the gun last.
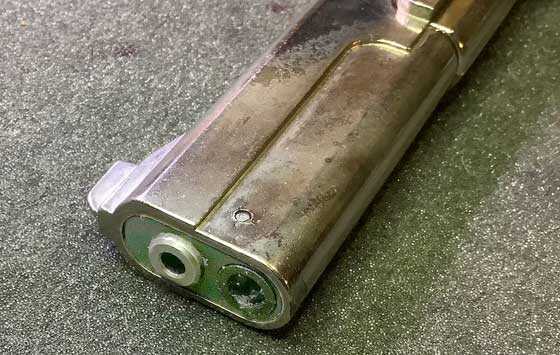
Leak test
To check for leaks on this model, after charging the gun with CO2, put some light oil (I used Crosman Pellgunoil), where the valve stem comes out of the valve, and some where the valve body cap is in the rear of the valve, and some on the area where the piercing pin and face seal screw into the bottom of the valve. Look for bubbles to form.

Performing the leak test.
If there are no leaks in the oil (arrow), put the grips back on the gun and function test.
Testing
Since this model uses a face seal, the CO2 cartridge goes in with the flat end up toward the top of the pistol. Tighten the CO2 cap at the bottom of the grip to pierce the cartridge. With this type of cartridge arrangement, it is suggested you not leave a cartridge in the gun, as the face seal will eventually lose its shape and start to leak prematurely. But the service manual does say to leave it charged for 24 hours, then test again to see if it still holds gas, and shoots to same velocity in the initial test after repair.
The service manual minimum specs are listed as:
The first 20 shots from a new co2 cylinder are as follows:
With the velocity adjustments set to max.
Room temperature between 70-85 deg. F.
(They don’t specify what pellet or pellet weight.)
S&W78/79G, Daisy 780-790 Phase I&II:
780 320fps (98mps) minimum velocity.
790 330fps (101mps) minimum velocity.
Phase III and Model 41:
780 340fps (104mps) minimum velocity.
790 420fps (128mps) minimum velocity.
41 420fps (128mps) minimum velocity.
Some things Daisy got right with the 41
They added metal to the valve support screw area to prevent cracking.
Simplified the valve, and reduced the parts count, and o-ring count.
Nylon Transfer port seal instead of metal to metal port like the S&W.
They added a trigger spring support to make assembly easier.
They added a middle position to the bolt probe so it can be in 1 of 3 positions, closed and ready to fire, partly open but the o-ring not compressed for storage, and open for loading.
What was Daisy thinking?
The entire bolt assembly and probe are made entirely from plastic!
Plastic rear sight assembly.
A new seal system for which, as far as I know, no replacement parts are available.
A plastic power adjuster that is easily damaged when adjusted.
A plastic co2 cap.
A treasure trove of information
With this reseal, we have learned the facts of what is and what is not inside a Daisy Model 41. We also now have a copy of the owners manual, and we now have an actual exploded parts view, and factory service manual. [Editor’s note: I have no place to put this entire manual — yet. I will work on it.
With this information, hobbyists will be able to repair and reseal their pistols and have at lease some idea of what they are up against before they start.
If you have any information that would be helpful, please post it.
Ian

Ian,
What kind of material is that proprietary valve seal made of?
B.B.,
You could A) Archive it along with the rest of the exploded diagrams of PyramydAir or B) Temporarily place it as a file in your FaceBook page until a better place to post the service manual comes along.
Siraniko
It appeared to be silicone, or something similar.
It was soft and pliable.
Where it sits in the valve, it is fully supported by the valve body on the rear of the seal.
Ian.
Ian,
Looks like something that was from a mold. Polyurethane looks like another candidate as a material.
Siraniko
That is possible, and yes it looks molded.
That’s why I hope someone made them for another gun, and Daisy used those available seals.
Ian
45Bravo-
Well written report! The pictures you posted really make your explaination much easier to follow.
Great job! Thanks for posting it.
-Y
Ian,
Perhaps Daisy’s thinking of the CO2 cap is to prevent corrosion or welding between metals. Another thought is that when cold, the plastic may shrink more than the metal, allowing easier removal. Third thought. Soft metals do not slide against each other well. Perhaps it is plastic to prevent binding.
Now the other parts may use some or all of these excuses, but plastic parts do tend to be cheaper.
Great write up!
Ian,
A great job in creating a treasure trove of information for anyone looking to rebuild one of these!
Well done!,… 🙂
Chris
If I ever find any of these air pistols at a yard sale, I’ll know just who to get in touch with. Excellent article! A lot of information.
I have to make a correction.
I apologize for this.
When I mentioned OEM in the article, I do mean ORIGINAL EQUIPMENT MANUFACTURER.
I had gotten a list of gunsmiths and airgun companies from Daisy that they sold their obsolete parts to.
I reached out to all of them, and only could make contact with 3 that were still in operation, but only 1 still had new old stock model 41 parts.
They listed the slides, the barrels, the face seals, and bolt probe orings, and retaining screws for the valve, all they had in stock were the screws and the face seals, and you were limited to 3 face seals.
The bolt probe orings they stock are the earlier 780&790 size, not the model 41 size.
When I went to buy what model 41 parts they had, they could only sell me 2 face seals.
I installed 1 in the gun, and sent the other to the owner of the gun as a spare.
So at this point in time, I think the supply of Model 41 original parts is exhausted.
Again, I apologize for the confusion.
Ian.
Ian,
I corrected the text so there should be no confusion.
Everybody — I made a comment in the report about the OEM Company because they make seals and are located in Huston, Texas, where Ian lives. I was sure he meant them and not the acronymn. But that’s how the process works. Sometimes mistakes are made.
BB
454Bravo, too bad the first style, one piece valve stem design is not available. TAP plastics has silicone for making a mold, and urethane for the part, that’s allot of trouble, but nice report.
Rob
Thank you for that information, if there was more of a demand for the parts that could be an Avenue to Making the obsolete parts and making them.
But due to the lack of information on the internet about this model, I don’t think it was a big seller.
So there is less demand for the parts.
But it does have more power than the S&W models.
Speaking of which, since we started the series on the S&W guns, I have noticed the prices creeping up, even the starting prices on gunbroker has risen, and less guns are being sold as “needs to be resealed”.
But deals are still out there, on one of the for sale boards, I saw an excellent condition S&W 79g with the box, some S&W co2 cartridges, and pellets for $110 shipped.
It didn’t last long.
Yes it did need a reseal, but hey, we know how to do that.
Ian.
Ian, thank you very much for this detailed and informative report. I’m glad that servicing my old Model 41 Powerline added to the “body of knowledge” regarding this hobby. As for this observation:
“The main seal in the valve looks proprietary to me. If you know where they exist anywhere else, please let me know!”
I concur, it would be really nice to find another one of those seals, if at all possible. I don’t know enough about Daisy CO2 air guns made in the 1984-198x period, but perhaps another model used the same or similar main seal?…I’ll defer to the experts re that topic, although of course it could have been an odd-ball proprietary part. (Fwiw, I also wish I could find a new power adjuster part and CO2 piercing cap, since I buggered up the slot heads on those plastic parts back in my teenage years, when I used this pistol at lot as a youngster).
BTW, I should mention that after the re-seal, Ian tested the velocity of my Daisy 41 with five 7.9grain wadcutters, and the avg velocity was apparently around 490 fps with a 5 fps spread. That exceeds factory specs somewhat, and suggests that its definitely holding pressure. Thanks for testing it after the re-seal with a chrono.
Anyhow, I look forward to having these two old air pistols back up and running. It was a bit of journey along the way, and I really appreciate the diligent time and effort that Ian put into re-sealing these two air pistols. My two sons will inherit them at some point, and hopefully they will be able to enjoy them for many years into the future.
Thanks again, and keep up the good work(!)
Fish,
Just get something. Then you can tell us all about learning it.
RR,
Out of stock until the 14th.
/product/beeman-r7-air-rifle?m=1899
Oh man, so much can go wrong in my head in a week. 🙂
Fish
Then they might not even be in stock on the 14th. You may have to wait longer. Then what? 😉
Fish
Your not suppose to give a link on the blog that is in competition to Pyramyd AIR.
The AOA link with the QB78 rifle. I’m surprised BB hasn’t removed it yet.
GF,
You’re right. I’ve just realized it. I cannot delete now.
BB,
Please delete my comment; I was taken unawares. Honest mistake here, sorry.
Fish
I wouldn’t worry. And I probably shouldn’t of said anything. I just wanted to let you know.
Fish,
There is an airgun dealer in the SW USA that has them in stock as the HW30S. That new stock on the .22 is awesome! I wonder if it is available on the .177?
RR,
In stock at AOA, but they increased the prices – no ambi stock or life long warranty either. I’ll wait for the R7; I won’t be shooting anything awhile anyhow, so waiting tad bit more is no problem.
Ian,
I sent this to Part 1 and thought I should do it here just in case.
LOL! I am afraid that would not do it. I do have an old Daisy Power Line Model 45 that was given to me by my brother-in-law I have been trying to get working, so far without success. It would be kind of fun to fiddle with some, but I am not really a CO2 guy.
I have fooled with them off and on some, but they just are not my thing.
Ian
Maybe a 3D seal could be printed now days. Just a thought.
I thought that too, but it’s soft, I don’t own the gun, so sending the part out to be scanned is not really an option.
Ian.
Ian
I believe they have different types of the plastic that can be used in the printers.
Also I wonder if you can make a mold and then get the right type of hot glue and fill up the mold. That might work too.
45Bravo,
Thank you for this Guest Blog! It has made it clear that i won’t be buying one of these to practice with. I have shot the S&W 41 rimfire and enjoyed its similarities to the USM 1911A1 both in grip angle and general feel in operation. What a shame that S&W doesn’t embrace this CO2 Pistol as a trainer for a target gun they still are manufacturing. Which leads me to reiterate your comment from Part 1:
“Don’t get sloppy in your search, either. Smith & Wesson also made several versions of a model 41 .22-caliber rimfire target pistol. And they made bunches more of those than Daisy made of the air pistol. Be sure you put Daisy and “air pistol” in your search terms!”
S&W will in fact sell you the .22 rimfire one for over US $1,300.00 new!
Great report.
shootski
If you owned a 41 rimfire, I would get a S&W 78 or 79.
And skip the daisy.
The S&W guns are good quality.
And were made in America.
Ian
45Bravo,
Excellent tutorial on resealing these old CO2 pistols. I am not a pistol guy myself, but I can appreciate the your skills in doing the rebuild. Very good descriptions and photos than anyone should be able to follow. Enjoyed your blogs.
Now, I have two old Benjamin multi-pump pistols. One is a model 130 (smooth bore B.B. cal) and one is a model 137 (rifled .177 ). I bought the 130 many years ago and it was stored in the original box in a chest of drawers. When I got it out a while back, I found that the piston was frozen in the bore. I disassembled it and was able to free up the piston. Then I discovered that it would not build pressure. The valve assembly is apparently gunked up. The pistol was never shot very much so I would assume the seals are still good, if not deteriorated with age.
The model 137, with the rifled barrel, is really old with brass parts. I don’t remember where that one even came from. I know I did not purchase it. It is in pieces and I don’t know if the parts are even all there. I may have disassembled it when I was still a kid 60 years ago. I have both pistols on my work table disassembled. The reason I have not done anything more with either of them is for the fact that a special tool is required to remove the valve assembly. The tools I have been able to find have been too expensive to purchase for a one-time use. So, there they sit.
I am hoping that sometime, someone will do a blog showing how to rebuild one of these old Benjis. Until then, I guess they will go back in the drawer, or maybe I will just sell them for parts.
Geo
George,
Thank you.
How about it folks? Somebody want to take him up on rebuilding them?
BB
George, I have rebuilt 2 vintage Benjamin pumpers, both rifles.
I do not know if the tool and the seal kits are the same for rifle and pistol.
I do know, the seal kit you buy from Pyramyd AIR DOES include the tool.
And the kit is reasonably priced.
IAN
BB
Godfather’s Golden Gun
You asked me to comment on the Ataman AP16 Standard pistol I won. This should be my final update. My thanks go out to you, Pyramyd AIR, Gunfun1, Chris, RidgeRunner, Shootski and many others who offered congrats, encouraged and offered tips.
Here we go:
1- Extremely accurate. I shot a 10 shot group (yes 10) at 25 yards today that measured .53 inches center to center using AA 16 grain pellets and a popular priced pistol scope from Crosman Custom. My best ever with a pistol.
2- I’m using the lowest hammer spring setting and getting an average of 496 fps with same pellets.
3- Noise level is a Pyramyd scale high 2 to low 3. Most of my airguns are louder. Backyard friendly at low setting.
4-I got about 75 good shots from various pellets from 240 bar to about 120 bar where it fell off regulator. Another 20 shots at much higher velocities and loud by the time it reached 90 bar.
5-I used a Air Venturi G9 hand pump to fill to 200 bar without much difficulty. Should get 50 good shots from 200 bar to 120 bar. Heads up Matthew Z, Pyramyd AIR for excellent customer service on a fill attachment.
6-Trigger can be adjusted very light so be careful folks. I left it the way you adjusted it.
7-Safety is okay, just different. Magazine can be removed or installed without actually cocking the pistol. Just pull the lever and stop at the last detente. Magazine is nice quality as is the entire gun and can be topped off without removing.
The upshot is to quote Tyler, if you miss it is your fault.
Decksniper
Deck,
DUDE!!!!,… with groups like THAT!!!! at 25 ((YARDS!!!)),… you need to quit your “day job” and hit the PRO circuit! 🙂
I’m happy for ya’,… Chris
Deck,
All flattery aside,… you have what would seem to be a (real) natural talent for pistol shooting. BB was getting similar groups at 10 meters. I was so astounded by your #’s that I went back and looked at the reports here on the blog.
Chris
Chris
BB tested several pellets and his AA 16 grain group was half the size of others at a quarter inch. I expected it to be a favorite for this pistol but BB was shooting at full power or close to it. I was hoping it would do as well or better at lower power.
Deck
Deck,
Thank you. You have fulfilled your part of the deal.
I am so glad that you have adapted the pistol to your own style of shooting. You made it your own, which is all Pyramyd AIR could have hoped for. I hope you enjoy the pictol for many more years. 🙂
BB
Decksniper,
Way to do it! I’m glad the Godfather’s Golden Gun has a permanent place in a good home. I hope the pistol gives you many hours of great shooting FUN.
BZ
shootski
Shootski
I need to take this one to a rifle range sometimes and see how far the legs stretch.
Thanks!
Deck
Deck
Sounds like you got a winner.
And a nice job of shooting on your part too.
🙂
Off topic
Just received my SAM, Semi-Auto Marauder, and was a little dumfounded with the 10 for 10 target included, It only had one hole in it. They only shot it once? Then the bulb in my rememberer lit up, 10 in one hole @10 meters.
It is not a drop in for the RAI Marauder Chassis and probably not the Armada chassis because of the air gage location being moved forward of the included air regulator on the SAM
Also the charging handle will not clear the top of the RAI Chassis or the Armada. But I believe it can be done with a little work for a new RAI Chassis gage hole and charging handle modification but it may seriously compromise the strength of the Armada stock by removing material to clear the charging handle. I will not go there myself and the gage position is not great for repositioning in the Armada, unlike the RAI Chassis.
Thanks for the report 45Bravo, only a few hundred models left to report on now 😉
“Only one hole?’ Dah. Correction 5 shots, one hole . Why waste the rest? And at 10 yards not 10 meters.
Wait … That was a Benjamin Crosman target with Crosman Premier Domed Pellets, 22cal
Bob M
A ray of hope !
Looks like the SAM will fit the early RAI TERYX Chassis if I just drill out a hole for the gage. And it would require no lower Weaver rail mod. The T handle should clear the stock easily.
Bob M
Bob
Nice target from Crosman. But I’m waiting to hear how it shoots for you.
If it does turn out to be a nice gun I’m going to get one. I have been waiting for them for some time now. But I think I’m going to have to thin the herd before I get one. Starting to run out of room. 🙂
GF1
I won’t be shooting it till I clean it and get it in the Teryx Chassis, after I modify it, and that is not a high priority right now. Been without electricity and on an emergency generator for three days in a wind storm, monitoring a wild fire two miles away across the border and caring for a disabled persons needs. Retirement never looked so good, right?
I don’t expect I can out shoot, or even match a fixed gun rig at Crosman. Although it was low and to the left. They probably don’t sight it in. I have many airguns that need to be checked out and I’m expecting to get the AK1 in today.
When the weather is good it’s time for a few cool ones under the shade tree and get in some shooting. They do mix well after 50 years of practice. Besides we need to keep BB on his toes and show us the facts. I can’t out perform him.
By the way, LPG puts out way less HP than gasoline, but it’s a lot easier to deal with.
Bob
Sounds like you just haven’t been having a good time lately. I hope that all settles down for you.
And what I’m mostly worried about with the SAM is reliability and accuracy.
And in no hurry to buy one yet. Probably around Feburary I’m thinking is when I’m going to be ready to get one.
So whenever you get to it post your results. Maybe BB will give a report on one by then too. Will be watching for any blog reports I can in the mean time.
GF1
If you read the reviews you will notice a lot of people saying its unreliable, especially the mag and feeding. May be pellet picky. Accuracy seems OK. Reviews are all over the place. I don’t really ring out the airguns with testing pellets of all types and shooting positions for the best accuracy possible.
I can look it up on line after a while or read it here. More for plinking and target fun.. As most know by now when I want to get serious my FX Indy is always by the door.
I have way too much other stuff to do. Like checking tire pressure on 20 vehicles, 4 motorcycles, a tractor and a Cub Cadet driving lawn mower for example. Then there is road repair. drainage control, gardening and constant weed and pest control, not to mention home repairs. I rest a lot too.
Maintaining family cars and repairing them takes up a lot of my time too. I just let the bicycles go flat till I need them and I don’t !
Bob M
Bob
That’s what I will be using the SAM for mostly is plinking. Maybe some target shooting and some pesting.
And I’m surprised BB doesn’t have one to test yet. Well hopefully you will get to yours and let us know.
GF1,
BB does have one to test.
BB
BB
Good. Still a ways before you test it?
GF1,
Yes. I’m taking a short vacation to see my sister in another week and I’m storing blog reports for that time.
BB
BB
Ok thanks. Will be watching for it.
Gives me some time to save up some money to get one. 🙂
Bob,
Don’t believe everything — yet. 😉
BB
Ian,
Sorry for being “late to the party” (too much crazy work stuff; no complaints, though; I thank God I have a nice job).
Anyway, while I don’t have one of these pistols, I still enjoyed your very informative report. You did a great job with the pictures and schematics. As does B.B., you are putting forth a wealth of information that will be referenced for years to come, and it’s evident you put a lot of heart into it…which is always cool, of course. =>
Thanking you for a job well done,
dave