
by Tom Gaylord
Writing as B.B. Pelletier
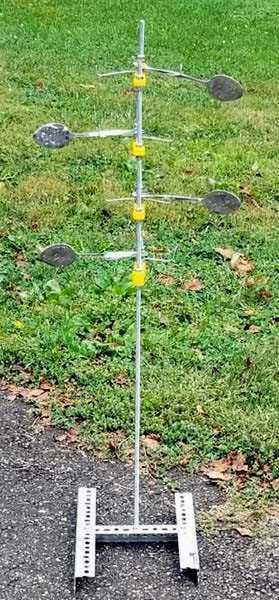
NTOG dueling tree made to handle low energy. NTOG provided the photo.
This report covers:
- From NTOG
- Interested
- Some assembly required
- Yes, it really works!
- M1 Carbine
- Testing with steel BBs
- Target operated perfectly
- Testing with Dust Devils
- Smart Shot
- Modified target
- Summary
Several weeks ago, reader New to Old Guns (NTOG) contacted me with a new project he was working on — a dueling tree for lower-powered BB guns.
Today’s target is an action target, but it’s one with a big difference. I’ll let him tell you what he first told me.
From NTOG
“It is a “down to about 1ft-lb capable shooting tree”. Yes, you can have fun with a shooting tree with the Red Ryder!
“The short version — I realized I was having a ton of fun with the big tree “dueling” and “racing” guns like the Vectis, Sumatra, Nova Freedom, and AT44. But I couldn’t shoot that tree with my son, as he’s 12 and doesn’t have anything near the about 18 ft-lb needed to flip those paddles. I remembered a bud talking about bending and flattening cheap spoons for use as targets, and, well, one thing led to another. Good shooting with the Red Ryder is enough to flip it. So any BB gun shooting in the neighborhood of 300 fps will work. That means training pistols like the Sig P226 should flip it too. Doesn’t that open a world of entertaining practice?
“The BB ricochet problem is of course not to be ignored, but I have two observations regarding that: a) frangible BBs do exist, though I don’t know if they’ll transfer enough energy to flip the paddle b) momentum laws would say that as long as the spoon is free to spin, half the energy goes to moving the spoon. That means any potential bounce back has already lost about half of its energy. In our enjoyment, we’ve yet had any bounce back that we’ve noticed.
“I’d also add, it is really shines with guns like the Crosman 73 Saddle Pal, and Walther Lever Action. Honestly, the 73 was probably the most fun of them all. Pity those aren’t still made.”
Interested
I was interested because I am working on a project to bring some informal shooting competition to the Pyramyd AIR Cup next year. Out of the hundreds of people who attend, only the semi-professionals and highly advanced amateur shooters actually get to compete. Doesn’t that seem reversed? Could this dueling tree be the answer? Is it reliable enough and rugged enough to stand up to a lot of shooting? I needed to know, so I asked NTOG to send one for me to test.
Some assembly required
As you see in the first photo, the target is mounted on a long section of 5/16-inch threaded rod. He didn’t want to ship that, which I understood completely. I can buy the same rod at my hardware store, so he sent 6 of the paddle mechanisms. I bought an 18-inch length of rod plus the channel material for the base and a couple other things like washers to get started. Once it was assembled I did some testing right away.
Yes, it really works!
The first test was successful. This target really does work. The spoons have to be loose enough to swing freely but not so loose that they wobble and rob energy from the shot. Let’s look at some detail.

This photo shows a lot of detail. You can see the bent wire that stops the paddles when they swing around. But it also made me wonder about the yellow standoff rod that holds the spoon mechanism away from the threaded rod. Is it necessary? The yellow paddle at the top is not a part of the target I am testing. NTOG provided the photo.
When I assembled the target I put just three spoons on my 18-inch threaded rod, as I was only testing the concept. And that got me shooting right away.
M1 Carbine
I chose the new Springfield Armory M1 Carbine to test the target. I wanted accuracy which that gun has in spades and I also wanted a semiautomatic because, let’s be honest — that’s what this target is all about.
Testing with steel BBs
My first test involved shooting steel BBs, because I wanted to know about bounceback. Steel BBs do bounce back from hard targets, and that’s a safety issue. I shot from inside my small patio slab that opens on the back yard and, because the threaded rod I used was low. I was shooting into the ground behind the target.
Out of about 30 BBs that were shot one did came back. It didn’t come straight back at me, it veered off the the side about 10-15 feet, but it did return. I could hear it hit the house at low velocity. So NTOG is right about the bounceback issue; it is greatly reduced. But it isn’t eliminated, and that’s what I wanted.
Target operated perfectly
I was shooting 12-15 feet from the target and the paddles operated perfectly. I had to loosen the nuts on one of them a little, but after doing that, that paddle functioned like all the rest. The paddles came to rest against the wires on either side and didn’t rebound from them very much. The worst that can happen is all the paddles rebound off the wires and swing back to the center of the target. Then you have to manually reset them to see them again.
The M1 Carbine shoots steel BBs at about 420 f.p.s at the muzzle. That’s quite a bit faster than the 275-300 f.p.s. of a Red Ryder, so now we know a range of power that this target works in.
Testing with Dust Devils
NTOG mentioned frangible BBs, so they were next. I have good news and bad news. The frangible Dust Devils did break apart on the paddles, but that pushed each paddle straight back so it wasn’t visible anymore (it was in line with my sight and too thin to see). I thought it might be just a random thing, but after 15 shots did exactly the same thing I knew this target doesn’t work with Dust Devils. Ah, but we are not out of safe BB options yet!
Smart Shot
I tried Air Venturi Smart Shot next. These lead BBs don’t bounce back, either, because lead is soft and deforms when it hits a hard target. Being non-magnetic Smart Shot doesn’t work in every BB gun, but the M1 Carbine handles it fine. Better yet — it works! It moves the paddles and it doesn’t bounce back — at least not from 100 test shots.
I have more to say but now I want to show you the target in action. Here is a little video I put together to show it. In the video I mention that Codeuce made the target, but it was really New to Old Guns.
Modified target
I haven’t told NTOG yet about the modifications we made to his design, so he is seeing this at the same time as you. We (my neighbor and I) were looking for ways to build the target for even less money than NTOG spent. Getting rid of the long threaded rod was a big start. If you have scrap wood lying about this target could cost you very little. But more importantly, it still works exactly like NTOG designed.
Summary
I made this report Part 1 because I think there is more to test. For example, does our modified target still work with a Red Ryder, and so on. I’m sure you readers will have more things to check.

Coduece,
Excellent job. I like the concept/working model. Is this something that you will further develop for market? What are the yellow “dog bones” from?
Well done!,…….. Chris
(nice job on the video B.B.)
Chris,
I think he printed those and the yellow washers. I don’t think they are necessary.
B.B.
The yellow dogbones were indeed 3d printed. I made them to support the notion of changing targets. The original design did run the nuts that hold the spoons straight down the big piece of all thread. But the paddles being worked with then were printed plastic, and prone to breaking. The paddle on the top of the tree in the second picture will actually flip for a Daisy 179! But 10 shots with a Red Ryder broke it. It was a pita to take the whole tree apart just to change a paddle! This design lets you change any paddle at whim.
The wire was mostly chosen because I had wire, not wood lying around. The beauty of this target is you can build it with what you have on hand. And that kind of speaks to Chris’s question about taking it to market. There’s nothing there that can’t be easily made, or bought at a hardware store. I’m not sure what could actually be marketed!
I guess it boils down to this: as a kid, I liked Erector Sets. At some fundamental level, that’s all this is. 🙂
NewToOldGuns,
Great job on this. I’m going to try to build one based on your design. Unfortunately, as a kid I was more the Lincoln Logs speed than Erector sets. ;^)
Michael
NewToOldGuns
Always loved Erector sets – kept me busy for hours on end!
Main item on B’day and Xmas lists for years. Had so much that I couldn’t lift the box!
Hank
Hank,
Do you remember the toy called Panels And Girders? It was snap-together Panels and, well eh… Girders ( I Beams ) that you could build skyscrapers out of. That was my favorite toy in 1963 at age 8.
Half
Half,
Never did Panels And Girders… did Lego at a young age but it was Erector sets that held my attention for years! Had coffee bottles full of nuts, screws, gears and pulleys.
Hank
Hank,
I actually misremembered the name. They were called Girders and Panels. I had Erector Sets as well as Tinker Toys and Lincoln logs, too. My dad was creative with his hands ( made all our toys in his woodshop ’til we were 6 or 7) and I guess he wanted to stimulate me to it as well.
Half
Hank,
I had Lego’s and the Lincoln Logs. The Lego’s got me hooked. “Back then”,… Lego’s were a bit cruder than nowadays with all of their specialized kits, bits and bobbles.
At age 7 (2nd grade-ish) I made a carnival ride type “thingy”. Good sized block/base, gears snapped to wheels. Side gear meshed with top gear,… from which was mounted a “tower” that had cross arms. From that, more wheels and long arms with weights that hung down.
End result was something that when you turned the base side gear, that meshed with the top gear,… the whole thing rotated and the 4 arms swung outwards more with additional RPM’s,.. like a carnival ride. Maybe 16-18″ tall.
My Mom forbid me to tear it down and my Dad was amazed when he got home from work. For the next 2 weeks,… it was showed off to all relatives that visited. I guess they figured that I was some sort of super engineering genius. Well,… that did not quite work out exactly to plan,…. but if I had to do it again,…. I sure could have been. “Could have, would have,… should have.” 😉
Me? I was more mad (at the time) that I could not tear it apart and rebuild something new,… as my pieces were somewhat limited/finite.
I will say,… the need to build and tear things apart never did leave me even unto this day. Maybe not the most ideal,… but it has served me well throughout the years. Hey,… if I could not afford to repair something in my younger years,…. well than at least I had a pretty good crack of fixing/rigging it myself. 🙂
LOL! Just thought that would share since childhood toys were brought up.
Chris
Chris,
Yeah, build something, tear it down and make something else – still do that!
Back then the Erector kits (IIRC it was called Mechano up here) were not specific for a project but rather just a box of various lengths of pieces (flat stock, “angle iron” etc.) and some screws, nuts and washers. Some kits had wheels, pulleys, gears and crank-handles and wind-up motors to power the “inventions” were available – had two of those.
Because it kept me busy (and quiet) Mechano was a popular gift from my parents, aunts and uncles (big family) so I had more pieces than I could carry – literally, my father had to carry the box out for me.
My brothers eventually inherited the stuff and I went on to slingshots, bows & arrows and anything else that would shoot a projectile or fly.
Guess I my interests haven’t changed all that much. LOL!
Yup, the fix and repair skills we learn as kids… Just got a cheap chinese bipod and am half-way through the overhaul – it’s looking pretty good now. It will have to do until I can get a good one.
Hank
NewToOldGuns,
What a great FUN and inexpensive project to do with my grandsons!
Lots for them to learn along with simple handtools and wire bending jig!
And then hours of fun spinning the spoons!
Thank you!
shootski
That sounds great!
A little hint about the wire, if you go that route: I found the best way to form it was to, starting with the length of wire (measured from the tip of my thumb to the tip of my pointer finger) more or less squeeze the ends together, not really folding the wire in half, as much as putting a little kink in the midpoint. Then open the ends a bit, opening up the kink a bit. Hold a spare section of all thread against the kink, and finish pulling the ends around the rod. That yielded pieces that were tight enough on the rod to almost need threaded on. Then bend the tips up with a lineman plier.
Enjoy!
NTOG,
I didn’t see yesterday’s blog till today, but your spoon spinner is way cool! I have been thinking of what kind of targets would work for grandkids and the neighbors’ kids, and you have given me the answer; thank you. =>
take care,
dave
Great idea! I will file it away somewhere in my feeble mind and pull it out when I get my act back together.
RidgeRunner,
Hope you find your Round TOIT soon!
shootski
NTOG,
Apologies for calling you Coduece. I have about 10 – 15 minutes in the morning to read and 5 minutes to respond,…all,… while waking up and still on the first cup of coffee. 🙁
I like it and thank you again for sharing an easy to make at home spinner.
Chris
Chris,
I was the one who made the mistake. The blog said Codeuce all over when you read it.
B.B.
B.B.,
I caught that after reading further. I usually read for comments on past blogs,… skipping the current day’s comments,… then going back to current days comments on the actual blog itself.
Hey,… if that is the worst that ever happens,… I would say that we are all in good shape! 😉
Chris
Interesting design Coduece!
I am working on spoon-based knock-down style target designed for pellet guns in the sub-10 fpe range. I’m in the final tweaking stages and if there is enough interest I would consider detailing it in a guest blog.
Thanks for sharing!
Cheers,
Hank
Vana2/Hank
Looks good. Pull the line attached to the 5th spoon to reset the target. I suppose there is a wire welded to the handle of the spoon to pull the other fallen spoons back into position?
Siraniko
Siranko,
Everything is built to pivot on a threaded rod, the reset-wire (a piece of coathanger of course) included.
Just some odd scraps and some dollar-store spoons – took about an hour to make.
Hank
Great design! I like the angle iron on the front, too.
Yeah – it’s amazing what you can do with an old bed-frame – never pass one up.
Attached is a picture of the back side of the target. Missing from the picture are the washers and O-rings that I am using to add friction to stop the spoons from bouncing back after the hit. I use a pair of 6″ spikes to anchor the target so it doesn’t move around when resetting the spoons.
Hank
Vana2,
Hank, all you need is a drilled faceplate out of sheet steel and you could have 5 apertures to shoot through! Paint the spoons black and the steel plate white and I would feel totally at home…now if I could just get that dreaded feeling of skiing Penalty Laps out of my mind!
shootski
Good idea Shootski!
Have to look around, might have a suitable piece of steel.
Hank
Hank
I would have the concave side of the spoon facing forward. That would compress the exspansion of the pellet when it hits and less likely to ricochet.
GF1
Understand what you are suggesting. I have them that way around to reduce the energy and torque transmitted to the “paddle”.
Hank
Hank
That would increase the torque and energy transmitted to the paddle if the concave side of the spoon was being shot at.
If the convex side of the spoon was being shot at that would reduce energy to the spoon. It would allow the pellet to glance off easier or if it was a higher powered shot it would fragment the pellet away from the convex spoon sooner.
Hank,
Sweet! This would be great for so many of my airguns.
Hank, you’ve got my vote for a guest blog on it. =>
Coduece,
Excellent design! One question: might bounce-back be greatly reduced if the spoons are not flattened and have the domed side facing the shooter?
Well done.
Michael
When messing around with my tree, more often that not I’d see the bb continue past the tree after flipping the spoon, just deflecting a little from its path. I’m sure it is all about how much resistance the paddle is set with (how tight the nuts above and below clamp it). If the spoons are really free, the energy in the bb goes into flipping the spoon, and excess momentum keeps them sailing away. The tighter the spoon (or heavier), the more energy is returned to the bb, reflecting it.
Part of the challenge is tuning the tree to the power of the gun. Setting it up to work for a 1 ft-lb Red Ryder then shooting it with a 5 ft-lb gun made the spoons bounce over and back! I imagine setting it up for the 5 ft-lb then shooting it with a 179 would result in the spoon not flipping, kind of acting like a wall, returning the bbs energy. My son and I thought the extra bounces just made dueling more fun 🙂 .
I think a curved spoon just introduces lots more directions the bb could go. At least with a flat spoon, the bbs shouldn’t go up!
NTOG,
I’ve been working for a few years trying to develop a dueling tree for BB guns ( CO2 powered handguns, in my case ), and have found that the most difficult part has been the tuning.
The guns I use will shoot much harder with a fresh cartridge and if you set the target up to flip and stop at that power level, when the gun has cooled some from the effects of the CO2 it will tend to just flip the target halfway, rendering it invisible to the shooters, as BB pointed out. On the other hand, if you allow the paddles to be flipped fully with a lowered energy, cooled gun, then shooting with a fresh cartridge will bounce the paddle all the way back to its original position. Finding that balance is a much greater problem than it may seem to most folks. I actually feel that the non-repeatability across many power levels and, to a lesser degree, the ricochet issue are the main reasons a dueling tree for recoiling replica guns is not already commercially available.
Additionally, I’m trying to make my target usable at 7-10 yards to mimic tactical handgun practice and therefore have to use target paddles that are around 3″ square because of the accuracy limitation of replica BB guns. I’ve made enough progress with my design to know how much stinkin’ fun it is to compete on one of these trees. Most of my testing has been using the Umarex polymer Python because they are cheap, get great shot count, have adjustable sights and are more than accurate enough, especially in single action. I have a Saddle Pal that I never thought to use with my target, but I remember shooting it at a roll of plastic 35mm film cans over and over when I first got it back in the ’80s, I think, and I seldom missed at about 10 yards. I remember that I could work the lever almost effortlessly, compared to a Red Ryder, to fire very quickly. I can see it as a “Dueling” gun, for sure.
Thanks for sharing this with us. I’m thrilled to hear that there are others working to design one of these things and I know if we ever get the bugs worked out it will be a DYI project that many shooters will want to build, they are just that much fun.
Half
Hi Half
Yep, that seems to be the sum of it, just the right amount of rebound, across a wide range of forces! And just using friction for the whole rotation (tightening the nuts against the spoon) has the unintended side effect of making the paddle absorb more of the force of the projectile too. If you rely on that too much, the spoon will take more and more damage.
I did find that leaning the whole tower forward towards the shooter helps with the rebounding spoon issue quite a bit. If the spoon is free enough, gravity will bring any spoon remotely on the correct side back to the wire. So you need a little more force to get over the gravity keeping the spoon on the shot side, but once past the midpoint, there is a gravity assist to the wire, and a gravity well keeping it on that side too. I think that turned out to be the change that helped the Saddle Pals the most.
I think my next change will be to add something like felt or the fuzzy side of velcro to the stop areas of the wires.. something to dampen out some of the force arriving at the wire. I wanted the wires to be the safety stop, the component that deforms if all goes too crazy. After all, it can be easily bent back.
By the way, the spoons flatten to 1 5/8 x 2 1/2″, and that was plenty shootable at 10 ft with the Sig X-Five open and 1911. At that range, the spoon probably looks larger than 3″ target at 30 ft., but that also helps absorb the relative inaccuracy of some bb guns. For more challenge, one could always switch to a smaller spoon 😉 15 and even 20 ft was quite doable with the Saddle Pal.
These are a hoot, and I do hope they catch on. I don’t think my son and I had more fun shooting than shooting the tree in quite some time.
NTOG,
Thank you so much for responding.
The 7 – 10 yard range that I spoke of helps to mitigate the rebounding BBs issue (in my design) as well as being within the accuracy range of the guns that I’m using at this point in my prototyping.
I wanted to ask you something before I drag out my Saddle Pal. Does it require you to aim downward when you cock the lever to load the next BB? I seem to remember shooting at those 35mm cans that I mentioned in the comment above while they were on the ground and I don’t recall if that was convenience or necessity. All of my Dueling Tree designs, thus far, have been based on 8-10 paddles on a tower that spans from knee high to head high. I ask because the Model 73 wouldn’t work ( at least not as fast ) on my target system if it had to be pointed at the ground while losing the sight picture to chamber each round.
My approach has been to make my paddles from 1/8″ UHMD plastic, ( think plastic cutting board material ), and to use tiny magnets, taped in place with aluminum HVAC tape, to control the rebound. The face of each paddle has “high visibility duct tape” in one of two colors stuck to it to differentiate “Mine” from “Your’s” and to make it …uh…highly visible… and to help absorb the energy of the BB’s impact. The plastic helps in this regard, as well. The combined effect of the plastic and tape seems to rebound the BBs at very close to 75 degrees from either side of the firing line as the paddles swing, which leaves the shooters, as well as the observers ( let’s face it, nearby people are going to want to watch the action, unless they’re just dull and brain-dead ) , safe from ricochets. The tape also works much better than paint since it doesn’t chip off with each shot.
In my design, PVC pipe sections are connected to salvaged, “Bed Frame” angle iron, again taped with aluminum HVAC tape, to form the pivots for my paddles. This is an area of my design that is sort of inconsistent. I think that Gordonsbuck’s use of wire and eye screws may improve my design. I will definitely be pursuing that because your suggestion about leaning the tower forward, to allow gravity to help fully-swing the paddles once they reach mid -swing has not worked in my experimentation, so far. I think that my pivots have too much friction.
This seems like such a simple project until you try to make one. At that point you learn that there are various and sundry situations that just, frankly, complicate the hell out of the endeavor. As soon as I get a chance I will post some pics of the direction that I’m going and maybe you or Gordonsbuck can improve on it. It would tickle the hell out of me if we could, on this totally free platform, among ourselves, put together a DYI version of this target system before some corporate type was able to do it with an entire “Engineering and Development” department at their disposal. And……just give it away!!
Half
Hey Half!
Like you said, let’s figure out the engineering before some corp takes it 😉 . Have you seen the flipper target on PA’s site? Pity it doesn’t come active *until* 7 fpe.
A big factor to the amount of rebound is the weight of the paddle. The entire spoon is 40 grams, with much of the weight being in the axle end of the handle. There’s certainly not a lot of inertia there, especially when the spoon is set very loose. Do you have any idea what one of your paddles weighs?
Yes, the 73 is gravity feed from its magazine. My tree is mid-chest to maybe knee, so I just have to be careful when chasing the top spoon. You’re right, bobbing the muzzle down can be a little disruptive, but with a little practice I found I could muzzle down as I was flipping the lever (one motion), and bring the bead back up to my sight line without looking away from the target. My top rate with that gun is about .8 seconds per shot, but more common it is just under a second per aimed shot. I don’t know if that’s fast or not, but it is the fastest cycling lever gun I have. The Walther Lever is right behind that at about 1.1, and the Umarex Cowboy @ 1.3. What a great way to spend shooting time 🙂 . Oh, I downloaded a free ISPC Shot Timer app to figure all this out. Great fun! Highly recommended.
I like your use of plastic, and the plastic you chose. That’s a great way to go! And switching to wire and eyes should definitely help cut down drag. Today I played around with sticking chair-foot felt pads to the wires, changing their shapes (it is now a moustashe) so the flipping spoon hits the felt. Not sure that it helped too much, but it definitely helped a little. The gun of the day was the Daisy 130, which is about a 5 fpe break barrel repeater from the 80s, I think. I started gathering metrics on lean angle (downloaded an inclinometer for the phone too.. amazing what you can find) and free play at the tip of the spoon as a stand in for how tight I have the nut set. 10 degrees and 1cm free play was “the setting” for the padded moustache with that gun. Almost all flips stayed on the flipped-to side, and mostly settled. Many shots on the non-felt moustaches bounced over and back. I think that’s the approach I’m going to take.. tracking what combination works with what power level, and hopefully a chart will come out of it all. If it turns out this is all repeatable, that’ll be a big help!
Love the brainstorming! Here’s a picture of the spoon’s new moustache.
NTOG
NTOG,
The ‘stashes remind me of Oil Can Harry from Mighty Mouse and Snidely Whiplash from the Dudley Do Right segments of Rocky and Bullwinkle. LOL
I weighed my paddles and they are about 36 grams fully assembled and I double checked the thickness and it is 1/8″. I likened it to a cutting board but it is actually a sheet of plain UHMW that I bought on the Web. I first used material cut from small cutting boards that Walmart sells for 88 cents, but once I started shooting at them ( which was after I cut out and covered 10 of them with the duct tape, of course !! ) they broke very easily, so if you’re tempted to use that material be careful. I was trying to use all commonly available stuff because I really did want to present it as a DIY project that could be fabricated easily without a lot of tools, but some of the gear had to come from online. I got the plastic tubing from Home Depot but I can’t remember what it’s called. I think it’s a PVC product and it came in various length straight pieces, not in a coil. One size fits nicely into the other one to form the hinge.
The short pieces of larger tube are just aluminum-taped inside the web of the angle iron.That was nice and simple, but then I had to get the smaller diameter tube to stick to the paddle proper and that required some experimenting. If you make the paddle too small it rattles around inside the tube, too large and the tube becomes an oval that won’t spin inside the larger tube. Finding the right magnets was a challenge also and without them the paddles bounce like crazy. The ones that I settled on had to be of a large enough diameter to have plenty of contact with the edges of the angle iron and I was able to fine tune the grip of the magnets by increasing or decreasing the layers of tape that I held them on with.
I just have a point at the bottom of my post so I can stick it in the ground. There are a lot of tree roots in my yard so I had to add the cross piece to give me something to stomp on. Once it’s in the ground good I can tilt it left or right and backwards and forwards to make it plumb and level or to lean it to further reduce the bouncing issue.
This is currently working pretty good for me across a fair range of power but it’s probably a little fiddlier to make that most would want to mess with. I think that I’m going to try shooting it with a 1077 at a longer range. At 7 – 10 yards I believe it would damage it but with a little more distance it may be OK. A couple of 1077s and 3 or 4 loaded mags for each could be a real blast, pun intended. 8 – 10 paddles takes a while to determine a winner if they are equally matched. That’s why my paddles just lift out. Sometimes it takes more shots than you can have ready so you just reduce the number of targets!!
I’m including a few pics of my tree.
And here are the paddles up close.
Hi Half
That’s really nice work! I like where you took it. Thanks for sharing! We’re going to have to keep updating here as our projects evolve. I know it won’t be the most current thread, but it seems as good a place to archive all this as any.
Back to the drawing boards! 🙂
Everyone,
I really messed up this time. I attributed this target to reader Codeuce when it was actually designed and made by reader New to Old Guns. They are two different people.
I have corrected the text, but the links cannot be changed. WordPress locks them in once an article is published. I also can’t change what I say in the video without re-filming and re-editing the entire thing. So I will put a retraction in the text.
I am so sorry this happened. My apologies to both New to Old Guns and Codeuce.
B.B.
Absolutely no problem, Tom! May this be the worst thing that ever happens 🙂
NTOG,
I accept that! 🙂
B.B.
I made an air soft or BB gun dueling tree from a piece of PVC pipe, a few screw eyes, some coat hanger wire and some cardboard. Here’s a link to the YouTube video about my dueling tree: https://www.youtube.com/watch?v=cX8ha-r4LjM
Gordonsbuck,
I looked at your video and I like the simplicity of your design. In the testing of your finished product I noticed that you had issues with the paddles rebounding. Did you ever work that out? I’ve put in quite a bit of time myself on a steel BB tree design, as I posted to NTOG above, and that has been a thorn in my side as well.
Half
The paddles still rebound sometimes — I don’t consider that a serious problem. I suppose some sort of additional drag/friction could be added but that drag would likely have to be tuned separately for pellets, airsoft BBs, steel BBs.
Gordonsbuck,
I’m shooting my tree at up to 10 yards at present and may be extending that to as much as 20 yards with a 1077 or some other CO2 powered long gun, in the future, and personally think that walking that distance to reset an errant paddle that stopped midway or having a paddle that I flipped, fair and square, flip back over to benefit my opponent would be a buzz-kill if it happened very often and those are the reasons that I’m looking for help in this area. It isn’t easy to overcome, it seems.( It also may not be as important to others as it is to me ! LOL) If you find a way to stop the rebounding please share it, OK?
Half
To reduce rebound in my design, rather that add friction, I think a better approach would be to add a “cushion” where the wire hits the vertical pipe. I think I’ll wrap the fuzzy side of a strip of Velcro around the vertical pipe as suggested by NewToOldGuns.
Gordonsbuck,
I know that this is not how you intend to use it , but your mention of Velcro gave me an idea. I don’t know why it didn’t occur to me from the start. I may be able to replace the magnets, which are sort of expensive when you include the shipping, with strategically placed strips of hooks and loops in my design.
Half
I installed Velcro “cushions” where the wire hits the vertical pipe but this did not stop the rebounds. In fact, the cushions did not seem to make a difference. I’m editing a video to demonstrate the rebound and the Velcro and will have it on YouTube soon.
Off subject.
I received an email yesterday from PA. It seems the Sumatra has been updated. If it shoots, this may be a winner.
/product/seneca-eagle-claw-lever-action-pcp-air-rifle?m=4952
I read B.B. blog post about this gun yesterday, he posted it awhile back. He liked it then, cocking “Rifleman” style. “Wanted Dead or Alive”. Think he would love it now!
-Y
I’ve been hot to get one of these for a while, and especially so after I shot one at the Cup! But I have to say, it would take a strong, talented person to pull off a claimed “follow up shot in less than a second”. My personal best average with my tuned Sumatra is about 1.3 seconds. Well, then again I’m neither strong nor talented. 😉
NTOG,
I have not seen one of those old Sumatras in years.
It is definitely a favorite. I wound up having it tuned (as opposed to just repaired) when a problem with an inaccurate pressure gauge led to internal damage. The lever is wonderfully light now, and it will still make 47 ft-lb of force, though that’s not how I usually shoot it anymore. I love it enough to have made the 3d parts for it!
NTOG,
I can remember there used to be guys who specialized in these and developed new stocks with a more vertical grip and a lever to fit it. I personally was never really fond of the shotgun look and I did not like the engravings at all, but I know that appealed to some.
This new one most definitely has my attention though. That is a nicely shaped stock, the action appears to be easily disassembled and the magazine is a vast improvement (I think) over previous versions. I hope BB gives one of these a good look real soon.
RR
I like that they finally made a shrouded gun.
I would love to get one if they offered it in a pellet shooting .30 caliber. That would be killer (as in slang) in .30 caliber and lever action. Imagine popping off ten 100 fpe shots as fast as you can bump the lever.
Heck maybe even the .177 and .22 caliber lever action guns would be cool.
Hmm. Only .22 and .25 caliber is available.
I could live with the .25 caliber. And another one of that airgun brand that I like. I keep wanting their air shot gun. And now this.
GF1,
They have some pretty heavy .25 pellets right now and this has enough power to get them down range. I also suspect that the barrel will be pretty easy to change out also.
RR
Maybe so about the barrel. But then the probe would be the next problem.
Anyway would like a .25 caliber version of the gun.
GF1,
Aah, well, I was thinking of a .25 polygon LW barrel.
RR
The LW barrel would be worth a try I suppose.
B.B.
I’ve seen one with large wing nuts. First person to unscrew the wing nut wins.
The repeating PCP guys have an unfair advantage. Lots of fun nun the less…
-Y
Yogi,
OOOOH! Like that idea!!
hmmm, could add a piece of pipe to move a lever and drop a flag after so many hits (sorry, the “designer” in me sneaking out again LOL!)
Hank
Yogi,
There used to be a spinner target that moved back and forth on a threaded rod.
RR,
Coduece was working on a horizontal model as I recall that did just that. .22 rimfire capable as I recall.
Chris
Yogi
Now I like that idea.
Put a double nut at the top of the threaded rod for a stop. Then race back down once it hits the double nut stop on the top.
And heck you could make the threaded rod 6″ tall or a foot and a half tall. I do like that idea alot. And really you could make one 2 or 3 foot tall for those people that have those semi-auto pcp’s. 🙂
A nice simple but effective design. That’s what I’m talking about.
BB;
Based on your photos and videos, it would appear that your dear old fence has suffered much abuse as a “backstop”???? Or am I looking at knots in the wood? Now the fence has some real character [;-).
Bob in Texas
Bob,
I think those must be knots because I have never shot at this section of fence before. And this fence is only 3 years old.
B.B.
B.B. and readership,
Public Service Announcement:
Be careful of what you take digital photographs of!
https://www.thefirearmblog.com/blog/2019/10/22/google-firearm-serial-numbers/
A sobering article on who Big Brother might actually be!
shootski
Shootski
And your just now worrying about big brother.
How about angling the spoon so the bb is deflected down to the ground? 45 degrees would send it straight down, but even less angle would probably be safer than 90. Some testing might be in order!
Well, one problem.. if the spoon is “angled down” when it is on one side of the tree, it is angled up on the other 😉 . If the spoon was stopped and forced back on the one side, then you might be onto something!
NTOG,
L stop on one side,…. a 90 degree V bend on the other side to provide some “spring back” energy,….. or something, sort-ish, kind-ish, thingy type doo-dad,…. thing,…… 🙁 You get the idea. Still wire only.
Chris
Also,
Tilt the pole forwards (towards the shooter). The weight of the spoon will hold it at down pressure. You would have to angle the spoon face to present vertical to the shooter,…. but still do-able. That said,… the spoon would face increased rotational pressure as it makes it way past the peak (most rearward) point of rotation,… which in theory would help to (not) bounce back. This would be a 2 sided target.
Chris
That’s the beauty of all this.. build it to how you’d like it to be! I mentioned, most of the time I see the bbs fly on past after hitting the spoon, and that’s plenty good enough for me. And we do love the flip as it clanks onto the other side. And you can’t duel on a one sided tree! 😉
As for forward tilt, my v2 tree does have adjustable forward tilt. It is more a factor of catching the spoon onto one side or the other, and only really comes to play when you overpower whatever drag you have. When I upped to 5 ft-lb, I had a choice of adding drag, or adding forward tilt. I opted for adding tilt, as it was quick and easy. The spoon would take the hit, flip over, lose some energy to the wire, and as long as it didn’t make it past the high point, settle down onto the new side.
I drew the inspiration for that from the “real” shooting tree I bought. It is a rimfire tree with really small (so much lighter) paddles. 2″, instead of 3.75″. That tree has a forward tilt built in.. about 30 degrees worth! I guess it serves to both encourage the lead splatter down and closer to the tree, and settle the paddle on the correct side.
Interestingly enough, I’m in the process of working with the company who made that tree. We’re trying to figure out how large of a paddle we can make that’ll turn for about 18 ft-lb, and still be able to handle upwards of 50 ft-lb. They figured I can’t be the only air gun shooter with mid to higher powered 22s that would like to shoot a dueling tree. It is great fun when you have two people, but almost as much fun as just another action target. And, 50 ft-lb seems to cover many 25s too. We will see how that all goes… I know they’re hoping to have something to market for the Christmas buying season.
JDB NY,
I read your comment and those who responded to you. I will give this some consideration.
B.B.