by Tom Gaylord
Writing as B.B. Pelletier

Michael’s Winchester 427 is a Diana model 27 by another name. The rifle pictured is my Hy Score 807/Diana 27.
Part 1
Part 2
Part 3
Part 4
Part 5
Part 6
This report covers:
- New breech seal
- The breech test
- Second tune with a new piston seal
- The hand test
- No relief
- Rear sight was fooled with
- Too much air escapes the compression chamber
- Where we are
- Summary
This is the report about tuning reader Michael’s Winchester 427, which we know is a Diana 27. It’s a .22 caliber breakbarrel air rifle.
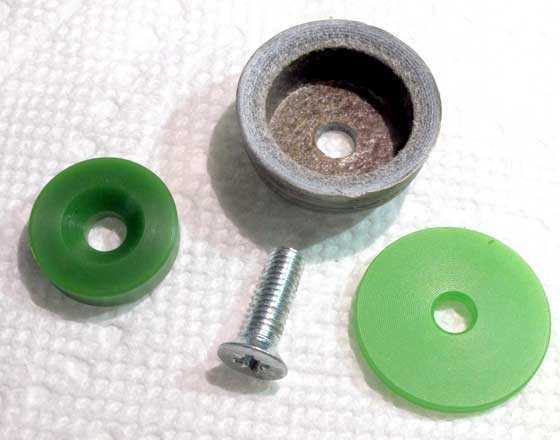
New breech seal
I completed the tune in Part 6 and then started shooting the rifle to burn off the excess oil from the piston seal pre-lube. I expected one or two explosions after the tune, but the rifle never stopped detonating. It was constant. Something was wrong.
The breech test
The rifle acted like it was leaking air at the breech. There is a way to determine whether the breech seal leaks. Put something light, like tissue paper, over the breech and see if it gets blown off by escaping air. I did that and the paper stayed in place when the rifle fired. So the breech seemed to be okay.
I let the rifle rest for days at a time, hoping the issue would resolve itself. But then when I came back to it, It still detonated. I didn’t want to continue shooting it, as that would serve no useful purpose, so I set it aside again. Then came the SHOT Show and I was gone for a week, but just to make certain I had what I needed, I ordered some parts from Chambers before I left.
Second tune with a new piston seal
After returning from SHOT the rifle still detonated, so I reckoned there was still too much oil in the new piston seal. So on Thursday of last week I disassembled the rifle again and dried out all the oil from the compression chamber. Then I removed that oily seal and replaced it with another new seal that wasn’t oiled.

I installed this new piston seal assembly, thinking the other one was over-saturated with oil.
I assembled the rifle and then oiled the new seal through the air transfer port with just a few drops of oil. I wanted it to be lubricated but not saturated. But, even after this the rifle still detonated.
The hand test
On Friday, when the rifle was still detonating, I got frustrated and put my hand over the breech to feel for air. The air blast was so powerful that it was painful, which surprised me, as I hadn’t sensed it in the earlier test.
At first I thought that my breech seal might not have been working well enough, so I installed a new synthetic breech seal from Chambers. It had arrived when I returned home from the SHOT Show, and I installed it now. But for some reason the rifle was still detonating. That was when I put my hand over the breech in frustration and felt the powerful air blast.
No relief
I tried heavier pellets, lighter pellets, silicone chamber oil and nothing worked to stop the detonations. However, by putting in the silicone oil I caught a break. When I fired the rifle last Saturday morning I saw a spray of oil blowing out of the rear screw hole for the rear sight. I examined it more closely and, sure enough, the hole for the rear screw is drilled all the way through and into the bore! I shined a light into the breech and could see light coming through that rear screw hole.
When I did the hand test there was something I hadn’t taken into account. My hand, being larger than the tissue paper, had also covered the screw hole for the rear sight. That was where the air was coming from.
Upon seeing the light coming through the screw hole from the bore I now knew what was wrong. Someone has deliberately messed with this rear sight!
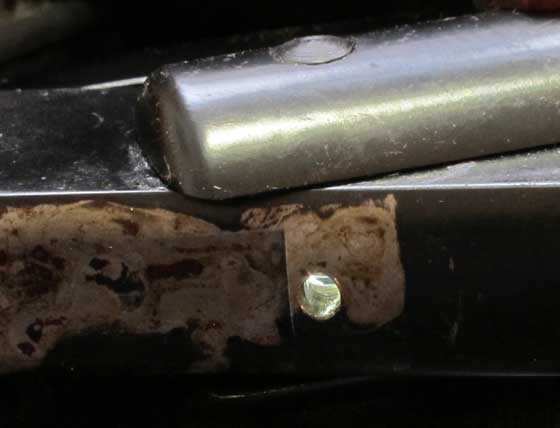
The rear sight rear mounting screw hole has been drilled all the way through and into the barrel. There are no threads in the hole anymore! This wasn’t done by the factory.
Rear sight was fooled with
When I first disassembled the rifle back in December I had noticed that the rear sight was missing its rear mounting screw and the horizontal adjustment screw had also been fooled with. When I removed the sight from the rifle I noticed there was epoxy on the bottom of the sight base and the bluing had come off the place on the base block where the sight attaches.
Traces of epoxy on the bottom of the rear sight base, coupled with the hole in the bore tells me someone has been fooling with this sight.

The place where the rear sight sits on the rifle has had its bluing burned off. This looks like a reaction with the epoxy rather than a deliberate thing.
Now everything came together for me. Someone has taken the rear sight off the rifle and, for some reason, drilled the rear screw hole deeper, breaking into the bore. Then, to fix the mistake, they tried to epoxy the rear sight back on the rifle. That won’t work.
Too much air escapes the compression chamber
With this hole in the barrel, too much compressed air escapes the compression chamber, and it escapes too fast. The piston is not slowed down by the cushion of pressurized air, because that cushion never forms. This rifle will never stop detonating until that hole is plugged.
That brings the project to a standstill. Getting to this point has taken me two full days of work.
Where we are
Michael’s rifle has now been tuned and the tune feels good when the rifle doesn’t detonate. I was able to plug to hole temporarily to test it. The trigger is adjusted nicely and I am ready to get on with the rest of the testing, once Michael decides how he wants me to proceed.
Summary
Don’t be discouraged by this turn of events. When everything is completed it will serve to demonstrate that, in almost every instance, a vintage air rifle can be repaired.

B.B.,
If you fill the hole with a fitted rod of some sort, might the rough spot in the bore and no doubt permanently damaged rifling affect the accuracy of the air rifle?
This 427/27, which now has from you and from me over $400 into it, will never have even a dollar’s worth of value as a vintage air rifle, but perhaps it can be a shooter if with the hole temporarily sealed it is accurate. If it is not accurate, however, it could be converted into a flintlock. It already has a touch hole! And we know it likes to detonate. Perhaps I could hire whoever messed up the rear sight to epoxy the flash pan into place. ;^(
Can you test it for ten meter accuracy without putting more work and/or money into it?
Thank you so very much once again for trying to fix this basket case. I’m sorry you had so much trouble with it.
Michael
I can’t imagine that this would completely destroy the gun’s vintage value, especially if it can be made to shoot well again. And it seems to me that it can… the air leak itself is easy enough to plug, and I imagine that the hole in the bore can be checked for burs easily enough, especially since it’s close to the breech.
Vince,
That’s my feeling, as well. This will be a good shooter once I plug that hole. And shooting is what a Diana 27 is all about.
B.B.
Hi BB, I have a real basic question. Nothing to do with Michael’s Diana or the SHOT Show. You occasionally point out that a rifle comes with sling swivels. Great. You can keep your hands free while carrying the rifle from Point A to Point B. My question is, does the sling help with Point C? Does a rifle sling help me hit my target?
Dave
Dave,
The hasty sling technique is easy to do and does steady my shots with the two air rifles I gave with slings. I have found images of a simpler technique called a hasty sling, but the below is what my dad taught me, and he called it a hasty sling.
https://www.americanrifleman.org/articles/2014/10/16/the-only-way-to-sling/
Michael
Michael,
That’s a real interesting article. It’s going to take some unpacking for me to figure out how rig an air rifle for an aiming sling.. I’m in the target shooter group. The difference between one and two seconds deployment time probably won’t ever matter to me. Hope not, anyway.
Thanks for the reference.
And I hope BB figures out how to heal that wound in your rifle’s barrel.
Dave
Dave
I don’t use a sling.
I tuck both elbows into my rib cage. I don’t hold my off hand out forward on the stock. It’s actually be very steady. And I place my foot (the foot that is on the same side as your off hand forward). Trigger hand foot behind. And point your off hand foot towards your target.
I have shot that way off handed since I was a kid and works good. Well for me anyway.
Michael and you other potential sling users,
First let me say I think that your rifle will probably not shoot worse, once B.B. is done with repairs, as a result of the cosmetic fixes that were performed on it to get the internet sale! The sad old girl really was “Bubba’d” badly!
As far as the sling link: Jeff Cooper needs to learn a bit more about BIATHLON! It may just be how long ago he did his research…the large bore (.308) rifles required much larger ranges and way more expensive target systems. The ranges were also far more difficult to operate safely!
Here is a BIATHLON type sling I use for practical snowski hunting:
https://www.triadtactical.com/TAB-Gear-Biathalon-Sling.html
The real BIATHLON sport sling is much different:
My favorite source for all things BIATHLON:
http://www.altiusguns.com/product.php?product_id=21125
For our readers in Canada:
http://www.nordicmarksman.com/Slings.html
Finally the best all around rifle slings are from this company and I own a few with lots of accessories for attachment: https://www.armageddongear.com/gallery
If you have time check out their videos they are a hoot!
Hopefully some of these ideas will get SOME of you to rethink your conception of what slings can do for your shooting and hunt outings.
shootski
Dave,
That article’s author claims a sling anchored to the butt end is not useful, but I feel it helps steady a shot, too. (Not a photo of me.)
Michael
D’Oh! Here’s the photo not of me.
shooting standing free hand is a waste of ammo in a high power rifle and ammo is expensive. I got pretty good with it in the early 90’s with my M1A and $3.95 a box norinco 308 that shot 3″ at 200 yds.
Dave,
If the air rifle is not a sproinger it can help.
Hi Dave,
I’m a strong believer in slings and feel that they do contribute to accurate off-hand shooting.
I thought that I would chime-in with the way that I attach and use slings on my hunting/plinking rifles in the hopes of getting some feed-back and comments from the reader community.
I use a simple sling and can go from carrying to shooting position in under a second. The simple sling is not as stable as the approach detailed in Michael’s link but it is a heck of a lot better than nothing.
I attach the sling to the left SIDE of the stock and carry the rifle muzzle down over my left shoulder (I’m right-handed) with my left hand on the forearm. In the shooting position, the sling (attached to the side of the butt) goes across my chest, around my left elbow to the forearm.
Attaching to the side of the rifle instead of the bottom and carrying it muzzle down allows the rifle to lie comfortably against my side close to my body where my left elbow covers the trigger and keeps the rifle from flopping around. I hold the forearm with my left hand (with the sling on the outside of my elbow) so I can easily control the muzzle as I walk through the bush. The sling length is adjusted such that when the rifle is in the shooting position moving my left elbow (slightly) will loosen or tighten the sling across my chest creating a stable “triangle” without having to tense up. Left to right and up and down aiming is (always) done by pivoting at the waist.
Going from a carrying to shooting position is done with the left hand; the muzzle is swept to the right and up keeping tension on the sling, the sling slips across my chest and along my left arm as the butt is guided to my right shoulder (by the sling) all in one smooth motion. My right hand goes to the grip and my left elbow moves away from my body to tighten the sling.
With a bit of practice, aiming, stepping into a shooting stance, mounting the rifle and shooting all happen very fast.
Hope this helps.
Hank
Hank,
That is an awful nice looking sling attachment you made there. Is the front a “standard” swivel stud?
That would also be a nice arrangement for a sproinger as long as you did not use the sling for bracing.
RR,
Yup, standard sling swivel on the front.
The back mount is some 1/8″ 6061-T6 aluminum. Doesn’t show well but the sling mounting “ear” is bent forward about 15 degrees so it doesn’t poke into the chest.
I’ve used this type of sling arrangement on sproingers without problem – the front sling is very close to (usually touching) the left hand so the there isn’t much leverage to pull on the side of the forearm. Most of the tension is across the chest which keeps the butt firmly against the shoulder.
On rifles (PCPs and sproingers) with little wood in the forearm to hold a woodscrew, I use a modified (filed and bent to suit) T-nut epoxied in place and mount the swivel with a machine screw and lockwasher.
Been using this arrangement for decades.
Hank
Hank,
My brain is in SLOW mode today.
I just went back and re-read the comments to today’s blog.
That’s a beautiful job on the sling mounts!
take care,
dave
P.S. It’s not here yet, but I run out to the mailbox faithfully every day…hoping to see it. =>
Wow, guys, lots to read, think about, spend money on, and try to do!
Gunfun1, that’s how I shoot too. I don’t remember where I got the idea originally, to tuck in like that, but when I have to shoot a rifle standing up, that’s how I do it.
Shootski, I’ll be spending a lot of time on those links. Biathlon technique looks useful.
RR, I can see how the “stable triangle” idea might conflict with the artillery hold. Hmm..
Hank, that’s a beautiful sling installation. I’ll try it on something that I won’t screw up with sloppy woodworking. I’m thinking a plastic multipump.
Thanks, folks!
Dave
Dave
Yep it’s surprising how stable it makes you.
I just got that Hatsan Bullmaster awhile back. It’s my first bullpup. That hold works real well with it too.
And I always thought it funny when I see a person shooting off hand and has his trigger elbow pointing to the horizon. Then their off hand is out in space trying to support the whole gun. You can watch them do the figure 8 when they are trying to shoot. Don’t see how that’s any good.
I’ll stick to the way we do the hold. Works good for me.
B.B.,
Interesting. Depending on the total depth (meat) of the hole,… drill and tap. Very short set screw first, lock tight and then a longer screw for mounting the sight. Creating a hard to remove burr inside the barrel might be a concern though.
Good Day to you and to all,……. Chris
Chris
I was thinking the same thing. Drill and tap it.
And I’m not sure what to think about accuracy. Maybe it will affect it, maybe not. I think BB should just shoot it after he plugs the hole permanently and see what the accuracy is like.
And on another note. I would think you could just replace the barrel if another one could be found.
BB,
It seems the general consensus is to drill and tap the hole. Chris expresses concern for creating a burr in the bore. Would it have to be “drilled and tapped” all the way through?
RR,
I believe I can tap the hole and install a short screw so there is little disturbance with the bore. I think the accuracy will not be affected.
B.B.
BB,
That was my thought. The small cavity that is left should not affect things unless there is already a burr or such protruding into the bore.
B.B.
If there is a burr from the hole it is close enough to the breach end of barrel that it could be cleaned up with a pin file.
Gerald
Gerald
Good point about it being close to the breech.
And even if the hole was farther down the bore. A peice of sand paper could be glued to a wooden rod to deburr the hole. We do something similar at work on production parts that need reworked.
using a .25 dia. Delrin rod turn down to .218 to .22 (snug fit in bore), cut to 1/4 inch long, tap into bore to cover hole, fill screw hole with JB weld, use tooth pick to make sure no air pockets, allow to cure and drill and tap for correct screw size, use loc-tite on screws and install sight, do not over tighten rear screw, tap out plug and inspect for burr cuts, if none then ready to go, if burr is present then carefully with 3/16 inch fine chain saw sharpening stone and Dremel tool remove burr trying not to damage rifling…should now have smooth bore and peace of mind…
Mike,
Simpler still is to drive a solid .22 caliber “pellet” up the bore til it blocks the hole and then do the other stuff.
B.B.
I suspect that a JB-repaired threaded hole might not have the strength or reliability one would want for a repair like this.
I would think that a preferable repair would be either soldering in a plug or threading for an insert – either of which could be drilled and tapped for the original rear sight screw.
Also: if deburring is needed, would a fine grit diamond ball be better for that? Since the abrasive part is much shorter, might be less risky to the bore…
B.B.,
Please do what you think is best and repair the hole. Gerald made a good point about smoothing any burrs with a pin file. Is the hole close enough to the breech that you can see it, helped by reversing the light position you used to take photo number three.
That same photo shows just how close that hole is to the pivot bolt shaft. The idiot who tried to destroy the rifle did miss the pivot bolt, correct? I forget, is there a lock screw adjacent to the pivot?
Why someone would destroy a vintage German air rifle is beyond me. And epoxying a sight? Ugh.
Michael
Michael,
The hole only goes through one side of the barrel. The pivot bolt is far from it and has not been affected.
Why was this done? I don’t know. Maybe he lost the rear sight screw and was trying to drill and tap for a larger one. But plug taps are available that don’t need to go through all the material, so drilling through wasn’t necessary.
I’m surprised that many commenters have mentioned drilling all the way through the hole to tap it. I don’t intend doing that — just deep enough to be able to plug it with a new screw. And I’m only doing that so the rear sight can be remounted.
If it was my gun I would just plug the hole with Plastic Steel and use a peep sight like I mentioned in my email. That is the easiest way to proceed and the hole would be completely sealed against air loss. Of course the new screw I fit will also plug the hole very well.
B.B.
BB
I wouldn’t tap all the way through.
And use a flat bottom tap so you can get more threads before you contact the bore area.
I’m guessing there is not much material from the outside of the barrel to the inside bore diameter. And tapping into a round diameter reduces the effective threads you have. I’m betting if your lucky 3 threads. Which is probably ok for plugging in this instance. But at the limit for holding if attaching something.
And yes if it was me I would plug the hole with a set screw after doing what was just described.
The gun does have a dovetail right. If so you got some sighting options for the gun. Maybe it won’t have the original rear sight but a peep or dot or scope would be perfectly acceptable.
Don’t you think? Or should I say don’t you think Michael?
“Of course the new screw I fit will also plug the hole very well.”
B.B., I’m sure it will, and all I can add is this series has been a real education; thank you!
BB
Just take it to a machine shop. They will perform all the operations easily. I know,so because I worked as a manual machinist for a few years. It will be as good as new. FYI, there is a tool specifically made to deburr inside holes.
Greg,
That’s not a bad idea. But I have to match the threaded hole with the right size screw that has the right shape head. The head also has to be sized to fit into the rear sight — in a hole that’s small. I think I woulds rather do the work myself, to control the outcome.
B.B.
Do you have a Mill and Lathe ? You need a Mill to drill and tap perfectly. The screw can be made to fit easily.
B.B.,
Please consider taking this 27 to a machine shop that has a complete set up with mills, lathes, presses, etc. They are reasonable in cost and incredibly precise in outcome. This is what a competent smith would do.
I’d respectfully suggest that you and Michael ignore the original bores for the rear sight, have them both plugged professionally, pay to have the rear sight bore hole professionally deburred after plugging and redrill and retapp new bore holes for the rear sight as close to the factory sight holes as the machinest suggests.
Respectfully,
kevin
ps-hope all is well with you my friend
Kevin,
All is well with me. How about you? I pray for you every day.
I will consider your request.
B.B.
B.B.,
Greatly appreciate your prayers! I’m beating the odds just like you.
kevin
Greg I agree to with you and Kevin.
I been a machinist for close to 35 years now. And yep that would be a very simple fix.
Sometimes its easier in the long run to pay someone that does the type of work then trying to do it yourself.
Sometimes that just causes more problems.
Hi! I know this is off topic, but I didn’t know where to ask this. I want to make a plunger gun. What would be the right amount of psi to shoot a plunger in order to get the plunger to stick to the wall? How big does the air chamber needs to be for this project?
Thank you so much and sorry for the off topic.
GaboRG,
Welcome to the blog.
It takes surprisingly little velocity to make what Americans call a dart (with a suction cup head) to stick to a flay surface. 40 f.p.s. should do it.
B.B.
GaboRG and B.B.,
As I began to read the question, I thought you meant building an airgun that uses a toilet plunger (the language used in the United States) to build up pressure in a compression tube to shoot some other typed of projectile.
I had no clue you meant small rubber suction cop tipped “darts.” You might first try a drinking straw with is close to the right diameter and blow through it to propel the plunger. I’ll bet that alone would provide surprisingly good results.
Michael
B.B.
“I let the rifle rest for days at a time, hoping the issue would resolve itself.”
Never happens, LOL.
First car accident I ever had, I checked it the next day hoping that it would fix itself, nah never did…
-Y
Yogi,
Yeah, but infinite typewriters and monkeys can write Shakespeare — right? 😉
B.B.