by Tom Gaylord
Writing as B.B. Pelletier
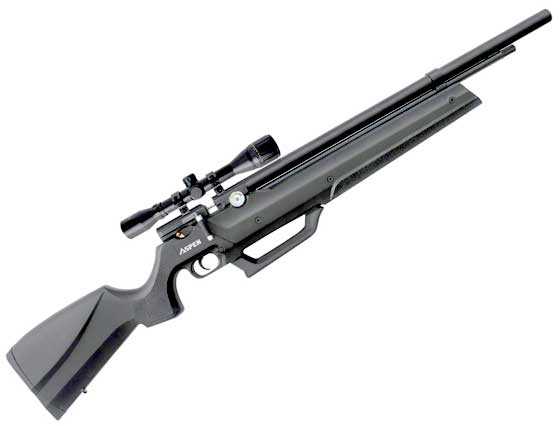
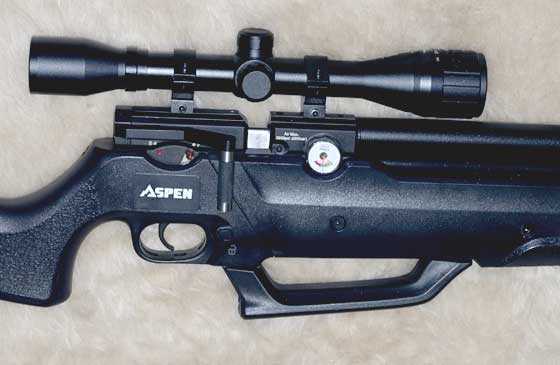
The Air Venturi Seneca Aspen precharged pneumatic air rifle.
This report covers:
- Not the accuracy test
- Man plans…
- Testing as a PCP
- Filling
- Mounting the scope
- Sight-in
- Back to 10 meters
- Back to 25 yards
- Scope adjustments
- My test plan
- First group of five
- Shots 6 through 10
- Second group
- Third group
- Discussion
- Summary
Get ready to learn something, kids, because school is in session!
Not the accuracy test
Today would normally be the start of the accuracy test for a normal PCP air rifle, but the Air Venturi Seneca Aspen PCP is anything but normal! I did shoot a lot of targets today, but there aren’t going to be any dimes in the pictures. I was just trying to figure this rifle out!
Man plans…
I figured I would mount the 4X32 AO scope that comes bundled with the rifle and at least start to shoot for accuracy. Well, there is a saying about thoughts like that. Man plans and God laughs! If you don’t believe it, read the book of Ecclesiastes. It was written by King Solomon, who was the wisest man ever to have lived. Near the end of his life he figured out the meaning of life and boiled it down to just that. Oh, he didn’t say it that way — he was more reverent and polite about it, but in chapter 12, verses 12 through 14, he pretty much sums it up that way.
Testing as a PCP
Although the Aspen is a PCP, I have never tested it that way. It also has a built-in air pump and when I tested the .22 I always pumped it, because I learned it liked much lower air pressures than the reservoir was built to contain. So, I thought, why not just pump it and I can be the regulator? It worked like a charm, if you can recall those tests.
But we learned in Part 2 while testing the velocity of this .25 that it likes much higher pressures. So, this was the perfect time, I thought, to fill the rifle from a tank and use it as a PCP. My plan was to sight in and then shoot some groups at 25 yards to discover the best pellets and also whether high or low power was best. And, that was when the laughter started!
Filling
I connected the fill probe to the rifle and filled to 3600 psi/250 bar. Let me warn you — the reservoir fills very fast. Go easy on the air tank knob until you learn the rifle or you will have to bleed it down. It may be capable of shooting at higher pressures, but it may not want to. In fact — it doesn’t.
Mounting the scope
The next step after filling was to mount the scope. As long as the rifle comes with a scope, I at least need to try it. The two-piece rings have two-screw caps so there is no trick to tightening them. I did shim under the rear of the scope with one thickness of credit card simply because 75 percent of the air rifles and firearms I have ever scoped need some kind of downward slant. If you put a shim in and they don’t need it you do no harm — you just get a little more elevation adjustment. If you need it and don’t have it you have to remount the scope.

I mounted the 4X32 AO scope that comes with the Aspen in the rings that are also bundled.
Sight-in
I decided to use the single shot tray today. That allows me to switch pellets at will, although the need for that never arose because this is where things got strange. All testing today was done with the Benjamin dome. I always start by sighting in at 10-12 feet from the target. That eliminates any surprises later on.
I began shooting on low power. The thought was I would then switch to high power when all the pellets had been tested on low, but the laughter started to increase. You’ll see why in a bit.
The first shot (shot 1) hit below the target paper, but at 12 feet you expect it to be low. In fact, it would be at least as far below the aimpoint as the center of the bore is below the sight plane (the center of the objective lens). My first shot was just a little below that and a little to the right. Thank goodness for the shim!
Back to 10 meters
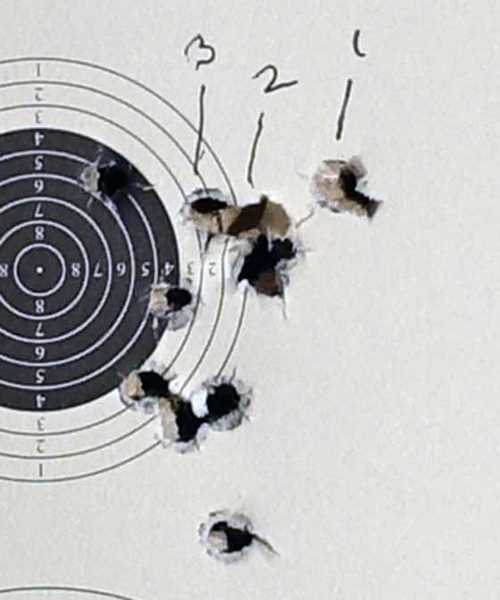
A second shot (shot 2) hit very close by, so I raised the scope several clicks and also dialed in some left adjustment. The third shot (shot 3) hit a little higher and over to the left. It wasn’t quite centered but was close. Close enough that I backed up to 10 meters and fired again. This shot (shot 4) was higher but still not high enough. It was also over to the right again, so I increased the elevation and dialed in a lot of left adjustment. The final shot at 10 meters (shot 5) was at the bottom of the target, but too far to the left. I then adjusted the scope way up and way back to the right. At this point I felt comfortable to move back to 25 yards.
Back to 25 yards
When you move from 10 meters to 25 yards your impact point will rise without adjusting the scope 95 percent of the time. At least mine does. It rises by an inch, so I factor for that when sighting-in.
The first shot from 25 yards (shot 6) hit just outside the black at 1:30 position. Now I was at 25 yards, so the adjustment clicks move the impact more. Each click is 1/4-inch at 100 yards, so 4 clicks are 1/4-inch at 25 yards. I dropped 4 clicks and went left 4 clicks, which should have put the impact into the upper right quadrant of the black, but instead, shots 7 and 8 were very close to the center of the bull. In retrospect I should have fired another shot, but these two were stacked so I felt I could begin shooting a group. Ha!

Here is the sight-in target described in the text above.
Scope adjustments
I will mention here than the scope adjustments seemed to move the impact point of the pellet exactly as they should. There was no stiction of the reticle remaining in any place after it was adjusted.
My test plan
I thought I would shoot pellets until the rifle started dropping them below the aimpoint, which opens the group. Of course I will do this on both power settings with all pellets, so there is a lot of shooting to be done. I will take a picture of the group after every 5 shots.
Let’s see, I’m shooting on low power and I have already shot 8 shots on the fill. The tank still reads about 2900 psi, which should be good enough for some more shooting, so I continued, hoping I was right about the pressure.

After sight-in that was 8 shots the Aspen’s pressure gauge looked like this. I read it as 2900 psi.
First group of five
And I watched the first shot curve through the scope and land almost two inches to the left and above the center of the bullseye! Okay, I’m here to learn about the rifle. Let’s keep shooting.
Shot number two hits to the left of the first shot. See? I was right! The shots are walking to the left and towards what I thought was the aimpoint. Shot three hits a little to the left of shot two and now there is a line of three holes that is walking down and to the left — towards the center of the bull. Oh, what a smart boy am I!

I marked shots 1 through 3 in this group of 5, so you could see how they walked toward what I thought was the established impact point. Shots 4 and 5 didn’t bear that out.
Okay, so maybe I wasn’t right about where the point of impact was after all. Or maybe the rifle wants the pressure to go even lower? So back to the bench I went and continued shooting at this same target. Surely this time the shots will walk into the center of the bull.
Shots 6 through 10
This time I just shot and didn’t pay any attention to where the pellets were hitting. Unfortunately I could see all of them through the 4-power scope, which is my way of telling you that, besides the adjustments working well, this little scope is also pretty clear. But, darn it, the shots just weren’t going where they were supposed to!
There are the five new holes and I don’t know what to tell you about them, except they aren’t where they are supposed to be! I saw none of them in flight.
Second group
The gun is still reading in the mid-2500s, so I continued shooting. I adjusted the scope to the left a couple clicks but left the elevation alone. The first five pellets are closer to the center of the target, but they are also a little lower.

The group has moved left, but the shots are starting to fall lower. I want to shoot 5 more to see where they go.
I shot the next group of five and didn’t see the group grow much, except for a flier that went low and right.

The second five pellets did not continue to fall like I thought they would, but one veered off low and right. The others are actually as high as the first 5.
Okay, the rifle isn’t doing what I thought it would. But one thing is certain at this point — it’s out of air. It has to be because the gauge shows 2100 psi and in Part 2 we saw it drop from 2000 psi pretty rapidly. There is not enough air left for another 10 shots, so it’s time to fill her up again. I filled to 3000 psi, because I thought that would give me the most consistent shots.

After the sight-in that was 8 shots plus the 20 shots I just fired for record, the Aspen’s pressure gauge looked like this. I read it as 2100 psi.

I filled the rifle to 3000 psi.
Third group
I left the scope where it was and tried my best to shoot the best group I could this time. The first shot went to the same place the rifle had been hitting. Then shot two dropped about one inch. WHAAAAT??? Had the pellet hit the muzzle cap on its way out? Is the Benjamin dome not the right pellet for the Aspen? I completed the group with the same care as the first two shots and got a reasonable group — except for the one flier.

After filling to 3,000 psi again, here are the first 5 shots. Shot two is the low hole. I could live with that upper group.
Okay, I have a good group of 4 and one flier. What’s going to happen with the next five shots? Actually, the group did grow, but not by as much as I expected. Have I gotten a hand on the Aspen .25 shooting the Benjamin dome on low power?

The pellets stayed together this time.
Discussion
I know the pictures are fuzzy today. I had to enlarge them too much for this article. But they do show the progression of my work — which took a LOT LONGER than I thought! Remember, this isn’t the accuracy test. It’s B.B. Pelletier learning how the .25 caliber Aspen likes to shoot.
I can hear someone right now, “BB, are you sure the Benjamin dome is the most accurate pellet for this rifle?”
No, I am NOT sure. In fact, I have no idea. It might be the worst pellet. I had to start somewhere and after I got into everything you have just read I sure did not want to add another variable to the mix.
I wanted to shoot other pellets today. I also wanted to shoot on high power. But until I knew something about how this gun prefers to operate, anything else I did would be suspect. At this point I think I have established that this Aspen wants to shoot at 3,000 psi or slightly less when it is set on low power. I need to confirm that with other pellets, but given what I do know, that test should go faster and smoother.
I am curious as I can be about how it does on high power. I hope to get to that real soon.
I know that I will test this .25 Aspen as a PCP, rather than as a multi-pump. Too much work is required to operate this one for me to be pumping all the time. That doesn’t mean it doesn’t work well as a multi-pump. Hunters should find it especially useful that way.
You guys also want me to tweak the power adjustment (the screw in the back of the action). Most of you just want to know how powerful it can be. I will go there once I know the gun better.
Summary
I always say that a rifle with many adjustments presents an infinite list of possibilities. The Seneca Aspen is one such air rifle. I can never test everything, so my goal is to demonstrate its potential in a useful way so those who are interested can make a good decision.

That’s wonky. Bad scope, Manometer, and clipping pellets? Hopefully you sort it out, my Aspen shows up Friday.
B.B.,
Best wishes getting it sorted. Some semblance of accuracy, predictability and positive correlation of adjustments to results is required to at least get started. I would try JSB 25.39 or 33.95’s and do the shoot down again. If the scope is at all suspect, go with a known performer.
Good Day to you and to all,…… Chris
BB
I would change the scope before using another type of pellet to verify it may be the problem or not. If it is, the combination scope package really ought to be changed.
But then again simply using a different pellet that performs better could verify it’s good. I’m leaning to a bad scope.
BB,
You mentioned in an earlier instalment of this breathtaking story that the rifle needed some more oil as the pump was dry. Could it be that there is a little excess oil seeping into the barrel?
I see this behaviour quite often when I shoot a repaired gun. The last one was a Diana 6 which was a little over oiled. It took that one around 20 to 50 shots for really calming down and behave.
Regards,
August
August,
Thank you for that suggestion. I really felt good about this test, but there is so much more to do. I will consider the oil thing.
B.B.
B.B.
This report begs the question, “What is the point of a .25 air rifle”?????
.22 is more than enough for me.
-Y
PS maybe I should have phased it as, is air the right propellant for such large calibers?
Will the gun be offered in .30 calibers as well?
Yogi,
I doubt it, but I have no idea.
B.B.
Yogi,
I get that a, “.22 is more than enough for me.”
What I don’t get is your questioning of larger caliber propelled by air?
I’m not certain if that is based on your personal needs or if you think anything larger should be in the realm of firearms. I have .25, .308, .458 and .58 caliber air propelled guns that can all reach out well past 100 meters effectively; for target shooting and hunting effectively.
Some further enlightenment is called for with regard to your stated position.
shootski
Well shootski,
The gun shoots great in .22. It shoots like horse manure in .25. Enough said!
-Y
-Y,
Time will tell if this gun has anything to bring in the way of accuracy.
Your position on this issue is as clear as a bell!
thanks,
shootski
We have started installing the Daisy 499B abutment, piston and shot tube into the 1938B Red Rider. Remove the 1938B shot tune, install the abutment from a 499B in its place, remove the original 1938B piston and replace it with a 499B piston, remove the loading door and screw the 499B shot tube assembly into the 1938B barrel shroud and for a $17.00 investment you have a Red Ryder that is every bit as accurate as a 499B with the only handicap being the open sights. That’s easy enough to take care of by mounting an optic on one of the scope mounts available from Pyramyd AIR. Muzzke velocity with the 1938B spring will be around 400 fps give or take, and if that’s too much or for shooting indoors, etc. simply replace he 1938B spring with a new $2.00 499B spring and you’ll be right around 240 fps- same as a 499B.
The exact same modifications work in any of the current production Daisys that use the plastic trigger module- models 1938B Red Ryder, 1998 “Pink Ryder”, 105B Buck, model 10 “Mini Ryder” to name the ones I’m familiar with. The model 25 still uses the old style abutment so I haven’t tried to use the 499 parts in it.
The shot tube of a 499 is just 9″ long so no reason a pistol couldn’t be made, with the potential accuracy of the 499.
Had a friend do a stock for one of my Red Ryders, it’s shown below. He works in maple. He’s already working on one for my 499B and has just finished a couple for the 1894.
Cobalt327,
Wouldn’t that turn out to be a Mare’s Leg if anyone developed a pistolized Red Ryder? Then again if anybody is going to make one it would probably be you.
Siraniko
Siranico,
Around 1962 or so I made a Mares leg using the barrel from one of Daisy’s pistols. The barrel was about 3″ long. It was a fun plinker.
Cobalt,
That is a nice Red Ryder. A repeater with the accuracy of a 499 and 400 fps; what’s not to like. That stock makes it look like a high end gun.
Have you worked on the older Model H and 12. I am trying to get the plunger head apart on my Model H so I can replace the leather seal. I am thinking it was not made to be repaired unless the leather seal can be stretched over and into the notch on the plunger head.
I don’t know if any modern plunger heads will fit. Here is a picture.
Don
Sorry if I misrepresented the gun- it’s a single shot muzzle loader, same as a 499. Just a ton cheaper is all. Still working on a front sight to be able to use the rear open sight. It’s a work in progress.
Mare’s Legs are neat as heck but the BB pistol idea doesn’t need to use a RR for the beginning, I was thinking more of a fresh start on a pistol using the 499 shot tube. Building such a thing is way beyond my pay grade, though.
On the leather seal guns I’ve worked on, the center “button” was a press fit into the rear part of the piston/plunger head, however one wants to refer to it. Carefully levering it out using flat blade screwdrivers on each side did the trick. Might want to use a good penetrating fluid on it, I like how PB Blaster works but it’s pretty stinky so be aware of that. And good luck.
Cobalt,
Thanks for the reply. I did not read your description correctly. Still a nice gun.
I figured the center button was press fit but I have not had any luck getting it out. You can see where I have been prying on it. It has soaked in liquid wrench for a few days and I have heated it up with a torch. My last attempt was to drill and tap the center of the button and try to tighten a machine screw through the button against the main body. No luck the machine screw sheared off. I think a hundred years has welded it together.
I will keep working on it.
Thanks
Don
Benji-Don,
If you would supply me with the dimensions of the assembly and answer a few questions I believe I will be able to help you separate them.
Was the shank of the button hollow or solid?
What size and grade machine screw/bolt (including TPI) did you use?
Were you able to drill and tap COMPLETELY through the shank of the button?
Bugbuster
Bugbuster,
Thanks for the assistance. I don’t have internet out at my shop so I will have to get back to you later.
The shank of the button is solid.
I used a small metric screw I found in my stash. It was a low grade and sheared easily. I am going to try and extract it.
There was no indication of a gap between the base of the button and the plunger head when drilling. I went as far as I could leaving some metal between the bottom of the drill hole and the rivet hole in the plunger head. I used a flat head tap to cut the threads and then ground the tip of the machine screw down below the threads for about 3/16 inch.
Today I plan on making a small puller that will apply pressure while I heat the plunger head. Like a claw hammer I can drive into the notch under the button.
I will let you know how it goes later and provide dimensions.
Thanks
Don
Benji-Don,
If you have not already successfully removed the button with your new idea, I am relatively certain that mine will work with no damage to the plunger head. I just require the dimensions I requested earlier. Also, how deep did you drill the initial hole and what is the diameter of the rivet hole? Did you drill the hole on a lathe?
Bugbuster
Bugbuster,
My Idea did not work, I broke the top of the button off. Once that happened I went back to my original idea and drilled and tapped threads for a 5/16 x 24 screw and made a new button I can screw in. see picture below.
I wish I had a lathe but I don’t have a good place to keep one. All my work is by hand with a drill press. My holes are never perfectly centered. I figure with a leather seal it wont make any difference if the new part is a little off. For a synthetic seal it would make a big difference.
I would still like to hear about your idea. I also thought about stacking some washers over the button and against the plunger head and then use a screw to pull the button out.
For your info:
The plunger head shaft is 0.374 or 3/8 inches.
The plunger head face is from 0.758 to 0.763 probably 3/4 inches originally.
The button shaft is also as best I can measure 0.375 inches at least the shoulder below the face plate is.
I am guessing the button face plate was about 0.5 inches.
The rivet hole is about 5/32 inches.
My original drill hole was about 0.3 inches deep. Later I went deeper and did not measure it. My hole now is about .35 inches for the new machine screw.
I am now thinking my plunger head was a one piece part with the leather seal stretched over the button. That matches the parts diagrams I found for some of the older Daisies. I did not find a parts diagram for the Model H or the Model 12 B.B. is working on, So I don’t know for sure. I think if the button was separate they would have shown it in the parts diagram. A mystery.
Thanks
Don
Benji-Don,
I apologize for the late reply, a friend was helping me with some computer issues yesterday.
After studying both of your photos, it is difficult (for me) to believe that the part was one piece due to the absence of tool marks from facing/grooving or turning, especially the finish on the top face of the flange.
I would highly recommend glass bead blasting for cleaning parts. It will remove rust, corrosion and oxidation without damaging the base metal. If this had been done on this part initially, a careful examination of the corners of the seal groove would have given an indication of its construction. Regardless, your modification of the original assembly should work.
Lastly, my idea was similar to yours with the following differences. I would have drilled and tapped the button 1/4-28 to a suitable depth to get a minimum of .25″ full thread engagement and use a piece of grade 5 (minimum) or grade 8 (preferably) all-thread. Screw the all-thread fully into the button and use a suitably sized socket resting against the flange, then draw the button up into the socket with a nut resting on a couple of lubricated grade 8 flat washers. A needle or ball axial thrust bearing placed between the socket and nut would make this more efficient yet.
Will your new leather seal be merely a flat washer or cupped?
Good luck!
Bugbuster
Bugbuster,
Your method would work if anything would’ve. Good idea. I do some blasting at times but don’t keep it set up, not even sure where it is right now.
I expect B.B. has been following our discussion as he is doing the same on his Daisy Model 12. I am going to give a link to our discussion on today’s blog it may help.
I plan on a cupped leather seal. Not sure what the original was. The parts diagrams I have seen of the oldest Daisy rifles are so fuzzy I can’t tell. Because the button head was smaller than the plunger head diameter I think it should be cupped.
There are still quite a few things to work on before the gun is ready for assembly and I am converting our old kitchen into a bathroom so the gun is going to take awhile.
Thanks for your help.
Don
“I hope to get to that real soon” and God laughed.
I will say that all of the Aspen’s I have tested have preferred JSB. And from what I have been told, the factory even tests the guns with them….probably worth a re-try with some 25.4 grain Kings.
Tyler,
Oh I’m just getting started with this one. I have many more tests planned with other pellets. I just needed to find out how it worked.
B.B.
BB,
I’ve seen, when testing my guns from a vise in my basement, and from reading here for a few years now, I know that you and others have seen, as well, pellets that fly into odd shaped groups of 4 or 5 inches in relatively short distances from some guns. It seems to me that if you started with a large sheet of paper with a dot on it to aim at and just fired 5 shots at it, letting the pellets group in whatever area they chose, you could tell whether that would be a good pellet choice to base your scope adjustments on. I personally wouldn’t care to adjust the scope. I would just measure the groups wherever they landed, but I realize that you need them placed nearer to the aimpoint/target for your photos. It would take a little time and a few shots to do as I suggest, but it could also end up saving time if your arbitrary pellet choice was one of those that prints 4″ at 10 or 12 yards. You could chase that zero all day and end up incorrectly concluding that the scope was at fault.
When you get to the point in this report where you are firing at the max distance that you intend to shoot with the pellet that proves most accurate, would it be worthwhile to do a ten shot group firing the gun as a PCP from a fill pressure that will display vertical stringing and then fire another group from that pressure, but this time give it a few pumps between shots to demonstrate how effective the “human regulating” of the gun can be?
Under “Filling”, ” It may be capable of shooting at higher pressures, but it may not way to.” “want” to?
Half
Half,
Got it.
Thanks,
B.B.
BB
I have had pcp’s that do exactly what your saying. Impact changes in windage when pressure changes as your shooting.
It happens in Co2 guns too. But more so in pcp’s because of how much air they move for each shot.
What you will find is that a certain weight pellet will show the side shift more than others with fill pressure.
But once you shoot the gun enough you will see where minimum shift is for a given area of fill pressure.
And no it’s not because the scope is not mounted true to the barrel. The side shift happens at different distances in relation to sight in distance if it’s scope mounting.
I may be wrong in this case. But I definitely have seen all of above that I have mentioned.
B.B.,
TESTING, TESTING, TESTING! People either LOVE it or hate it or simply ignore it entirely.
I believe it is safe to say which camp you fall into Tom.
I looked at your groups as you presented them and think you have a valve issue! Of course it would be easier if I had been your Spotter for the testing since I would have noted each impact and other data points and you could just shoot. I will also repeat my request for:
If you have the time…
A string of 5 shots on target: on high (or LOW) power, same Benjamin pellet (ANY Pellet) at pressure 2,700psi maintained by pumping, please.
As far as testing FUN; the link below and the comments and rebuttels posted are very informative about scientic testing (and reader response) of recoil and recoil mitigation effects. For when you have the time and inclination!
https://www.thefirearmblog.com/blog/2019/02/12/tracking-free-recoil-and-recoil-mitigation-to-test-for-effects-on-velocity/
shootski
shootski,
I like that test. I’ll try to do it next time — 5 shots at 2700 psi maintained low power Benj. pellet.
B.B,.
B.B.,
Thanks Tom!
Hope it proves informative or highlights the rifles issue; if it has one!
shootski
Benji-Don,
Ran out of room.
What brand of drill press do you have. Have you ever checked the total indicated runout (TIR) with a dial indicator? Some of the Chinese manufactured presses can be pretty good and some horrible.
I have an old floor model Sears Craftsman, a Rockwell benchtop and a Chinese benchtop model which has a lot of runout (one of the horrible ones). The Rockwell, I rebuilt several years ago and replaced the chuck but I haven’t done anything with the Chinese one yet. I also have two metal lathes, an old Southbend belt drive and a Jet 1340GHE (13″ swing 40″ between centers)quick change.
The best part is that one of my best friends has a tool grinding business and we help each other out as needed. If I need something that I don’t have I can either borrow it from him or he can make anything I need. He also has a Van Norman vertical/horizontal milling machine which I can use anytime, unfortunately it is just not as handy as a Bridgeport since it doesn’t have a quill with power down feed.
What is the I.D. of the compression tube on your Daisy?
Bugbuster