by Tom Gaylord
Writing as B.B. Pelletier
Today’s report is Part 4 of reader Vana’s excellent report on stock making.
If you’d like to write a guest post for this blog, please email me.
And now, over to you, Hank.

This is my original 55 year old Slavia 618 in its new “firewood” stock. I made this one in a “camo” style, using cherry and maple blocks in a random arrangement of the pieces.
This report covers:
- The Firewood stock
- Why firewood?
- How do we do this?
- Some design considerations
- Is your wood dry enough?
- What if I want to start right now?
- Microwaving wood – how does it work?
- Art or science?
- Microwaving wood summarized
- Working with the blocks
- Summary
The Firewood stock
And now for something completely different – an additive construction stock made from firewood. I’ve made a couple of these and have been pleased with the results — there’s lots of artistic opportunity to make a stock that is special.
I’ve been experimenting with different wood finishes. Here I have used Howard Feed-N-Wax wood polish and conditioner and followed up with an application of paste wax. Howard’s is a blend of beeswax, carnauba wax and orange oil that penetrates well and leaves a nice matte finish.
Why firewood?

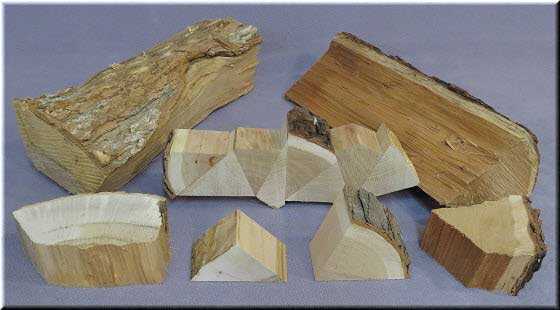
Firewood cut into slices and dressed into blocks for gluing.
Locally, a maple board large enough to make a stock (2 x 8 x 48 inches) is about $50.00. Firewood has a number of advantages over hardwood boards — it is readily available, inexpensive and comes in a size that can be managed with general shop tools. Even if you don’t have a fireplace, chances are that a friend or neighbor who does will gladly donate a couple of pieces just to see how your stock turns out.
How do we do this?

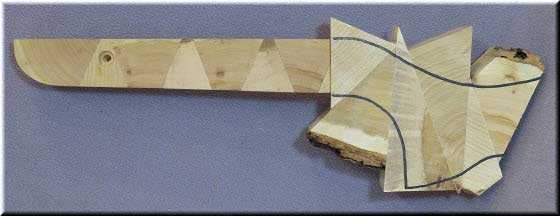
From chunks of firewood to a block of hardwood to a rifle forend – just add glue and remove the wood that is not needed.
Lumber is cut from a log by ripping with the grain; firewood is cut across the grain. For making a firewood stock, I continue to cut slices across the grain then cut them into suitable shapes.
To build the stock, I’ll place the blocks on the cardboard layout cutting the shapes as needed. Once I am satisfied with the arrangement I will number all the pieces and add alignment marks to use for reference when gluing. To speed the process, I’ll glue up adjacent pairs of blocks then glue those pairs together once the first joint has set.
Similar to the Try-Gun stock, I will glue up a block for the forend, machine that to fit the receiver; then I’ll glue on the grip section and shape that and then continue to add wood to complete the rest of the stock as I go. The nice thing about making a stock this way is if something is not right you can just cut it off and add another piece.
Here I have added the pieces for the grip area and am ready to start shaping. The cheek-piece and the butt section will be added in the same way.
In keeping with the “camo” theme for this stock, I have added blocks of contrasting color and grain in a random pattern. Another approach is to use rectangular blocks cut from a log and glued together in the same orientation. This creates regular repeating pattern that is very nice as well.
Some design considerations
Because the wood is cut across (at 90 degrees to) the grain, it is not going to be as strong as wood cut with the grain. Stocks made this way are fine for PCPs and rifles that do not take a large amount of force to cock/pump. If you want to make one for a magnum springer, though, I would recommend that you reinforce the high stress areas. I have never had one break but it is easy enough to reinforce the grip area with an imbedded pin (a dowel or screw) for added strength. One option is to cut the blocks at 45 degrees to the grain for increased strength in critical areas. I would not use cross-cut wood for a thumbhole stock design unless the sections in the grip area were reasonably thick and reinforced.
Is your wood dry enough?
In suggesting firewood as a stock material I need to talk about its moisture content. For stability, it is important that the blocks are well seasoned before they are used.
When people say dry firewood, it usually means that the logs have been cut and seasoned six months to a year. Considering that green wood air dries at a rate of about 1 inch of thickness per year, most dry firewood will still have a lot of moisture in it.
To have a supply of dry hardwood wood for my projects I keep a pile of selected firewood in the garage where there is good air circulation and it can dry naturally. I coat the end-grain of the logs with a sealant (wood glue or two coats of latex paint) and mark them with the date. It is best to keep the wood out of direct sunlight and away from heat sources, as drying wood too quickly will cause the pieces to check. Small checks are not a concern as they can be repaired with a drop of CA.
What if I want to start right now?
If you are in a hurry to dry some wood, the pieces can be seasoned using a microwave. Microwave drying is more of an art than a science (probably because there are so many variables) and there are many ways of doing it shown on the WEB. The two universally accepted rules about microwaving wood are, don’t use the kitchen microwave and don’t leave it unattended while heating the wood. I think that is good advice. I picked up my workshop microwave for 5 bucks at a garage-sale — if you go looking for one make sure it has a rotating table.
Microwaving wood – how does it work?
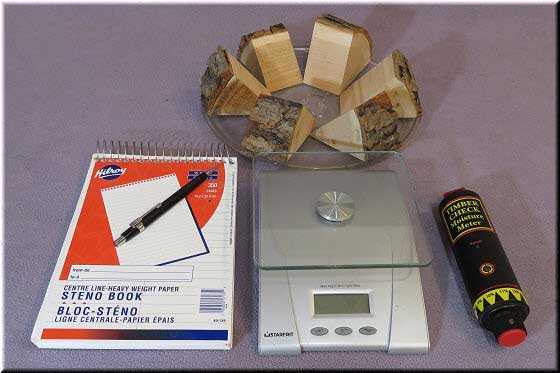
All you need is a microwave. The note book, scale and moisture meter are optional equipment.
Art or science?
In trying to make a science out of the art of microwaving wood, this is what I do. I sort the pieces by type (I’m using cherry and maple which dry at different rates) and by size. I will make groups of 6 and label them. Then the groups will be weighed (on a kitchen scale) and notes made.
With everything prepared, I will determine the initial heating time for the group by microwaving at 20 percent power with the timer set for 10 minutes — I’ll interrupt the heating every minute and check the temperature until I find the time to reach “very warm to touch”. This will give me a baseline for this group and an idea of how much time will be needed for the other groups.
To dry the wood I will load the microwave with a group, blocks on their edges (end-grain exposed) with the thin end of the pieces toward the center, thick ends to the perimeter like the spokes of a wheel. This is shown in the photo, above. The group is microwaved at 20% power for the appropriate time then left to cool in the high humidity environment inside the microwave to stabilize. Don’t open the microwave door for 30 minutes after you finish.
When the timer goes off I will remove the group, weigh it and make notes. Then I’ll wipe the inside of the microwave with a towel and do the next group. I repeat the cycle as needed (up to 5 times in a day) then rest the wood over night to let it stabilize. When it has 10 to 12 percent moisture content it is done. If you don’t have a moisture meter then it is considered to be dry when the weight of the group stops changing. As a good indicator, there will be a noticeable change in the amount of moisture condensing in the microwave as the groups dry out.
You have to be aware that as the wood loses moisture it will not take as long to heat. Some people rush the drying with a good blast near the end of the process. I prefer to be gentler and use shorter cycles (less heating time and a 15-minute cooling time between each heat).
Microwaving wood summarized
My detailed comments aside, microwave drying of wood is really a simple process. You heat the wood then let it cool and stabilize in the microwave. You want to do this gently and gradually and let the stresses in the wood relax.
Working with the blocks
The blocks of firewood can be any shape, the only thing that is important is that they are cut and prepared such that the edges to be glued are at 90 degrees to the slice. When cutting slices off the log (a cross-slide jig for the saw is recommend), it is difficult to keep the two surfaces parallel. To avoid an issue I mark an X one side to identify it as the reference plane.
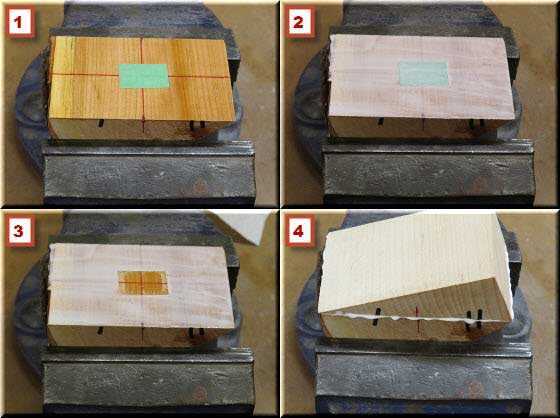
These are the gluing steps I follow; please see the text for details. The red reference lines and black alignment marks are for the picture, they are usually lightly drawn in pencil.
Gluing the blocks together can be a bit challenging as their shape defies clamping. To get around the clamping problem I use a drop of cyanoacrylate (CA) to hold the blocks together while the wood glue sets.
If you are creating a pattern of blocks or grain, it’s a good idea to have alignment marks penciled on both blocks for reference. What works for me is to mask-off a small area on both surfaces with some tape, wipe the surfaces with a damp cloth to clean off any dust and take the dryness off the wood ( #1 above). Apply a thin, even layer of wood glue to both surfaces (you should be able to see the wood grain through the glue #2), then remove the tape and apply a drop of CA glue on the clear, bare wood and press the blocks together firmly, holding them tight until the CA glue grabs (#3). Given a couple of minutes to set up, multiple blocks can be glued together quickly. Properly made, there should be a small amount of glue squeezed from the joint to show there was enough there and the parts will cling together (#4).
Summary
So there you have it — a crash course in stock making. I’ve gone into enough detail to get you on your way and I’ll do my best to answer any questions you have.
The best thing I can suggest is to grab a board and bash out a couple of spruce stocks. Don’t worry how they turn out, just carve wood until you are comfortable with the process. Learn your tools and what you can do with them. As experience accumulates there will be less mistakes and solutions are more obvious.
We are not finished with this report yet. Because you readers asked, I am adding Part 5 that includes surface preparation, checkering and such, and Part 6 that covers finishes and how to apply them.
If I have managed to convince a few people to try making their own stocks then I’ll feel that I succeeded in writing this blog. For those who do, please share pictures of your masterpieces so we can all admire them!

Hank,
Another fine installment. Looking forwards to the remaining two. The drying part was cool. A $20 kitchen scale would be more the tool as opposed to a powder scale. How does the moisture meter work? I have never seen one and have no time to look it up this AM.
Is there any place for a “chop saw”, or miter box saws? Some of the better ones have large blades, can tilt in a whole host of ways and can run in and out on rods/rails.
A table top radial arm saw could be another option?
Good Day to you and to all,………. Chris
Hi Chris,
A $20 kitchen scale is ideal for this kind of work, don’t think that a powder scale has the capacity. They are handy to have in the shop, I use mine when I am mixing up a batch of something (like epoxy or blending wax) which is best done by weight.
The moisture meters measure the resistance of the wood and displays it as a percentage. I’ve had mine for many years, recently I have seen newer designs on sale for under $25.
A moisture meter is a very useful tool for bowyers because we work with wood in log form and knowing the moisture level is critical to making the bow. For making a fire wood stock it is a nice tool to have but you can easily get by without one.
A 10″ table saw with a cross-slide table works well for slicing logs up to 3″ thick; a band saw with a 4 TPI blade is ideal. With both of these saws you have two hands to hold the log and miter slots to guide the cut.
I would not recommend using a miter-saw or compound sliding miter saw as it is difficult/dangerous to hold an odd shaped piece of fire wood steady for the cut, ditto for a radial arm saw. You need one hand to operate the saw and only one hand to hold the wood – works ok for a flat, square piece of lumber but a log is anything but that.
Hank
Hank,
The (general) train of thought is that you could see the tool/blade (and) the wood/layout marks that you wish to remove. This,… as opposed to the forend being flipped over, table saw blade underneath and visibility is restricted.
Also,… if you have an opinion,…. how is a stock like the Red Wolf made,… or any other intricate/sculpted stock for that matter? I would think that a wood blank is loaded into a (multi-tool) CNC machine and 95% of the carving and finishing is done prior to human hands finishing it. (Hand) carving/making (any) production (repeatability made) stock makes 0% sense in practicality. Not to mention, custom engraved lines, checkering, letters/words, grip textures, etc..
Your thoughts?
Chris
Chris,
I have a band saw, table saw, chain saw, sliding compound miter saw and a radial arm saw to choose from. Here I have listed them in order of preference for slicing off pieces of log for the firewood stock
I prefer the band saw for slicing because of its narrow kerf and the thickness of wood it can cut. Overall, I feel that the table saw is more versatile and if I had to chose one tool that would be it.
I took a look at the Red Wolf stock and it appears to be laminated up from fairly thick plies of stained wood. Agree that the shape is carved on a CNC machine, any logos, text or texturing would be done by laser and the finish sprayed on. I suspect that there is very little hand finishing done… maybe screwing on the butt plate.
Cheers,
Hank
Hank,
On the topic of scales,… in Europe,… weighing baking mixes is the norm. Liquids and dry goods. We use 1/2 cup, 1 tablespoon, 1 teaspoon,… etc..
Weighing does not care about density. Pack a measuring cup tight or loose,… weight is weight. Weight measuring is far superior.
Not a baker myself,.. more of a chef/cook. At any rate,… I thought that little morsel of info. might be of interest to someone here.
Chris
I do a bit of baking and will quickly convert volume measurements in a recipe (for flours and sugars) to weight, find the results to be more consistent.
h
Hank,
I can most definitely see why a “shop” microwave would help to keep peace and harmony in one’s home. Kathy has been most tolerant of many things, but has refused to allow me to have an indoor range. I imagine the wood shop is out also, especially since she is not crazy about having to dust the furniture as it is.
😉
RR,
Yes, peace and harmony is good – my garage-sale microwave was a excellent investment!
I have a (warm) “clean” workshop in the basement and a (cold) dusty one in the garage. In spite of my best efforts, I still get trouble for tracking sawdust and shavings into the house. LOL!
Hank
Hank,
Kathy has me mostly house broke. I even sometimes take off my footgear when I come into the house. 😉
RR,
My wife is a 3rd degree black-belt in Shotocan karate… I always take off my footgear!
Hank
Hank,
LOL! You had better!
Hank,
Sounds like a wife that can handle herself; that’s way cool. =>
I do have one dumb question about this:
” I coat the end-grain of the logs with a sealant (wood glue or two coats of latex paint)
and mark them with the date.”
OK, dating them I get, but why seal the end grain?
I thought that’s where the moisture was supposed to escape in the drying process
(obviously, I must be wrong about that =>).
Keep up the great work on this report,
dave
Dave,
That’s not a dumb question at all. Thanks for asking, I had forgotten to explain that.
When air-drying wood you need to coat the end grain to prevent the ends from drying out too fast relative to the internal moisture levels in the wood. A large differential in moisture causes internal stress which shows up as cracks in the end of the log.
With kiln and microwave drying the wood is in a temperature and moisture controlled environment (that is why you need to leave the microwave door closed while the wood cools) so it has a chance balance its eternal moisture levels and normalize the stresses.
Each species of wood has its own characteristics and there can be differences between different samples of the same species.
Generally, the harder the wood the more likely it is going to crack if not dried properly.
BTW. Buckthorn is particularly sensitive. That is what happened to the first fork. I was working on it, unbalanced the stresses and it cracked from handle up along to the fork with a loud “snap”. I normally “heat treat” the forks to relieve the internal stresses but had forgotten to do it.
Hank
“A large differential in moisture causes internal stress which shows up as cracks in the end of the log.”
“…unbalanced the stresses and it cracked from handle up along to the fork with a loud ‘snap’.”
Wow, Hank; that’s very interesting; I’ve still got a lot to learn about wood; thank you! =>
Vana2,
Continued great information, presentation skill and carefully crafted blog.
Tracked dust, dirt, debris, swarf and wood shavings elimination? Add these to your best efforts: Coveralls (Overalls in some places) dust overbooties Hank. I also have a new item on the floor by my “dirty” shop exit; a sticky mat that I first learned about at the local commercial shooting range. First rule of best shop practices! MUST keep spouses happy.
Looking forward to the concluding Two Parts?
Thank you Hank!
shootski
Shootski,
Agreed! Must keep spouses happy!!
Good suggestion about the coveralls – I have an insulated pair that I can use. Don’t know if a sticky-mat would work for me as I may just freeze, it will be -22 C, (-7 F) tonight.
Yes, two more parts.
Hank
Hank,
I’m amazed that the glue alone is sufficient without requiring a lot of dowels between the pieces. I had imagined a tedious time aligning pieces together prior to squeezing them into place. Thank you for this series. Now I just need to finish my honey do’s to get round tuit!
Siraniko
Siraniko,
A clean (no dust, no oily finger prints) tight fitting joint made with the proper amount of glue will be substantially stronger that the wood itself. Dampening the joint (SLIGHTLY) allows the glue to “wet” the surface and bond even better.
Static joints like the ones used here are easy – dynamic joints like those found in the flexing limbs of a laminated bow are a bit more challenging.
Hank
Hank,
Once again you’ve produced an excellent blog installment. The photo of the pattern drawn on the wood helps my brain “wrap around” your process.
It might not be very practical for an air rifle stock, but have you ever thought of including a live edge in a stock, perhaps behind the pistol grip, along the bottom edge of the buttstock? I think they look very nice, and they add a “woodsy” touch.
Michael
Here’s an example with bark (mostly) removed. Be sure to click on the pics as they are thumbnails. You can get a much larger view that way.
Beautiful bench Micheal!!!
There is no reason that you couldn’t incorporate the live edge into a stock. I have made several stocks that had large knot holes or huge rough knots in the wood and they looked great.
I love natural wood and see knots and flaws as “beauty marks” that add character to the piece. Attached is a picture of a couple of roughly shaped slingshots that I am working on right now. Yeah, just like the grip on the rifle stock, the grip on a slingshot benefits from some sculpting.
Hank
Hank,
Nice slingshots! My father and I made a slingshot out of a piece of tree branch when I was a boy, and while yours are much more polished (no pun intended) than was ours, it brings back a good memory.
I had nothing to do with the making of those benches, by the way. i found the pics online and thought they were good examples. There is a guitar amplifier maker in Lockhart, Texas — the amps are called Red Iron — and many of them have cabinets made of mesquite and have live edges. FWIW, I own one, and it is both glorious looking and glorious sounding. I do not have a picture of it, but it looks very much like the one below, from Red Iron’s website.
Michael
One more example of a Red Iron amp with its live edge mesquite cabinet. They are entirely hand-wired amps, and the cabinets are, of course, hand made as well.
Michael
Michael
Cool amp.
Michael,
I like simple traditional “forked branch” slingshots like I used when I was a kid as well. These days I usually shoot a slingshot with a sculpted handle though I prefer to carry a traditional one when I go for a walk about.
Those amps have a lot of character to them. Very unusual these days when most furniture is made from particle board.
Hank
Hi Hank,
Thank you for writing this terrific series, you’re doing a great job. I am going to make a good stock before my race is run and I’m so glad for this primer on the subject. Bedding the action looks kinda tricky. I’m looking forward to learning how you make the wood fit the steel, and the tooling required to do it. Microwave drying wood, what a nifty idea!
Best regards,
Will
Will,
If you were making stocks commercially a milling machine and a selection of router bits is the ultimate way to go.
For us puttering around in the garage we can make do with the typical tools we have. Making a series of cuts on a table saw does quick work of cutting the channel for the receiver and sanding it smooth is easy enough to do. There is nothing wrong with leaving the small “steps” from the saw kerf and bedding the receiver in epoxy – I’ve done that on a couple of powder-burner stocks.
The fitting of a the trigger block and other features of the action can be done with a spade-bit, chisel and a file. Doing that free-hand can be a bit challenging but its a piece of cake with a drill press and a vice. I sketch the shape of the cutouts on the side of the stock and use that as a guide to setup the depth-stop on the drill press. Don’t try to drill overlapping holes as that never works out, drill them close together and chisel out the web. For a square cutout. drill small holes in the corners and drill out the rest of the cavity with a spade bit. If the cavity is a bit too big it can be “custom fitted” with some epoxy thickened with sawdust – just be careful not to permanently glue the receiver to the stock. Some aluminum foil, “glued” to the receiver with grease will help protect the metal work.
Hope this helps!
Glad that you are enjoying the series – please be sure to post pictures of your stock when it is done!
Hank
Hank,
Just this answer is worth a blog. You are too good! 🙂
B.B.
Oh thanks B.B. …I think. LOL!
And August is hinting about a blog series on laminated stocks.
I’ll finish this series and see what time I have available. No promises though.
Hank
Hank,
And you thought you were retired! 😉
B.B.
Hank,
I agree with BB. You could easily add another chapter to this blog.
Vana,
Thanks, I loved the series. I would like to see how you designed that futuristic stock in part one if you ever have the time.
In my surrounding it is more useful to look for second hand wood as there is quite a lot demolition going on in a city. Old wood especially in small parts costs next to nothing and can be more than 200 years old. Saves the space for a microwave in a small woodshop.
Regards,
August
August,
The stock I made for my AR20 is a bit more advanced than what I cover in this series. It is not difficult, but does involve steam-bending of the laminates and shaping/gluing them ahead of time then some fine fitting of the filler blocks to assemble the stock.
It would take a complete blog series to cover that type of construction. I am half thinking of making a laminated skeleton stock for my FWB 300. I’ll take lots of pictures if I do but I didn’t plan on writing a guest blog on it.
Hank
Hank,
Oh — you just opened the back door to the meat wagon. Watch out! 😉
B.B.
Yeah, guess I did – think I better keep my head down for a while!
Hank
Hank,
Too late! I am VERY interested in vertical and horizontal lamination techniques.
RR,
Bending wood and making a laminated stock is a very 3-D kind of thing. It would probably be easier to make a video than to write it up.
Hank
Hank,
Oh, I am sure you could pull it off. It might take a lot of pictures though.
Maybe I could come up with something that could use a nice stock for you to work with when you write it up. Wink, wink. 😉
Hank,
We’ll be waiting for the tidbits you can relay to us. Even a once every few months installment. Ruff! Ruff!
Siraniko
Hank
When my dad made his guitars like the round back mandolins or box guitars he would make a form out of compressed gray type of cardboard particle board.
Then he would soak the wood in water for several days then mold it around the form. He used small model railroad tack nails to secure it to the form while it dryed. Once the wood dryed he would take the peices off then glue them together and nail them back on to the form and let the glue dry.
But the round back guitars were made from strips of wood that he sanded angles on the back side.
Here’s a picture of one he made. This guitar is now around 43 years old and is still holding together. It’s missing the bridge and some strings but still played the last time it was all there.
He made the frets and did the painting and staining and finishing also. And even the strings were made from bulk piano string he bought. Oh and the kneck of the guitar has a hole drilled through the center from top to bottom and is bolted to the body of the guitar with a threaded rod. He made a gun drill or as some people call them half round drills out of bar stock and drilled the hole on the neck.
But just thought I would share that info and the pictures.
Here’s the back side of the guitar.
And the shinny spots are glare from the windows in the breezeway.
Here’s the bottom of the guitar.
He made a top block and bottom block that the wood wedge shape strips got glued to.
The top block can’t be seen. That’s where the neck is glued and bolted to.
GF1,
That is a beautiful instrument. My music abilities are on par with my artistic abilities. I spent about 3 years trying to learn how to play the guitar. I finally gave up. At least I can enjoy others music and art.
My son has some hand made guitars. I also know a couple guitar makers. It takes a lot of ability and precision to get the sound and tuning correct over the whole range of notes on the instrument. Your Dad’s guitar with that long neck and eight strings also shows his great skill.
Don
Don
Thanks.
And also besides the things you mentioned about tone. The frets are very easy to press. More or less just lay your finger tip on the string and you hit your note.
And most of the playing is done strumming the strings in chords and lead thrown in. Italian and Greek music is what he played mostly.
And he played by ear. He was self taught. He learned to play with one string on his guitar then added strings as he went. But he could play right along with a song with just one string. Alot of movement up and down the frets. But he wouldn’t never miss a tone. I learned to play the same way but I am no way as good as he was and I’ll never be.
He even made a couple of my cousin’s violin’s. But he could play them all. Even a banjo. I liked when we was in the barn on the farm and he would pick up a guitar and start strumming off some bluegrass. It was a nice end of a day’s work.
Things you miss till you remember. Haven’t thought of that for some time now.
GF1,
That’s beautiful work! Thanks for sharing!
A guitar is out of my league at the moment but I might just give it a try. Start out with an electric and then maybe an acoustic one. There are half a dozen guitars around the house that I can use for reference.
My musical skills are limited to playing CD’s so best I keep things simple. Right now I am drying some pieces of buckthorn (similar to Osage but with an orange sapwood instead of yellow) to make a pan-flute.
Hank
Hank,
Will that be for Zamfir? 🙂
B.B.
BB
My dad liked Romanian music too. 🙂
B.B.
No! That will be for me to toot on when I am out fishing and there is nobody around to hear me! LOL!
Love Zamfir, I frequently listen to his albums when I am tying flies – both are very relaxing.
Hank
Hank
Thanks.
And you should make a guitar. When I was young, probably around 11 or so years old my dad gave me a dulcimer kit for a birthday present. It was all preformed and ready to glue together and sand and finish.
But there was a problem. They didn’t make the left side or right side formed wood the same. So the guitar would never of came out square if I built it the way it was. I remember my dad being very aggravated about the kit. But he wetted the wood and got it in shape. Then I put it together. I’ll have to say it was fun.
And I forgot to mention the black shaped wood on the front of the guitar is veneer. I remember my dad ordered it from somewhere. But he got a 11×7 envelope about a inch thick of different veneer wood.
Wood working is fun though. But how in the heck did I get into machining stuff out of metal?Which I do enjoy too. 🙂
But here’s the type of dulcimer I’m talking about.
https://en.m.wikipedia.org/wiki/Appalachian_dulcimer
That is cool. I only knew of the hammered dulcimer. A friend of mine plays one in a bluegrass band.
Don
Cool.
Well, it looks like the Gen 2 Gamo Swarms are coming. They have changed the magazine arrangement (good?) and changed the general appearance (b’ugly!).
https://hardairmagazine.com/news/gamo-swarm-fusion-10x-the-generation-2-swarm/
It is my hope that the new magazine assembly will retrofit to the older version such as on the new Bone Collector model. A nice wood stocked Swarm just might tempt me.
BB, please talk to Gamo at the Shot Show and see if the new assembly will retrofit.
Hank,
I think my youth repairing old farm equipment gave me an attitude that makes it hard to give my projects the beautiful form yours have. My approach was always to get it done quick and over built, looks was not considered. The source of materials was the junk pile out back.
Below is a picture of the scraps I used for the stock laminates and to fill in the pistol grip frame for a more secure attachment.
It is obvious you combine the art and science with the time it takes to make each of your projects a masterpiece. Thanks for the great report.
Don
I was like what you described growing up on the farm too. Get it done and make it work.
But cool woodwork with the skeleton stock add in.
What do you think about these. I always thought that was some cool wood coming from a production gun.
/product/crosman-outdoorsman-2250xe?m=1563
GF1,
I have seen pictures but never had a 2250XE in my hands. I like the style but it shore looks fragile.
I was trying to add some weight and have a solid stock for pumping leverage. So far the stock is very solid. I am happy with it.
I had to open the holes I had in the wood for the pivot pin on the pump handle. The pin was working loose so I added C clips to it and had to enlarge the holes in the pump handle. The pump handle has quite a bit more slop than before but is still comfortable and makes a good fit with my shooting rest.
Don
I also have wondered how strong the 2250xe stocks were.
I like the wood inserts people make for the 1399 stocks. I have a 1377 I been wanting to put a steel breech on and a Maximus barrel. I may try to make the insert and a pump handle for it. But come to think about it I still have a Discovery stock that I made to work on a 1377. Not the one I have posted pictures of but another stock I had and started working on to put on a 1377.
Right now the problem is I got more to do than I have time. Maybe sometime in the future I’ll get a “round tuit”. 🙂
Don,
I have always said that it has to “work well first and look good second”. Something that is functional is beautiful in it’s own right, if it is made from re-purposed junk even more so.
I have a big “good for something” box of treasures and my wife is always telling me not to bring home “junk”.
The other day I got trouble for bringing home a 40 pound propane cylinder I found in the garbage – But its not junk I told her, its a blacksmith forge disguised as an old propane tank – it worked, have it hidden in the garage! Already have two burners made for it and a hunk of railway track to use as an anvil. So now I will be able to make those big gouge chisels and an adze from that old car leaf-spring in the junk pile. LOL!
Think that you did a really nice job on that stock!
Hank
Hank, there is not much I can add to what the rest have said, your descriptions and pictures are so good that am now convinced that even I can make a stock from scratch. And be assured I will try.
Thanks for all the good work.
Henry
Henry,
Thank you for the kind words!
Hank
B.B. and/or Hank,
In, How do we do this last photograph caption.
Small correction: Cheek-piece rather than check-piece? Makes more sense to me….
I remember the skill set required to simply survive in temperatures like -20°C and below!
But you live them regularly most of the Winter Hank.
I put my hat ON to you.
shootski
Shootski,
Done.
Thanks,
B.B.
Shootski,
Thanks for catching that!
You get used to cold temperatures and unless they are extreme or accompanied with a stiff wind don’t bother me much. I’ll often put out the garbage in sub-zero temperatures just wearing a flannel shirt over my indoor clothes. I’ll dress in layers of loose clothes if I plan to work outside for a couple of hours, rarely is it cold enough for me to be uncomfortable.
No sense, no feeling eh?
Hank
Vana2,
You don’t consider -22 C extreme?
Okay so maybe your right…EXTREME starts at -25C, Lol!
I don’t know how far to your garbage runs take you…but in Island the US Navy eventually strung handlines between buildings for Wintertime whiteouts. That was done after too many folks died on “quick” trips between neighboring buildings in Winter whiteouts; of course they were unprepared for extended stays outdoors…maybe wearing a flannel CPO Shirt worn over a light uniform! Lol!!! We even wore Bunny boots (white rubber air bladder boots with felt liners) when we operated off the Ice. Almost everything fails if not left running or in heated enclosures. With a substantial amount of cold weather training and experience I’m still amazed at how we humans can overcome our lack of natural equipage to live in places that we Hairless Monkeys have no right to expect to survive. I do love the snow but need to have warm places with great accomodations along the Cross Country Ski Trails serving superb food & drink at regular intervals; heavenly!
As before my hats ON for you!
shootski
Shootski,
I always though that extreme started when C=F -40, but I am not happy with anything under about 78F, guess it has to do with getting old and not liking cold.
When I was younger playing in the snow and ice skating were great, now not so much.
Spring hurry up.
Mike
Mike in Atlanta,
I’m out of date on my EXTREME COLD definitions!
https://en.m.wikipedia.org/wiki/Extreme_cold_warning
Interesting how things change when your not paying attention.
I have been using Under Armor’s IR Cold Gear as my first layer down to about 10°f and then adding a middle layer of IR TACTICAL as my middle layer, top (outside layer) is usually a Teflon coated poly material that offers wind protection as well as liquid water Resistance.. The IR stuff really keeps you warm with very little bulk. I always carry a two person bivy bag for emergency shelter along with a tarp, cordage and a few candles. Works for even sub 78°f, Lol!
shootski
Shootski,
Properly prepared for cold is critical and you seem to be ready, that is something myself and others should consider as at any time things can go bad and without proper preparation for brutal cold you could be in a very bad way.
Prepper policies for sure, much more food than you think need, much more water than you think need and protective clothing and shelter for personal survival, indeed important things to think about. Even if it stays above my 78 F threshold.
Mike
shootski,
I find the damp-cold around 30 F to be more uncomfortable than the dry-cold around 0 F.
I went mid-winter snowshoe rabbit hunting at the cottage in the Laurentians 2 hours north of Montreal and needed to go to the “back-house” in the middle of the night. I was outside admiring the stars and norther lights for about 10 minutes when I heard a tree “pop” the way they do when it’s really cold, wandered over to the thermometer and saw that it was 18 below zero Fahrenheit. I wasn’t cold at all in spite of the fact I had bare legs and arms.
I’ve found that on extended winter hunting trips and early spring fishing trips that after a couple of days of constant exposure to low temperatures my body’s metabolism shifts into high gear and I don’t notice it anymore – the difficult thing is the discomfort going back home into a heated environment as it takes some time to acclimatize.
Hank
Hank,
Your middle of the night walk brings back countless memories of cold weather camping. Trees just don’t POP in the damp cold! I have been putting up with the Eastern Seaboard damp cold for about a month now. I’m ready for the Dew Points to be below zero for the rest of the Winter, just need to get back out West ;^). When I did open water swimming in my younger days the amount we humans can acclimate always astonished me. Swimming for hours in a Speedo and some body grease in 55°f (13°C) water was just as bad! I could not stand traveling to warm water places and getting in the water. Age has changed all that; now I wear a Dry Suit and the UA IR layers with more layers of polypropylene over that for fear of capsizing into 55° f (13°C) water. Lol!
shootski
What wood glue do you use?
-Y
Yogi,
For this stock I used “WeldBond” glue but any casein glue (white “carpenter’s glue”) that dries clear will be fine.
The WeldBond is a good glue but the beads of dried glue (that are squeezed out when clamping) are very hard and will dull a chisel or plane blade very quickly.
Hank
Vana2,
Disposable razors fitted to block or handle, maybe a Surform plane?
Not perfect: https://www.clcboats.com/modules/forum/archive-thread.php?filename=37543
You might find this site interesting for other reasons.
Better than messing up quality chisels or a plane!
shootski
Shootski,
clcboats.com – I have bought a couple of plans from them and made a bunch of their 17 foot kayaks (there is one, modified for fishing, hanging in the garage right now).
I use an old chisel and Surform rasp/plane for dirty/rough work like cleaning up glue drips and keep my fine edges safe.
Have you seen/used one of these razor-blade planes? They are great for light work like cleaning up edges.
I have another boat project in the works for this spring – I’m making an ultralight (30-40 pounds) rowboat for the small rivers I fish in – want to reach areas too deep to wade to. The oars are almost done and most of the strips are already cut for it. Just waiting for milder temperatures (so my glue doesn’t freeze on me) to work out side.
Hank
Hank,
Also a small disposable spokeshave!
I have always loved the wooden kayaks but with so many irons in the fire I have learned to have a small (very) amount of self-control. So I buy my kayaks made out of Money core, Kevlar & carbon fiber. Wood kayaks in saltwater is just too labor intensive.
Your ultralight sounds like it will be great fun for fishing the deeps!
shootski