by Tom Gaylord
Writing as B.B. Pelletier
Daisy 179 was the first Spittin’ Image BB gun Daisy made.
This report covers:
- Metal frame
- Love-hate
- Sights
- Trigger
- It is a catapult!
- Cocking effort
- Velocity
- Quiet!
- Do-over
- Reliable feeding
- Accuracy
- A real lesson!
Metal frame
We are back looking at my Daisy 179 again, and the first important thing to know is I got it wrong when I originally described the frame or body of the gun as being molded in plastic. It definitely is metal. It would have to be, to be held together by screws the way that it is. Sorry for the confusion!
Love-hate
We heard from some owners who love the gun and from others who hate it. I guess this is an airgun that you need to understand before getting one. It’s not what it looks like — which is a single action revolver. It’s single action all right, but very far from being a revolver. It is a 12-shot repeater, but the spring that operates the hammer is so strong that it is impossible to thumb rapidly with one hand, or to fan. It’s a very deliberate gun.
Sights
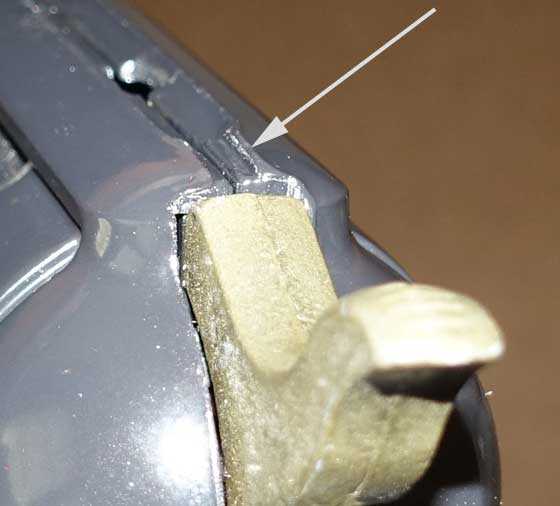
One of the thing I promised last time was a look at the sights. The front sight is a rounded blade that’s similar to the Colt Single Action front sight blade. The rear sight is supposed to be a groove in the top of the frame with a squared-off notch in the back. The hammer prevents me from seeing that notch, and therefore from using a conventional sight picture. If the hammer stayed all the way back when the gun was cocked, the rear sight notch would be visible, but where it rotates forward after cocking, which puts it above the rear sight notch. Daisy should have considered putting a rear sight notch in the hammer, likethe one on the 1860 Colt Army. And these sights are not adjustable in any way.

That shallow notch (arrow) is the rear sight! It’s not much different than the rear sight notch on a Colt Single Action firearm!
Trigger
The trigger is either a single stage or it’s the strangest two-stage trigger you have ever seen. As you slowly squeeze you feel it move through an arc and then hesitate. The hammer moves backward slightly as this happens Where it hesitates, the effort becomes noticeably harder, but the trigger doesn’t stop moving unless you consciously stop pulling it. If I can get used to this, it help me in the accuracy test, which I’m planning to do from 10 feet.
The trigger pull breaks at 5 lbs. 1 oz. That sounds heavy, but it doesn’t feel that heavy to me.
It is a catapult!
I was also wrong about how the gun works. It isn’t a kinetic gun at all, but a normal catapult that has a recognizable “flinger.” Look at this photo of the gun with the side removed and you can see the inner mechanism. The flinger pushes the BB into the barrel, rather than the “croquet-ball-whacking” explanation I wrote in Part 1. Sorry about that, but I’m learning this stuff as I go.

A look inside the 179 reveals that it is a true catapult gun. See the flinger arm that pushes the BB (arrow).
Cocking effort
The hammer of the 179 takes 17 pounds of effort to cock! That is a lot — particularly when you try to do it with one thumb. I can do it, but it isn’t pleasant. It’s easier for me to hold the gun in both hands to cock it.
I tested the cocking effort on my bathroom scale — the same scale on which I test most spring rifles. Believe me, the hammer slipped off the scale’s rubber pad several times before I got the hang of dragging it across while cocking it. I was surprised to see the force go so high, but now maybe you understand what I was saying about how hard this gun is to cock.
Velocity
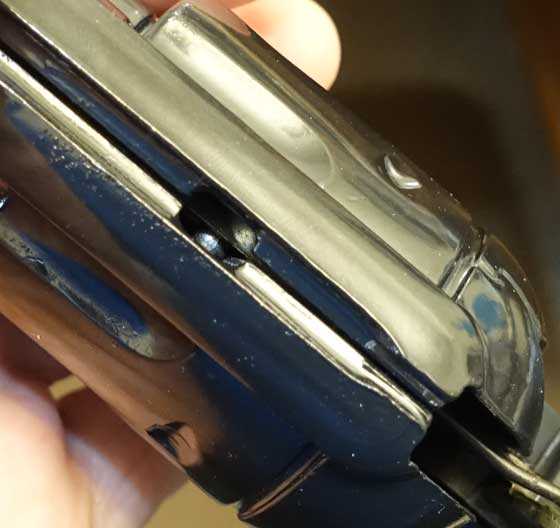
And what do you get for all that effort? I shot Daisy Premium Grade steel BBs for this test, and several things happened. First, there were several failures to feed. The BB gets pushed up in front of the flinger rod by a black segmented rubber spring on the end of the follower. I took a picture of that for you because it is very strange-looking. To get this picture I had to hold the spring-loaded follower out of the way with my finger, because the notch in the gun does not hold it reliably.
This rubber spring is on the end of the follower. Yes it is also a spring, but it is not the magazine’s mainspring. It’s just one of two springs that push the BB into position. It’s very weak, to allow just one BB to get in front of the flinger without putting pressure on it that might jam the gun.

Here you can see the rubber spring on the end of the follower. It isn’t pulled back quite far enough for a BB to enter the loading hole (arrow).
There is a viewing port in the top strap of the frame, where the rear sight groove is. It allows you to see if a BB has been loaded when the hammer was cocked. Apparently it’s because there often isn’t a BB ready to go.
The viewing port in the center of the rear sight notch channel allows you to see if a BB has been loaded.
Daisy BBs averaged 157 f.p.s. over 8 shots. Why 8? Because I shot the gun 20 times, just to get that many. If you count the number of times I fired and nothing came out, it was closer to 40. And my BBs were bouncing off the card stock in front of my quiet pellet trap that keeps the duct seal inside. That was very distracting.
The velocity ranged from a low of 149 f.p.s. to a high of 166 f.p.s. That’s a spread of 17 f.p.s., which is very large for a catapult gun. Usually I get a variance of 3 or 4 f.p.s. from this kind of powerplant. Incidentally, Daisy advertises a velocity of 140 f.p.s., right on the box, so this one is on the hot side.
Quiet!
The 179 makes very little noise when it fires. You hear the hammer striking the frame and the BB hitting the paper and that’s about it. If the gun is accurate, it would be a wonderful airgun for a small living space. But I am concerned about those bouncebacks.
I couldn’t use a normal cardboard backstop cover over the BB trap, and that’s where I usually tape my targets. At the low velocity of the 179, BBs would just bounce back. So I had to come up with a different setup for accuracy. I thought I would just hang a paper target with no backing, whatsoever! But then my eyes settled on the Winchester Target Cube, and, although it has suffered the impacts of thousands of rounds, it was still the perfect solution for this pistol. I just taped the target to one of the faces and started shooting.
Do-over
I test so many airguns that I’m usually on top of things when it gets to the accuracy test, but not this time. The first shots were a disaster from an accuracy viewpoint. I shot from just 10 feet and tested my hand on the UTG Monopod, but even then I managed to miss the backstop once!
The problem is, the 179 shoots very low! Well, having shot Colt Single Actions out to 300 yards, I know how to deal with that. Simply raise the muzzle until you see the base of the front blade at the top of the rear notch, then put the target on the tip of the blade and you’re good to go — at least from 10 feet! When you raise the muzzle this way you can also see the rear sight notch, which is an added plus. But that’s not all I learned.
Reliable feeding
I had several blank shots in the first batch, and one double feed. And that’s when I learned the other important lesson. When cocking the 179, do it deliberately, making sure the hammer is drawn all the way back. Only then will the feed hole in the magazine open on the inside of the gun and feed one BB in front of the flinger. After I learned that lesson there were no more failures to feed. I also must mention that the pistol was extremely quiet to shoot.
Accuracy
So the first magazine of BBs was used for a learning session. At the end of the first run I felt confident I could shoot the 179 as well as I ever will be able to, so the next magazine was for the record. I loaded 13 more BBs, but this time only 10 were needed.
Ten BBs from my 179 at 10 feet went into a group that measures 2.61-inches between centers. That’s hardly a good group for shooting from 10 feet. But I think it is representative of what a 179 pistol can do. I am delighted that I learned this pistols’s secrets before I finished this report!
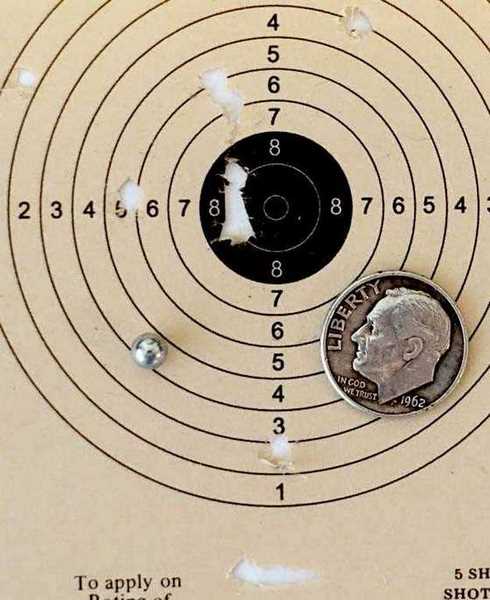
BBs everywhere. Ten Daisy BBs landed in 2.61-inches at 10 feet. Three of them made it into the black. I had to cut all the BB holes with a razor knife to get them to show, because the BBs just tore small slits in the paper.
A real lesson!
Testing the 179 has been a real eye-opener for me. I learned so much about the gun and how it works. While I’m still no expert, I now feel I understand this BB pistol for the first time in my life. For that reason, alone, this report has been valuable for me.

BB and Everyone
Off subject but interesting …. There is a guy selling a 650+ Vintage plus Daisy gun collection with photos. Found two links on the Yellow Forum, network54. with more links on his listing page….unreal !
Bob M
Bob,
I got his email and viewed his site. He has priced them high for their condition.
B.B.
B.B.,
Had to look at the article title twice. Thought it was still the Friday article. Then I realized that Daylight Savings Time had been imposed on your part of the world and that you have posted Part 2 which rarely follows immediately after Part 1 is published/posted.
Siraniko
Had the same reaction myself. 🙂
Matt61
B.B.,
Quite the adventure you had there! Love the “how it works” text and pics. The side cover w/guts exposed pic was a real treat. Never thought I would see 140-166 and “hot” in the same sentence. 😉
I have taken the cardboard backer and cut it out like a picture frame and then taped the target to that. I did that with the 499 @ 41 feet.
Good Day all,….. Chris
BB,
The trigger certainly looks like a single action to me.
I can see where there would be a love / hate thing with this. If you always wanted to be a cowboy, you would love it. If you wanted to hit what you were shooting at, other than the neighborhood Indian or bank robber as is likely what happened to 45Bravo, you would likely hate it.
Hey all you Mid-West Yankees! I don’t know if it has been mentioned yet, but there is an airgun show in August in Kalamazoo, MI.
http://www.kalamazooairgunshow.com/
If you have not been to an airgun show, you really need to go. Bring your camera and a wad of cash.
B.B.,
I love my 179. From 20 feet away I hit the aluminum can about 80 percent of the time. It shoots straight, and it is slow enough that every shot acts as a tracer. I remember a few years ago someone commented here that he loved shooting his Crosman Model 622, even if it did have a rainbow trajectory. Your comment was that rainbow trajectories are no problem if one knows his gun. For me the perfect example of that is my Model 179. It’s a daisy!
Michael
Michael,
Well said. That’s how a proud owner should feel.
B.B.
A Daisy 179 was my first BB gun, or for that matter, first gun of any type. It meant the world to me at the time, but wasn’t much of a gun in retrospect. Its a good thing I was crazy over shooting because if I had based everything on that experience, I don’t know if I would’ve continued.
I used to laugh at the old cowboy movies where they would thrust the gun forward with an overhand flip as they fired each shot. What did they think they were doing- adding another 3-4 FPS? I later figured they had shot Daisy 179s before, and indeed found that fling necessary to boost velocity.
B.B.
Your 179 looks a bit more accurate than mine…cool.
I really like the pic you took with the side off, the one that shows the flinger.
It is an interesting gun, a real piece of airgun history. Thank you.
take care & God bless,
dave
B.B.
Boy that was a different direction in your story than I expected when seeing the insides of the gun. Even though I could not see a good spot on the hammer to hit a pin in alignment with the bore I figured it was there. It is actually a true catapult gun.
I vaguely remember a pistol I had as a kid that hit some kind of small round ball with the hammer. I think the balls were smaller than a BB though. The max range was about 10 feet shooting up at 45 degrees. Knowing me I may have modified one of my toy guns.
Thanks for the look inside. Does the linkage from the flinger to the hammer mean the flinger also has to pull the hammer forward when the shot is fired? The mass of the hammer would really slow down the flinger. I guess the hammer would also help keep the flinger from breaking especially as many dry fires as you can get. A youngster may not figure out to draw the hammer back all the way for every shot especially as hard as it is to pull back.
Thanks for the look inside.
Don
Don,
The flinger is actually being pushed by the hammer. The hammer is being pulled forward by a coiled spring in the grip that attaches to the underside of the hammer.
B.B.
BB
From your photo I thought that the flinger was a coiled spring in it’s own right. Appears to be made from coiling flat or square stock and leaving a long arm sticking out to contact the bb. If that’s true, does that mean the hammer spring and flinger are both imparting their energy to the bb or is the coils at the bottom of the flinger there simply to provide a hole to fit over the screw that the flinger rotates about?
Halfstep,
I thought the same thing until I examined the picture. The flinger is a dead steel part that’s just wrapped around the screw that holds it. The hammer has the only real spring.
B.B.
B.B.
From the picture it looks like the flinger has a straight piece at the bottom that hits against a nub in the frame. Hard to tell from the picture. The spring on the hammer doesn’t look like it would take all that force to cock.
Don
Dod, (or Don) 😉
You guys might be right about this. I simply don’t know.
B.B.
My understanding is that revolvers rarely break, but when they do, fixing them is a real pain, much more than an auto. Seeing the inside of a revolver makes me believe this.
Flintrocker, thanks. It is nice to hear that someone has had my same problem. Since you shared your solution, I’ll share mine. I try to pad the cylinder housing with layers of cardboard. I’m hoping this will cushion any impact of the cleaning rod although wedging my cardboard into place makes me wonder if I am stressing the crane that holds the cylinder to the gun. Problems, problems… When I first heard about the pull cord, I was very impressed. But I told Clint Fowler, my master M1 gunsmith that I was going to use this method to clean my M1, and he was very scornful. So, I got the idea that this method is not as effective as the traditional rod. I doubt the difference is critical, especially for handguns.
I had another range day over the weekend. The highlights were finally getting my throwing ax to stick and finding an arrow in the long grass that I was certain that I had lost. I interpreted both of these instances as demonstrating that you never know when success will strike in training so it is all-important to never quit. It also tells you about the level of my shooting which was not great, but there were mechanical issues of interest.
I was particularly intrigued to try out a new method of loading my Lee-Enfield rifle. Before, putting the full 10 rounds into the gun caused rimjams which would definitely not do on the battlefield. And it doesn’t live up to this rifle’s reputation for accuracy. I decided not to the force the 10th as I had been doing before, and this time I had success. I ran 60 rounds through the gun without a single malfunction and truly felt like a soldier of the Great War. This was also my chance to see the results of my crimped ammo to see if it would improve my accuracy. I fired of a 5 shot group at 100 yards and looked through the scope to see…a 5 inch group. Boo. Possibly the groups would have tightened if I had continued shooting rested, but I doubt it given the type of sights and my vision.
I was also eager to see the effects of crimping on my M1. The rifle shot probably better than it ever has, but it was overshadowed by a couple of malfunctions. Getting those was equivalent to the voice on the phone saying, “I know where you were last summer” or whatever was said in the horror film. At least these malfunctions were not on a level with the other ones. Both were failures to feed. I just threw the bolt, and I was ready to go. But something about the gun was not quite right. There was an occasional pop and rattle as if the gun were slightly sick. What could be the problem? Since the gun has worked flawlessly with surplus and with uncrimped handloads, that points the finger at crimping as the problem. Crimping slightly increases the starting pressure to make it uniform, right? That would be consistent with the bolt moving a little too fast which, I suspect, caused the failures to feed. Still, I wouldn’t expect an M1 to be that sensitive. So, an additional complication must be the adjustable gas system. My new gunsmith wasn’t sure how it worked, and, apparently by accident, adjusted it just right for surplus loads. I tried to pick a handload that was comparable, but crimping stresses the mechanism. Possibly the gas system, either in its mechanism or in the way it was adjusted, is very precise for a particular load and more sensitive than the standard system.
Unfortunately, in my drive for perfection, I crimped all my hundreds of rounds of handloads! I guess I can live with it or try adjusting the gas system on my own… 🙁
Matt61
BB
Nothing I love more than an analytical challenge.
I wondered how the ‘Flinger’ got behind the bb feed port as it was pulled back by the hammer and what kept a bb from feeding into the barrel feed tube block behind the flinger. Noticed there are long slots cut into the feeder block, top and bottom, so the flinger can arc through it to get behind the bb port.
Next, to me, it looks like the part you call a rubber spring is the same plastic follower that the 1894 uses. The notches are there to allow it to pass through a curved tube and all it does is supply bb’s to the feeding block.
There appears to be something that is blocking a bb from entering that block and getting into the feed tube area behind the barrel until the flinger gets pulled behind it..
Now the picture is kind of vague but it looks like there is something mechanical that the flinger may operate as it is pulled back to open the bb feed port and allow a bb to ‘pop in’ in front of it. The rubber spring thing went right over my head. Am I right there ? The bb port would have to be closed off as the hammer pushes the flinger forward to keep another bb from popping in behind it.
Seems like that part would be what failed to operate and feed a bb if the hammer was not pulled back all the way.
Have I made a good analysis ?
Bob,
I think you have it. I call it a rubber spring because that’s how it acts. It curves as you surmised.
B.B.
BB
I wondered why they even bothered making this pistol but having ‘ been there ‘ I remember cap guns like my Roy Rogers six shooters were a big item then and as you mentioned actually being able to shoot something, other than a cork, was probably very desirable. Actually got to admire the creativity of the designers at the time.
Then I wondered why they did not go the CO2 way, which eventually happened, and thought, just when did the CO2 cartridge come to exist? … To my amazement a Bing search led me to an article ‘you’ had done on them back in I believe was 2003.
You have made your mark in history my friend and describing things in simple terms, I believe, makes this blog more enjoyable. Thank you for allowing us to participate with our, ‘Techy Talk’ comments.
Boy I still remember my balsa wood race car that used the small CO2 cartridge inserted in the back to propel it … a one shot run !
Bob M.
BB
I have one more question about the flinger, then I’ll let it go.(I think Bob M and I may be related 🙂 ) If the flinger is not a spring, how does it attach to the connecting rod that runs back to the hammer? I think I even see, on looking closer,at the bottom of the flinger is a protrusion from the flinger coil that is hooked over a projection cast into the body of the frame. If this is correct and the stock that the flinger is made from is as heavy as is seems in your photo, then it seems that the flinger would act as a substantial spring, would it not?
Halfstep,
I don’t know is the answer. What you say does make sense, and from what the picture shows, it does look like the flinger is a spring. But I still think it’s just a lever.
I would have to disassemble a 179 to find out, and until I can do that we will both have to wonder, I guess.
B.B.
BB, Halfstep
Just looked again, I believe Halfstep is right, There is a nub directly under the flinger mount screw that appears to be a spring stop and in hind sight there is no way that small hammer spring would require that much cocking force. The hammer is probably connected to the flinger with a wire loop as on the hammer and is used to pull it back. The hammer simply follows the flinger when fired.
Also look at the size of the flinger mount screw … way too beefy for a simple follower link to use.
Teamwork wins again !
Bob M
Bob M
I love this kinda stuff ! Wish we had a better view of the bb transfer port. Think it could be a rocker of some sort that gets toggled as the flinger sweeps past it on cocking?
BB
I guess I was assuming that the photo was of your gun, disassembled for this report, and that you had actually had eyes on the mechanism. Don’t need to do that on my account, I just wanted to see if I understood how it works.
Halfstep
Made the same assumption. So we are all making an assumption on how it works from a photo. Noticed a nub holding up the looped connecting rod allowing it to slide up and down on the flinger and at about the 8 o’clock position from it is another that appears to be on some sort of pin hit by the flinger on a triangulated part to open the bb port.
Found an animated firing cycle on the Daisy 179, https://www.reddit.com/r/mechanical_gifs/comments/3r3axp/daisy_179_bb_gun_firing_cycle_animated_by_uoelund/
Mike
Mike,
You da man!! That Is an incredible animation and answers all my questions ,at least. Great contribution.
Mike
Outstanding contribution !
So there is actually a spring loaded piston that blocks the bb’s from entering the port and the flinger pushes it back and the flinger which is actually a spring is held back by a pivoting paddle the hammer works like a sideways see saw. A lot easier when you have all the parts pictured.
Bob M
Mike,
Most excellent! Nice find. A picture,… or rather an animation,.. is worth a thousand words.
Mike,
The animation if correct shows the hammer released first and then the flinger following closely behind. That would give the flinger more velocity than if it had to match the hammer speed. It looks like the trigger releases the hammer and then the hammer pushes on a cam that releases the flinger. It is actually a very sophisticated mechanism.
Thanks
Don
We need a shoot off between this execrable thing and the Harrington Gat
See which side of the Atlantic had it worse at 10 feet if you were a kid
At least you could pretend you were a cowboy with the Daisy, with a Gat you just looked plain broke 🙂
In hind sight just pulling back the hammer again … after it was already cocked … would verify the ‘flinger’ is actually a spring that was being retained because it would be much easier to pull back the hammer to the end of its travel without having to pull the flinger / spring with it again.
I would like to thank the blogger who reported on the Daisy-Winchester M 14 scope mount that P.A. is selling. I bought 2 and installed one along with an old discontinued Tasco 2.5 scope. My M 14 is now as accurate as my 10-77,s , with several different pellets. I am waiting for my strap-on cheek piece to arrive. I expect this rifle to shoot even better, once I can get a cheek weld on the stock. ——Ed
Matt61—-Crimping can cause the mouth of the case to bulge. If your chamber has a very tight match throat, even a slight bulge could cause problems. I shot matches with 3 M1 rifles, for over 25 years . I used reloads most of the time. I never crimped my loads, and never had your problem. Of course, my rifles have service barrels and chambers. I never used small base dies either. Minimum match tolerances require better grade ammo. I just re-read your post, what was popping, and what was rattleing? ——-Ed